
I believe it's a 1 1/2 inch diameter fly cutter type bit that I get a Home Depot. It might be 1 1/4 diameter... the bridge routers are at the shop a few miles away, so I can't measure one at the moment.
G-man
Rough Core - Profiling Problems
Moderators: Head Monkey, kelvin, bigKam, skidesmond, chrismp
hey g-man, did you ever get some pictures of your vacuum profiler? i read on some early posts that you built the venturi system from joewoodworker. do you use that anymore or just the shop vac for profiling (you mentioned shop vac was better)? what kind of specs for the shop vac do you recommend?
thanks
can't wait to get some vacuum clamping action!
thanks
can't wait to get some vacuum clamping action!
-
Wannabebuilder
- Posts: 60
- Joined: Sat Oct 20, 2007 8:22 am

Hi redbull,
I've got so much going on that I needed that reminder. I have to go into town tomorrow and I'll try to remember to swing by the shop and get a picture, or two. I still just use the venturi system for smaller vacuum clamping jobs, and I use a 25 year old Craftsman 16 gal shop vac for the profiler. The poor ol' vac has been abused beyond belief and looks like heck, but it still works like new.
Wannabebuilder,
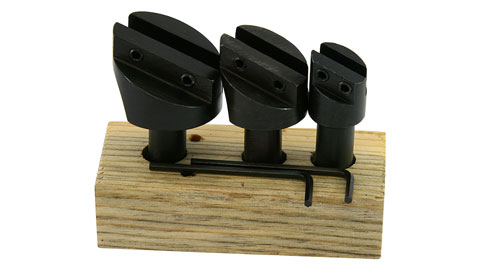
Yes, those sure look like fly cutters, but they don't look like they're balanced well enough to handle the RPM of a router. Are you sure that they're intended for router use? I wouldn't trust a couple of set screws to hold the carbide cutter in place at 25,000 RPM... and I wouldn't want to be close by when the cutter decided to launch off the mandrel. I'll try to remember to get a picture of my profiling bit when I'm at the shop.
Hey, I think this is post # 500 for this site. No wonder I can't get much work done.
G-man
I've got so much going on that I needed that reminder. I have to go into town tomorrow and I'll try to remember to swing by the shop and get a picture, or two. I still just use the venturi system for smaller vacuum clamping jobs, and I use a 25 year old Craftsman 16 gal shop vac for the profiler. The poor ol' vac has been abused beyond belief and looks like heck, but it still works like new.
Wannabebuilder,
Yes, those sure look like fly cutters, but they don't look like they're balanced well enough to handle the RPM of a router. Are you sure that they're intended for router use? I wouldn't trust a couple of set screws to hold the carbide cutter in place at 25,000 RPM... and I wouldn't want to be close by when the cutter decided to launch off the mandrel. I'll try to remember to get a picture of my profiling bit when I'm at the shop.
Hey, I think this is post # 500 for this site. No wonder I can't get much work done.
G-man
Okay... I have some pics.
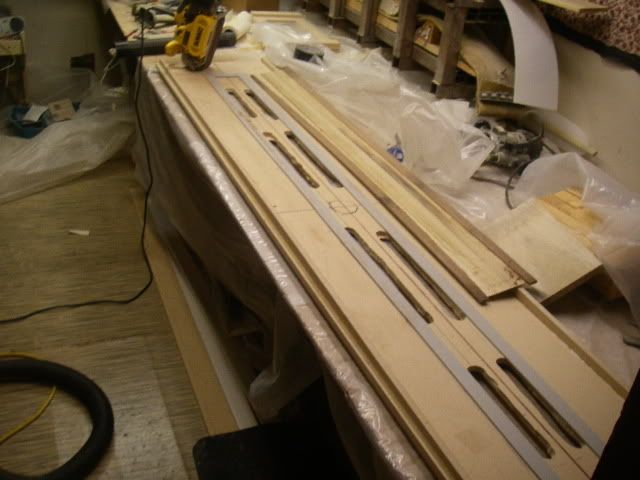
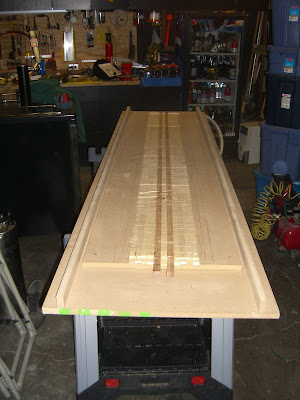
The vacuum profiler:

The Home Depot router bit:

The old shop vac:

The JoeWoodworker version venturi vacuum:

And my personal favorite, my pin router made from a couple of 1929 Ford Model A connecting rods and wrist pin:

The shop vac hose connects to the round hole in the vacuum profiler, and vacuum is supplied via the slotted holes in the profiler. Foam tape seals the vacuum at the profiler/core interface (I had to remove some of the tape because the vacuum was too strong). The rails of the profiler are removable via wing-nuts, so I can switch rails in a minute or two.
The router bit is 1 1/4 inch in diameter. I'll probably use one of these on the CNC router for profiling cores, if I decide to use the CNC for that purpose. The vacuum profiler is pretty fast and efficient, especially for larger runs of a same core profile.
Regarding the pin router, I'm betting that most readers on the forum don't even know what a connecting rod and wrist pin are... not many people spend their evenings and weekends tinkering on car engines these days. My high school ride was a 1929 Ford Model A Roadster... full chrome engine and a rumble seat. All those young beach babe hotties who used to beg to go for a ride in that car are shriveled up old ladies by now... yuk! Anyway, using the pin router, venturi vacuum, and a vacuum template, I can cut a perfect base in about 15 seconds. If I include time to remove the cut base from the template and attach a new base blank for cutting, I can cut about 2 bases per minute, or 120 per hour... all perfectly the same. Thats about as good as I could do on a CNC that was running at full tilt. Pretty cool for recycled parts from an 80 year old car engine, eh.
G-man
The vacuum profiler:
The Home Depot router bit:
The old shop vac:
The JoeWoodworker version venturi vacuum:
And my personal favorite, my pin router made from a couple of 1929 Ford Model A connecting rods and wrist pin:
The shop vac hose connects to the round hole in the vacuum profiler, and vacuum is supplied via the slotted holes in the profiler. Foam tape seals the vacuum at the profiler/core interface (I had to remove some of the tape because the vacuum was too strong). The rails of the profiler are removable via wing-nuts, so I can switch rails in a minute or two.
The router bit is 1 1/4 inch in diameter. I'll probably use one of these on the CNC router for profiling cores, if I decide to use the CNC for that purpose. The vacuum profiler is pretty fast and efficient, especially for larger runs of a same core profile.
Regarding the pin router, I'm betting that most readers on the forum don't even know what a connecting rod and wrist pin are... not many people spend their evenings and weekends tinkering on car engines these days. My high school ride was a 1929 Ford Model A Roadster... full chrome engine and a rumble seat. All those young beach babe hotties who used to beg to go for a ride in that car are shriveled up old ladies by now... yuk! Anyway, using the pin router, venturi vacuum, and a vacuum template, I can cut a perfect base in about 15 seconds. If I include time to remove the cut base from the template and attach a new base blank for cutting, I can cut about 2 bases per minute, or 120 per hour... all perfectly the same. Thats about as good as I could do on a CNC that was running at full tilt. Pretty cool for recycled parts from an 80 year old car engine, eh.
G-man
-
Wannabebuilder
- Posts: 60
- Joined: Sat Oct 20, 2007 8:22 am
Well G you are a pimp. That's a good thing. I just found those fly cutter pics as I have no idea what they are and I'm sure they are not router ready. As for your pin router I still have no idea how that thing works but that's ok I have a CNC machine to cut my base material I hope.
Thanks for the pics
Thanks for the pics
Yes, the pin router might be a little confusing because the actual router was not installed when I took the pic. Actually, a pin router is the next best thing to a CNC machine. It works like this: A router is mounted on the underside of the aluminum plate. The router has a 1/4 inch diameter bit installed in the collet. The bit is adjusted upward until it almost hits the 1/4 inch diameter guide pin that you see in the pic. The router bit and the guide pin are exactly lined up in the vertical plane. To use the pin router, a pattern/template is attached on top of the piece to be cut, and the height of the cutter and pin are adjusted so when the work piece is fed into the router bit, the pin follows the pattern/template and the cutter cuts through the workpiece. The template can be attached to the work piece in many different ways. I happen to like vacuum the best (vacuum is controlled by a foot pedal), but sometimes I use screws. The pin router is quite fast and is much easier to use than a regular router that uses a pattern bit to follow a template. It's really easy to see what you're doing with the pin router because you're watching the pin follow the pattern. Pin routers are available through a lot of woodworking supply catalogs or on-line shopping sites.
G-man
G-man
-
Wannabebuilder
- Posts: 60
- Joined: Sat Oct 20, 2007 8:22 am
-
Wannabebuilder
- Posts: 60
- Joined: Sat Oct 20, 2007 8:22 am

-
skiingfreak
- Posts: 20
- Joined: Sun Sep 23, 2007 8:33 pm
Well, I ended up trying the Hot Glue and still ran into a couple of problems when I got down to a very thin core. I decided late this week I was just going to take a shot at building a vacuum table. I kept it pretty simple, just build a small box out of 1x1/2's and a piece of scrap 1/4 inch siding from Home Depot. I think that all of the parts cost me about $6 or so. I started by trying to use the router to make long slots (as the above picture)... took way too long. I just decided I'd drill a series of holes instead. I sealed up the box with some caulking I had laying around the garage, works like a charm. When the shop vac is on, I can't pry the bases off by hand. Thank you very much for the ideas, I'm excited to get going on my next core!
Here are some pictures if anyone is intersted: http://picasaweb.google.com/skiingfreak ... cuumTable#
Here are some pictures if anyone is intersted: http://picasaweb.google.com/skiingfreak ... cuumTable#
-
skiingfreak
- Posts: 20
- Joined: Sun Sep 23, 2007 8:33 pm
-
skiingfreak
- Posts: 20
- Joined: Sun Sep 23, 2007 8:33 pm
I gave the vacuum table a test run tonight on a core that I had previously given up on since it was so uneven and I was worried about getting a flat surface to work with. The vacuum worked fantastic. The core didn't budge one bit. I also experimented between side to side and front to back profiling (profiling a flat surface for now). I noticed that the front to back worked quite a bit better on my rough cuts than side to side. It was both faster and smoother. Anyone know why this would be the case?
-
knightsofnii
- Posts: 1148
- Joined: Tue Jan 08, 2008 6:02 am
- Location: NJ USA
- Contact:
-
Nick's Sticks
- Posts: 105
- Joined: Fri Sep 08, 2006 9:15 am
- Location: Cascadia
I have tried thee methods of profiling the cores using a router, a thickness planer, and by hand with a block plane. When using a router I had similar problems with bit suck and rough cores. The vacuum is a great idea. Good job. If you take into account all the trouble I had with routing I think the block plane was as fast and just as good or better than routing. The last thing I wanted was one more jig but now am very happy with the planer crib. I would suggest this method to anyone still using a router.
I saw the same phenomenon using a router. When I routed lengthwise my cores were smooth. Doing it back and forth produced all sorts of lines on the core. I had plenty of time to think things over while making countless passes with my router bridge. These were my ideas of why running lengthwise is better than back and forth:
1.When you route your base lengthwise you are running with the grain in essence ripping it like a table saw would. When routing back and forth you are making lots of cross cuts. Cross cuts tend to splinter wood more than ripped cuts.
2.Any flex in your jig would be more noticeable with running back and forth since you have so many more passes.
3.When running lengthwise your jig is making and arc on the rails. When you go back and forth you are making discrete flat sections and when put together approximate the arc of the rail.