

Hi again gav
I got some of the erapol cc60D and my test so far is looking better than the smooth-on 305.
Just wondering whether you are using a vacuum to degas after mixing. It is pretty thick and I seemed to introduce bubbles when mixing that wouldn't dissipate during the pot life.
Secondly with the pigment are you just doing it by eye or as a % of total weight?
thanks
The pouring urethane sidewall thread
Moderators: Head Monkey, kelvin, bigKam, skidesmond, chrismp
Nah i just stir the hell out it and pour it. If you have a degassing pot set up you could give it a go, especially if you are adding pigment, you can stir in the pigment to part A, degas, then stir in the hardener.
I just mix pigment by eye, just keep it under 10% by weight of your polyurethane. 10% is heaps though, im usually closer to about 5%.
There is some paste pigments that work really well, especially if you use a little bit of white pigment with your colours, makes them really solid color and nice and bright.
-
stormyclouds
- Posts: 45
- Joined: Mon Jun 04, 2012 1:24 pm
I recently had my metal wizard friend build me a pressure chamber based on Goz' design. I have been fighting air bubbles since last season and I am so stoked that they will not be a problem anymore. Also, new product that I am in the middle of testing and it is half the price of smooth-on.
http://specialtyresin.homestead.com/castingresins.html
Model pro slow. Comes in off white and black plus it accepts color. Keep you posted on the results but promising so far.
I have to thank everyone on here especially Goz, Dtrain, and Head Monkey for really paving the way for me. Because of thier knowledge and ingenuity, it really takes a lot of the leg work of trial and error for new people getting into this craft. Cheers guys!
After fighting UHMW sidewalls for the past year or two, I decided to throw in the towel and move on with my life. The UHMW was expensive, a pain to bond (both for core profiling and in the final product), created a pile of nasty plastic waste, put up a fight to achieve a nice finish on the tips and tails, and I was horribly allergic to the stuff when it was cut with a router bit, like I would sneeze for days and my respiratory tract would get all plugged up. Gnarly.
These poured urethane sidewalls look like the way to go, thanks to those who pioneered this technique and shared their experiences! I read through this thread a few times and hatched a plan, ordered up a vac chamber and a few different resins to try, thought I'd share my results.
I ran tests on 4 different polyurethanes; Smooth-Cast 305, Smooth-Cast 61D, Smooth Cast 65D, and AlumaLite Water Clear. I degassed all the resins and poured them into some test cores that had been sealed with a variety of wood sealers; epoxy, oil based one-part polyurethane finish, water based poly finish, wood glue, acrylic paint, penetrating wood sealer and plain wood. I found the oil based poly was one of the easiest to apply, stopped the resin from bubbling, and bonded to the 2 part polyurethane sidewalls as good or better than any of the others. The penetrating wood sealer made a foamy mess of everything.
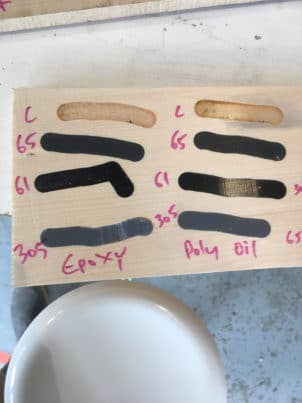
The smooth cast 305 and alumalite showed the greatest tendancy to react with the humidity in the wood and turn to foam (with the exception of the oil based poly wood sealant which worked pretty well). Both the 61D and 65D stayed fairly bubble free in most of the tests (except plain wood and acrylic paint). Some bubbles formed on the surface but after the top was smoothed off with the thickness planer, they were mostly bubble free.
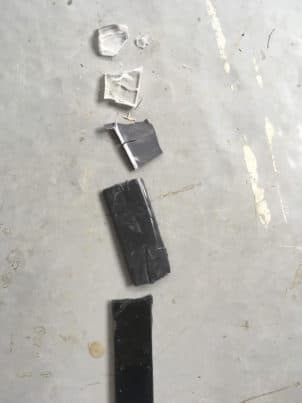
I poured some straight urethane test strips to check impact and flexural strength at room temperature and out of the freezer. The Smooth Cast 61D was surprisingly rubbery and was virtually impossible to tear, scratch or smash at any temperature, but it did feel a little bit soft for ski sidewalls, kind of awkwardly soft and I'd worry about it not supporting the metal edge in a rock impact. My sample of Smooth Cast 65D was significantly harder, and really had the hand feel of a commercial ski sidewall. Solid, but with a hint of give when pressed with a fingernail. The 65D was also fairly resistant to cracking when smashed with a hammer on the concrete floor. It did develop some cracks and eventually broke after a number of hits with the edg, but it put up a pretty good fight. It was slightly more brittle when frozen, but still performed relatively well in my opinion (especially compared to the next two). The Smooth Cast 305 was significantly worse in the hammer and flex tests, especially when frozen, it was quite brittle and snapped relatively easily when flexed by hand. It also cracked easier with the hammer than the 61D and 65D. Lastly, the Alumalite Water-Clear squeaked through the room temperature flex and impact tests and I had really high hopes for a see-through ski. Alas, when I tested the frozen samples, the Alumalite was insanely brittle and shattered like glass when I hit it with the hammer or flexed it by hand.
Next test was a quick and dirty bond test in the press. I found that sanding the surface that had been through the thickness planer noticeably improved the bond, and all the samples seemed to stick to the epoxy and triaxial glass equally as well as the wood around them. That was a welcome relief after fighting with UHMW. dded that stuff!
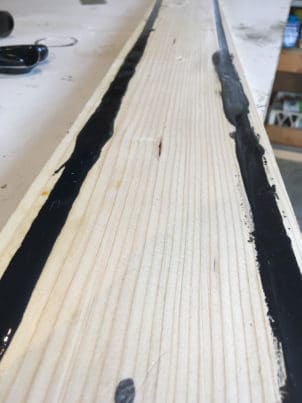
To summarize, I plan to give the Smooth Cast 65D a shot on a few pairs of skis because it seemed the best suited to our purposes. Its the same price as the Smooth Cast 305 and readily available on the internet. Furthermore, all the specs in the technical data sheet look superior to the smooth cast 305 series. The stuff does kick like a banshee after its 2.5 minute pot life. You definitely have to work fast to get the resin degassed and poured before it goes off. Degassing part A and B before mixing seemed to help. It also gets whiter as it cures. Im tinting it black, and its hard to gauge how much pigment to add because the liquid resin was jet black and it cured to a medium grey. I also found that it was helpful to seal not only the sides and bottom of the channel, but about a cm around the rim as well so any overflow doesnt react with the moisture in the wood and cause bubbles in the final product. It also looks like there exists a smooth cast 66D which has a 7 minute pot life but I couldn't find any trial sizes. If I start doing larger volume with urethane sidewalls, I'll probably give the 66D a shot because it would be nice to have a bit more work time.
Ill try to update this post with some photos of the sticks once they're done. Thanks again for all the help everybody!
These poured urethane sidewalls look like the way to go, thanks to those who pioneered this technique and shared their experiences! I read through this thread a few times and hatched a plan, ordered up a vac chamber and a few different resins to try, thought I'd share my results.
I ran tests on 4 different polyurethanes; Smooth-Cast 305, Smooth-Cast 61D, Smooth Cast 65D, and AlumaLite Water Clear. I degassed all the resins and poured them into some test cores that had been sealed with a variety of wood sealers; epoxy, oil based one-part polyurethane finish, water based poly finish, wood glue, acrylic paint, penetrating wood sealer and plain wood. I found the oil based poly was one of the easiest to apply, stopped the resin from bubbling, and bonded to the 2 part polyurethane sidewalls as good or better than any of the others. The penetrating wood sealer made a foamy mess of everything.
The smooth cast 305 and alumalite showed the greatest tendancy to react with the humidity in the wood and turn to foam (with the exception of the oil based poly wood sealant which worked pretty well). Both the 61D and 65D stayed fairly bubble free in most of the tests (except plain wood and acrylic paint). Some bubbles formed on the surface but after the top was smoothed off with the thickness planer, they were mostly bubble free.
I poured some straight urethane test strips to check impact and flexural strength at room temperature and out of the freezer. The Smooth Cast 61D was surprisingly rubbery and was virtually impossible to tear, scratch or smash at any temperature, but it did feel a little bit soft for ski sidewalls, kind of awkwardly soft and I'd worry about it not supporting the metal edge in a rock impact. My sample of Smooth Cast 65D was significantly harder, and really had the hand feel of a commercial ski sidewall. Solid, but with a hint of give when pressed with a fingernail. The 65D was also fairly resistant to cracking when smashed with a hammer on the concrete floor. It did develop some cracks and eventually broke after a number of hits with the edg, but it put up a pretty good fight. It was slightly more brittle when frozen, but still performed relatively well in my opinion (especially compared to the next two). The Smooth Cast 305 was significantly worse in the hammer and flex tests, especially when frozen, it was quite brittle and snapped relatively easily when flexed by hand. It also cracked easier with the hammer than the 61D and 65D. Lastly, the Alumalite Water-Clear squeaked through the room temperature flex and impact tests and I had really high hopes for a see-through ski. Alas, when I tested the frozen samples, the Alumalite was insanely brittle and shattered like glass when I hit it with the hammer or flexed it by hand.
Next test was a quick and dirty bond test in the press. I found that sanding the surface that had been through the thickness planer noticeably improved the bond, and all the samples seemed to stick to the epoxy and triaxial glass equally as well as the wood around them. That was a welcome relief after fighting with UHMW. dded that stuff!
To summarize, I plan to give the Smooth Cast 65D a shot on a few pairs of skis because it seemed the best suited to our purposes. Its the same price as the Smooth Cast 305 and readily available on the internet. Furthermore, all the specs in the technical data sheet look superior to the smooth cast 305 series. The stuff does kick like a banshee after its 2.5 minute pot life. You definitely have to work fast to get the resin degassed and poured before it goes off. Degassing part A and B before mixing seemed to help. It also gets whiter as it cures. Im tinting it black, and its hard to gauge how much pigment to add because the liquid resin was jet black and it cured to a medium grey. I also found that it was helpful to seal not only the sides and bottom of the channel, but about a cm around the rim as well so any overflow doesnt react with the moisture in the wood and cause bubbles in the final product. It also looks like there exists a smooth cast 66D which has a 7 minute pot life but I couldn't find any trial sizes. If I start doing larger volume with urethane sidewalls, I'll probably give the 66D a shot because it would be nice to have a bit more work time.
Ill try to update this post with some photos of the sticks once they're done. Thanks again for all the help everybody!

Nice one! It's always great to see people using and experimenting with polyurethane.
If you're located in Europe, you can get smaller batches of the 66D from www.kaupo.de
What grit sandpaper did you abrade the urethane with?
If you're located in Europe, you can get smaller batches of the 66D from www.kaupo.de
What grit sandpaper did you abrade the urethane with?


I really hope you are wrapping some serious harnesses around that thing bro.
That does not look like any pressure vessel I have ever built. They look like garden gate hinges.
Have you calculated the load on those hinges and panels?
Lets say that thing is 1.8 meters long and 400mm wide, that is a surface area on the lid of 1116 square inches.
So at 15 psi (a bit over 1 atmosphere) those five hinges are holding onto about 7600 kg. So over 7 tonne.
And I reckon that thing is probably even bigger than I suggested above.
I'm not trying to rain on your parade mate, I'm just a bit concerned for your health. Pressure vessels are nearly always round for a reason, square corners split and blow apart, plus anything built like that is usually a restricted class vessel which requires fatigue cycle counts. because every single time you use it the thing gets weaker by a decent margin.
The first thing is that it is not pressure box. It is vacuum. All that can happen is that this box will compress inside.
The second thing is that it is already tested.
Yes, there are some sounds, but they appear only, because 2.5 mm metal sheet in between steel ribs deforms. It is much safer than pressure box.
The second thing is that it is already tested.
Yes, there are some sounds, but they appear only, because 2.5 mm metal sheet in between steel ribs deforms. It is much safer than pressure box.
Re: The pouring urethane sidewall thread
For completeness sake, I just wanted to add my results, since I use a product not mentioned before.
I used Xencast PX90 (90 Shore A hardness), distributed through www.easycomposites.co.uk.
I sealed the channel with one layer of epoxy resin, however tests with an untreated test channel on the same core showed that it is not necessary; I could not see a difference between epoxy sealed and non-sealed strips. There were some small bubbles, but for the first try I'm pretty happy with the result.
Pot time is only 4,5 - 5,5 minutes, which is just about enough to mix, degas and pour before it starts to jelly.
- Sidewall_1.jpg (124.15 KiB) Viewed 17914 times
- Sidewall_2.jpg (105.53 KiB) Viewed 17914 times
Re: The pouring urethane sidewall thread
Hey Fred, what's the viscosity like of this product you are using?
Results look good but that pot life is damn short, I think I would need something that pours pretty easily and levels from one end to be that quick.
Oh and great results mate, really nice pigment too.
Results look good but that pot life is damn short, I think I would need something that pours pretty easily and levels from one end to be that quick.
Oh and great results mate, really nice pigment too.
Re: The pouring urethane sidewall thread
Yeah, looks good. But 4 minutes including degassing is tough ...
Tom