
sidewall bonding (again)
Moderators: Head Monkey, kelvin, bigKam, skidesmond, chrismp

sidewall bonding (again)
So I have always been pro-capping...but for tooling simplicity its time for us to try sidewalls. I am trying to get up-to-speed on the UHMW sidewall issue and have a couple questions. It seems like people seem most concerned with the bond between the sidewall and core. I would have assumed that the bond between sidewall and glass would be the most difficult (and likely to fail). When bonding sidewalls to the core, wouldnt you use a surface pre-treated by crown?
-
doughboyshredder
- Posts: 1354
- Joined: Mon Sep 17, 2007 7:37 pm
-
twizzstyle
- Posts: 2207
- Joined: Tue Mar 07, 2006 8:25 pm
- Location: Kenmore, Wa USA
-
MontuckyMadman

- Posts: 2395
- Joined: Fri Jun 20, 2008 9:41 pm

do it like me folks!
i route a channel into the core, pour in some 95A polyurethane resin (adiprene LF950A with e300 hardener...cures well at room temp even if a 16h postcure is recommended! i had the tech guys at chemtura do some testing for me), plane.
sidewalls are the toughest out there and they stick to the core and epoxy like nothing else. plus, you can produce seamless sidewalls/tipspacers. and the stuff is cheaper than buying uhmw sheets. and can be colored with regular epoxy pigments.
-
doughboyshredder
- Posts: 1354
- Joined: Mon Sep 17, 2007 7:37 pm
I am also very interested in the PU method. You say it "sticks to wood and epoxy like nothing else"...I get that it would stick to the wood, but isnt it the epoxy that would have to stick to it? Thats the part I am concerned with. It seems like the epoxy would have nearly as difficult a time sticking to the cured PU as flame treated UHMW. More about that?
doughboy: I get that the crown TFB isnt perfect, but obviously its significantly better than we can do at home...our topsheets and bases depend on it. Nobody answered if they are using the pre-treated surface to bond to the core.
doughboy: I get that the crown TFB isnt perfect, but obviously its significantly better than we can do at home...our topsheets and bases depend on it. Nobody answered if they are using the pre-treated surface to bond to the core.
-
doughboyshredder
- Posts: 1354
- Joined: Mon Sep 17, 2007 7:37 pm
I disagree with that statement. A proper flame treatment done by hand is just as good as a flame treatment done by a machine. As I have said before I flame treat everything immediately before layup, regardless if it's been treated before.mattman wrote: doughboy: I get that the crown TFB isnt perfect, but obviously its significantly better than we can do at home...our topsheets and bases depend on it. Nobody answered if they are using the pre-treated surface to bond to the core.
IME there has been no problem with the glue sticking to the sidewall material. It seems to be more of an issue with the wood failing due to the increased drag on the planer blades from the sidewall material compared to the wood. The sidewalls that I have had fail during planing all had the glue on them, with a very small amount of wood. Basically the wood is breaking away from the core.
-
doughboyshredder
- Posts: 1354
- Joined: Mon Sep 17, 2007 7:37 pm
Like I said the bond to the sidewall is not what fails. The bond to the wood is not what fails. It's the actual wood that fails.mattman wrote:it was my understanding that crown doesnt do flame treating, they do corona treating - an electrode-based process. so when your wood to glue bond failed, did you use crown's TFB surface to bond the sidewall to core?
But, no the sidewall material I was using was in a large block which I sliced the correct width off of, which meant that I had an untreated surface, which I sanded and flame treated. I've never had any issues with adhesion of glue to the surfaces that I have sanded and treated myself.
Here is an interesting read on surface treatments, with some info on flame treating and a lot of info on corona treatments.
Key points I picked up from a quick read. The corona treatment wears off in time, and is significantly degraded upon contacting a non treated surface. Rubbing the surface with a non treated surface also degrades the effectiveness of the corona treatment. This degradation is quite significant.
Also, it states that the least effective form of treatment is at the manufacturer only.
The most effective is treatment at manufacturer and at the press.
http://www.enerconind.com/files/7f/7fb3 ... 6d0bf4.pdfTable 6. Loss of Corona Treatment Tests.
Test Loss
Initial sample just before contact 56
After contacting untreated polyethylene surface on opposite side 39 17
After contacting corona treated polyethylene surface on opposite side 39 17
After contacting bare bleached base sheet on opposite side 43 13
After contacting flame primed bare base sheet on opposite side 39 17
After contacting slip sheeted bleached bond paper 44 12
After contacting slip sheeted bare aluminum foil 45 11
After contacting slip sheeted unbleached paper 49 7
Nontreated polyethylene surface 35
Table 7. Effectiveness Levels of Corona Treatment Degradation.
Most Effective
A moderate treatment by the supplier at the time of manufacture followed by moderate treatment on the press
just before ink laydown. This final treatment can be varied to optimize ink adhesion with heat-sealing
characteristics.
Second Most Effective
Treatment on the press only. This can lead to difficulties if the polyethylene contains slip additives. In any
case, it is much more effective than treating at the time of manufacture as the treated surface will not contact
the other side before it contacts the printing station. Thus, the full results of the treatment still exist at the
point of ink laydown.
Least Effective
Treatment by supplier only. The problems and difficulties encountered have been covered, but a
quick summary follows:
1. Loss of a substantial portion of the treatment.
2. Production of pinholes, blocking, scratches, etc., caused by using extremely high power levels at the
I have to admit it's nice to find a study that backs up what I've been saying for years, which is that you really should be treating your plastics immediately before use. Relying on the treatment from the supplier does not guarantee good results. In fact over half of the treatment is probably worn off from rubbing against an untreated surface during shipping.
i'll take some photos next time i make a core. for now i'll just explain my process.
i resaw my core blanks from a big block of laminated wood. i cut them to about 1/2" thickness.
then i draw the shape of the board onto the core and follow the line with my router. i use a straight bit with a 1/2 inch diameter cutter. the cut depth is usually at about 8mm to leave some headroom when planing to thickness.
then i pour the resin into the channel. the only thing you need to make sure is that the core is level so the resin spreads evenly.
after the resin is fully cured i first plane the underside of the core until the PU starts to show. then is flip the core over, place in on my thicknessing jig and start planing to the final thickness.
the planer gives the smooth PU a rough surface. i still flame treat the PU before layup though.
as for the PU resin, I use Adiprene LF950A with the E300 hardener. I buy it from http://www.asma.at/index-e.html. Costs are about 60 EUR for 4kg which lasts for 10 boards.
The stuff is produced by Chemtura, so you can contact them directly and ask for resellers in your area.
here are a couple of pictures of an unprofiled core blank with the resin cured.
this is the resin's natural color. the bubbles are hard to get out without a small vacuum chamber to put the mixed resin into, but they don't bother me too much. i'll try and build a small vacuum chamber in the future though.
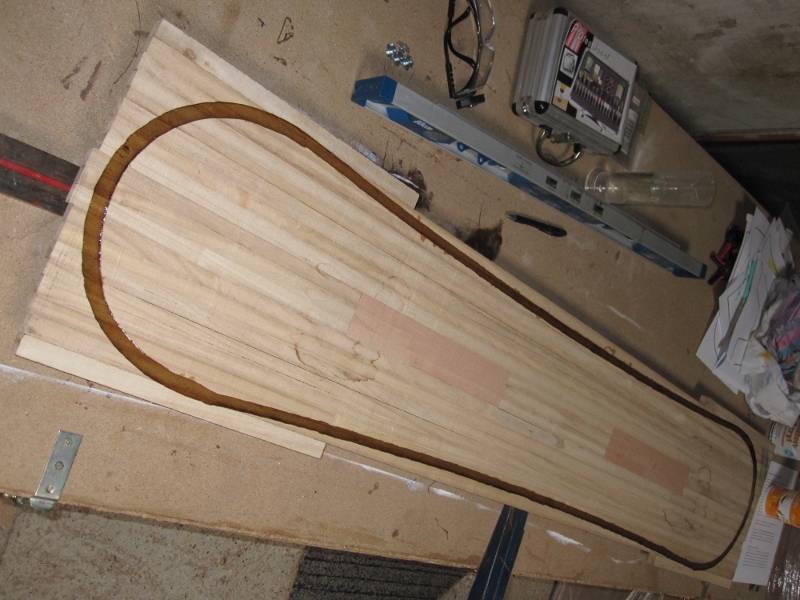
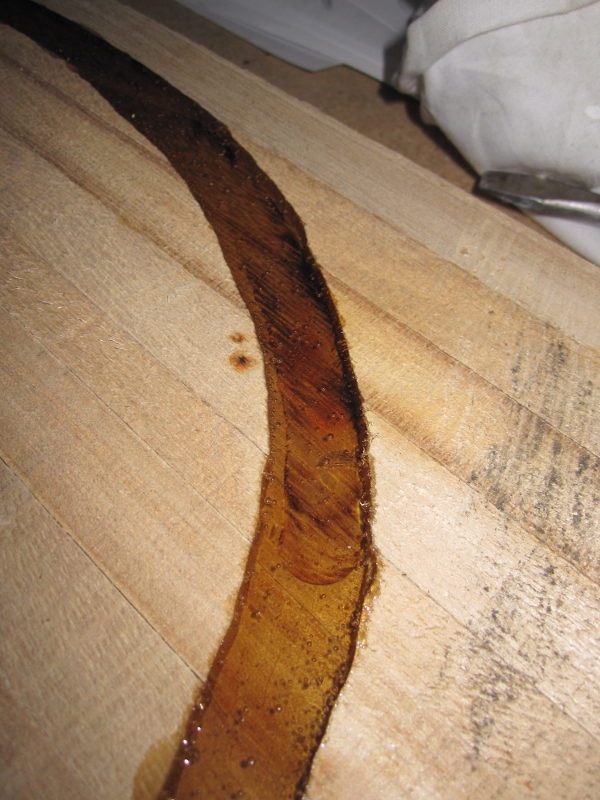
core is paulownia with beech under the bindings.
this is the resin's natural color. the bubbles are hard to get out without a small vacuum chamber to put the mixed resin into, but they don't bother me too much. i'll try and build a small vacuum chamber in the future though.
core is paulownia with beech under the bindings.

-
MontuckyMadman
- Posts: 2395
- Joined: Fri Jun 20, 2008 9:41 pm
the material expands something like 250% under vacumme I think, in most cases, so you have to have a big container.
I dont know if those things will pull enough mercury to vacuum degas.
I have some of those. I could try it with my resin and tell you if it did anything.
My guess is you will need a stouter plastic or glass.
I dont know if those things will pull enough mercury to vacuum degas.
I have some of those. I could try it with my resin and tell you if it did anything.
My guess is you will need a stouter plastic or glass.
sammer wrote: I'm still a tang on top guy.