

Well I'm just wondering what router bit people are using to trim sidewalls on a router table? I have tried the tilt base laminate trimmer and want to make a router table instead. So I'm looking for a router bit the same as the one in the skibuilders store but hopefully not spend $70 on it. Basically I need a dovetail bit with a bearing on it. Problem is the all the ones I can find online do not much wider than the bearing would be. A Keller dovetail bit is the closest I can find. A chamfer bit would be great but the router needs to be mounted from above and I prefer to have it below.
I searched and could not find anything on this so hopefully it is not an old topic.
thanks
Which type of router bit for sidewalls?
Moderators: Head Monkey, kelvin, bigKam, skidesmond, chrismp

what about this? http://www.skibuilders.com/articles/sidewalljig.shtml
allows you to adjust the angle and lets you use a straight bit.
allows you to adjust the angle and lets you use a straight bit.

I think you have pretty much summarised the situation.
There are various setups people have made with a router table and straight bit with top bearing. Either flat table with tilted router or straight router and tilted table. With a table mounted router you either have to have spring loaded rollers to push the camber flat as it passes the router bit (so the edge rides along the bearing evenly), or have an island next to the bearing so the cambered ski can ride on the island and the edge stays even on the router bearing (like kingswood and ON3P).
Some have cantilevered a router above the table as well.
Don't wait up, I'm off to kill Summer....
Alternative: viewtopic.php?t=2941&highlight=collet
You need to ensure any collar does not compromise the depth required for the shaft. The router I use plunges really deep - so this is not an issue. Cheap is OK - but make sure it is safe.
SHIF published a good method too.
Falls has a great finish with a palm router - I think it is a matter of having a really good jig which eliminates vibration. I was unable to make one.
-
MontuckyMadman

- Posts: 2395
- Joined: Fri Jun 20, 2008 9:41 pm
I was hoping to construct something like what folsom uses at 3:40 they are using a router table. The table is not on an angle and the router is mounted below but does not appear to be on an angle so they are probably using the type of bit I'm looking for. I can no longer find the Kingswood video that showed their island technique and have not seen how ON3P does theirs.
Thanks for the post Richuk. So you just had some pipe at a certain diameter and drilled it to a larger one to fit over the shank?
Thanks for the post Richuk. So you just had some pipe at a certain diameter and drilled it to a larger one to fit over the shank?
Brazen has worked on the first issue. I think he posted the result?
Yes - the internal diameter matches the diameter of the shaft. If you drill it out, you need to pay attention to the external diameter. If you play with the external diameter you will get different effect on the sidewall. So from partial vertical to semi-rebatted (poor description, but I'm sure you understand ; )
Given the way this is set up, it is really important to do a number of passes - so it not an all in one go method - start high and work low, especially with wood.
Like SD said, the collar must not impede how the cutter is seated! Anyone know the name of a good lawyer?
-
MontuckyMadman
- Posts: 2395
- Joined: Fri Jun 20, 2008 9:41 pm
I'm with you MM now that I have the tilt base router.
Also I think practice makes perfect. I'm not saying I won't chunk another sidewall ever again, but these days I feel much more confident router bevelling the sidewalls. NB. Good support along the length of the ski while doing this is key.
Maybe if I was doing hundreds of pair I would build a router table setup.
There is also a moment skis video that shows their tilting table router method and sander method that they use for sidewalls (sand flat on table, route with tilted table, sand with tilted table, done).
http://www.shorelinesnowboards.com/snow ... tory-tour/ pretty sure that's the 9 minute vid
Don't wait up, I'm off to kill Summer....
My laminate trimmer is only 3/4 HP so I find it a bit slow. I was just wondering if there was an inexpensive bit I could put in a more powerful router with a larger base. The trimmer works fine, just looking for a quicker way.
That Moment video was great. A few cool ways to do things in there. Their router table looks easier to make than I was thinking.
thanks for all the advice
That Moment video was great. A few cool ways to do things in there. Their router table looks easier to make than I was thinking.
thanks for all the advice

I spent a lot of time stuffing around to find dovetail router bits where the shank was narrower than the cutter so I could add a top bearing. This was the best I could do. I think the skibuilders store having a custom made router bit is pretty much proof that there isn't an easdy/cheap pre-existing way to get a bit like this
Don't wait up, I'm off to kill Summer....
-
MontuckyMadman
- Posts: 2395
- Joined: Fri Jun 20, 2008 9:41 pm
Yeah man they are all thee qtr you have to grind or sand to vert and then trim back.
You have to have a dedicated tool for this. Most people have a router table for all different shit.
Just stick to the laminate trimmer.
Its much more fool proof.
You can take off small amounts at a time if need be, not the same with a dovetail.
You can adjust your bevel very quickly and easily with a trimmer, you are stuck with a beveled bit or have to modify a table the other way.
Different skis need a different bevel, easily done with an adjustable trimmer.
A big bevel cutter on a small shank will lead to bearing burnout and more snipe/denting on the sidewall potential.
laminate trimmer all the way over a router table setup for speed and accuracy for the home builder.
If you have dedicated table then maybe it would be better but a modular setup laminate all the way. IMO
sammer wrote: I'm still a tang on top guy.
I will just leave this here. Hope it helps.
My 2 cents...
1) Anything that holds down the camber is a pain in the ass to build and use. Much, much easier ways to account for camber.
2) Finding bits with the correct angle is also a pain in the ass. A straight bit + angled router (either in a router table, or in an angled base of a laminate trimmer) is easier and gives you more options.
3) If you plan on doing more than 25-30 pairs, it is worth looking into bits with replaceable inserts.
4) Shapers spin too slow (without sanding after). We knock down our sidewalls smooth once we route them, but honestly post routing they look as good as 95% of the stuff we see in stores. Faster RPM + smooth/consistent person doing the routing should create a finish that doesn't have any visible bumps from the router at all.
For most everyone on here, the laminate trimmer is probably the cheapest, most affordable option. If you don't want to do it handle held, create a little router table for it and mount it up.
It doesn't have the power to cut sidewalls at the speed we need, but for homebuilding shouldn't be a problem.
-
twizzstyle
- Posts: 2207
- Joined: Tue Mar 07, 2006 8:25 pm
- Location: Kenmore, Wa USA
I have nearly the exact same bit as Falls above (mine is even red, it might actually be identical). The bearing I got wouldn't snug up all the way up to the cutters because of a fillet on the shaft, so when I was routing I had just a TINY bit of bearing touching the edge, and if I wasn't careful I'd slip off and gouge the sidewall. I have since machined that fillet down on the lathe and the bearing goes all the way up so it'll work better now (haven't had a chance to use it like that yet)
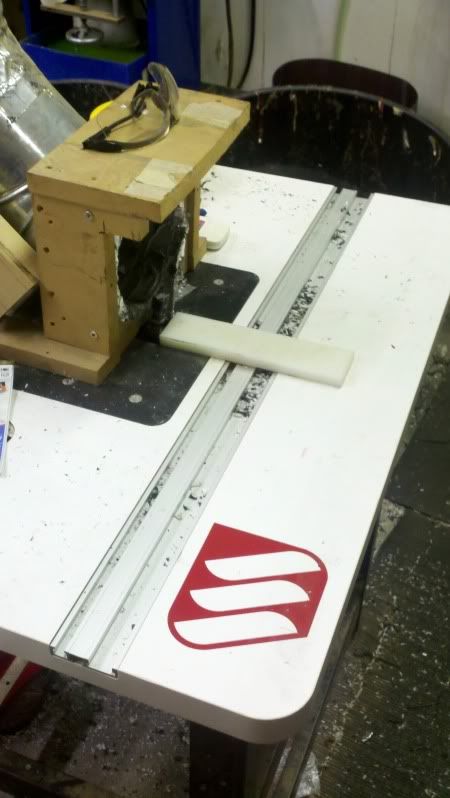
Thanks for the pic Scott. It looks like piece of sidewall you have used there and you have the router tilted with an straight bit in it? I need to look at router table to see if they all tilt or if I need to modify one (next time I can get to the city). I've haven't used one so I'm not sure if that's standard but should work well. Thanks for the advice on not setting up something to push down from the top. Was thinking that would be annoying to create.
Falls and Twizzstyle where did you get the bit from? I can find 14 degree ones with bearing too large that I may be able to change to a smaller one. But would prefer in the 18-22 degree range.
Falls and Twizzstyle where did you get the bit from? I can find 14 degree ones with bearing too large that I may be able to change to a smaller one. But would prefer in the 18-22 degree range.