
what is the best way to make arcs without a CAD program?
Moderators: Head Monkey, kelvin, bigKam, skidesmond, chrismp
-
originskis

- Posts: 79
- Joined: Tue Nov 24, 2009 6:31 pm
- Location: Salt Lake City
what is the best way to make arcs without a CAD program?
hi, I am wondering what the best way to create an arc for sidecuts and for the core profiler is without a CAD program like Mastercam, etc.

If I had to draw up a ski arc by hand without a CAD printout I would use a thin flexible piece of wood that I could bend in an arc and then trace it. Say you wanted a ski with specific dimensions. I would first draw a straight center line for the middle of the ski. Then I would measure off this centerline on both sides the width I would want at tip, waist, and tail. Bend your wood strip and screw it in at these points and connect the dots.
You could probably do the same for the core profile.
Recently I was thinking of doing something similar to this for cutting my core to shape before attaching my sidewalls. I did one pair where I just traced my ski template on the core and then cut with a sabre saw but it wasn't a perfect arc for the sidewall to mate to. I had to do some sanding to eliminate the slight gaps. I figured using a router with a flush trim bit and a flexible strip of wood as my guide would be more accurate. I am going to try it for my next pair.
Any particular reason you aren't using a CAD program? I paid $5 for my copy of TurboCad on eBay and it is super easy to use. Once you get the hang of it, it is fun playing around with it and drawing different ski designs.
-
originskis
- Posts: 79
- Joined: Tue Nov 24, 2009 6:31 pm
- Location: Salt Lake City

http://mytonskis.blogspot.com/
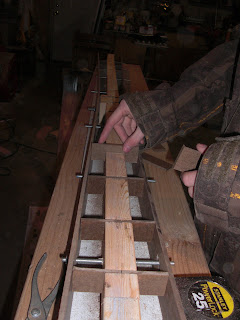
I made myself a nice little jig for routing out my core and base using flexible wood. Works well.
-
twizzstyle
- Posts: 2207
- Joined: Tue Mar 07, 2006 8:25 pm
- Location: Kenmore, Wa USA
If you use a CAD program (my recommendation) you have a few options for printing:
- Buy a roll of paper, and cut it into 8.5" wide and however long strips, set a custom paper size on your printer, and right it through that way
- Take it to a printing place like Kinkos, etc, and have them print it. Just make sure everything is printed 1:1 scale, sometimes they will scale things like 98% for margins, etc, and that can really screw things up for you.
We're lucky in that we have free access to a large plotter, so we print everything on there.
-
skidesmond
- Posts: 2338
- Joined: Tue Apr 07, 2009 3:26 pm
- Location: Western Mass, USA
- Contact:
I use snowcad-x. It's free and fairly robust. You can print a full size profile or shape of the ski. I have Staples print it for me on their plotter for about $4. You can order the print online, just upload it to their web site, pick a store close by that will print it for you and pick up when it's ready.
Nate, I've been thinking of making a similar jig that you made using hardware called turn buckles from TSC (Tractor Supply Co). The turn buckles would replace your bolts. Here's a pic I found on the web.
http://www.girishwirerope.com/images/turn_Buckles1.jpg
I was thinking of using the eye-eye ones. Add 2 nuts on each eye. The eye bolt will go through a hole in the MDF, then secure a nut against the inside of the MDF, then add a second nut, then add the turn buckle. Do the same to the other side. Now to get the shape twist the turn buckle to either expand the mdf outward or pull it inward. Probably need 5 or 6 turn buckles to get a decent shape. Once you have the desired shape tighten up the nuts closets to the turn buckle so they are snug against the turn buckle. Make sure the nuts against the MDF are snug too. That should lock in the shape.
I'll post pics when I make it.
I have drawn almost all of my skis by hand, on the cores.
To do this, use a flexible piece of wood that has even flex, i.e. no knots. Pin the board where you would like the ends of the curve, then bend it until you get it to where you want the center of the curve... pin it there and trace. Super simple. The only warning is that it can be a challenge to get two exact curves using this method, but then again, a small degree of a-symmetry in your skis can be a good thing.
To do this, use a flexible piece of wood that has even flex, i.e. no knots. Pin the board where you would like the ends of the curve, then bend it until you get it to where you want the center of the curve... pin it there and trace. Super simple. The only warning is that it can be a challenge to get two exact curves using this method, but then again, a small degree of a-symmetry in your skis can be a good thing.
Want skis Better, Cheaper, Faster and much much Cooler... build your own.
-
originskis
- Posts: 79
- Joined: Tue Nov 24, 2009 6:31 pm
- Location: Salt Lake City
My local place can only print PDF. I found some software at www.docudesk.com to convert it and maintain scale. The "trial" version puts a watermark on the document but you don't have to fork over any dough to use it.
-
originskis
- Posts: 79
- Joined: Tue Nov 24, 2009 6:31 pm
- Location: Salt Lake City
The store I go to is just an office supply store, not a Staples. I don't know where you live but I would just call around first and see who has a large format printer that knows what they are doing.
One thing I have realized is that it is not as simple as you would think to convert to PDF and have it print properly. You need to have proper custom page size, scale, origin, etc. When I first just saved as PDF, it did not maintain scale at all. I had to use the program where it is an actual printing option. So when I finish with the drawing I go to "print" and the options come up as regular printer or desk PDF. Then it opens up the Adobe program and I know whether or not it worked correctly.
I had a lot of trouble getting my templates printed when I first started. Also check with engineering firms who might be willing to help you out as they run CAD and have large format printers. They can usually print a few different formats easily.
Good luck.
I also figured out that most home office printers won't take a custom page size the full length of the ski. My printer maxes out at something like 43 inches. I am pretty sure that only the expensive large format printers can print a full ski on one page. If anyone knows otherwise, let me know what printer you are using or how to circumvent the restrictions.
I found it not all that difficult to print out templates on a stardard printer. I designed in Snocad2, exported to .dxf, and then opened the .dxf in Google Sketchup. Then I printed from Sketchup, where it gave me the option to define the scale. Ie. I knew my ski was 170cm so I told it to set the length of it at 170cm and it automatically printed the width correctly. Then I took all the pages and cut off the margins with a utility knife and a ruler. Then spray adhesive onto my template material. (1/4" hardboard)
All that was easier than I expected and got my hopes up that it would bring good results. The problem came, however, when I tried to cut it out. I used a jigsaw to bring it close, then tried to finish with a beltsander. All in all it was less precise than I wanted. The curve had subtle waves and a couple places where I went too deep. So I made the jig I posted above.
All that was easier than I expected and got my hopes up that it would bring good results. The problem came, however, when I tried to cut it out. I used a jigsaw to bring it close, then tried to finish with a beltsander. All in all it was less precise than I wanted. The curve had subtle waves and a couple places where I went too deep. So I made the jig I posted above.
I make a 1/2 template out of mdf. I use a 1"x8" piece of mdf to make the template. I use the straight edge of this mdf board as the centerline of the whole template. I use a thin strip of mdf to follow points measured from the centerline. I screw this strip down and follow it with a router using a bit with a bearing that follows the curve. I shape the tip and tail with a jigsaw and belt sander. After I am satisfied with my half template I secure it to the other straight edge of the 1"x8" and use the router to duplicate it. I then flip it over and screw the whole template to another piece of mdf and use the router to make a complete and whole template. This method works well in terms of symmetry and I can put the halves onto the mdf so the tip or the whole template is wider. This method would also work to make a router bridge style core profiler.