
Anyone wanna get paid to build ON3P a few PID Controllers?
Moderators: Head Monkey, kelvin, bigKam, skidesmond, chrismp
Anyone wanna get paid to build ON3P a few PID Controllers?
got it covered. thanks
Last edited by iggyskier on Tue Jul 28, 2009 6:54 pm, edited 1 time in total.
-
MontuckyMadman

- Posts: 2395
- Joined: Fri Jun 20, 2008 9:41 pm
check out this - Bradley Smoker Controller. It's very simple to use and the guy who builds them answers his emails 24/7. He sells on ebay and has many other PID/relay options, but I dig this one the most. I haven't hooked it up to the press because I built a reg unit but it controls my Hotbox heating unit quite nicely.
-
MontuckyMadman
- Posts: 2395
- Joined: Fri Jun 20, 2008 9:41 pm
120v, 20A Single blanket PID Control. Total cost, $190 shipped:MontuckyMadman wrote:that is sweet. krp8128 is building me one hopefully he can come close to that PP. THanks!
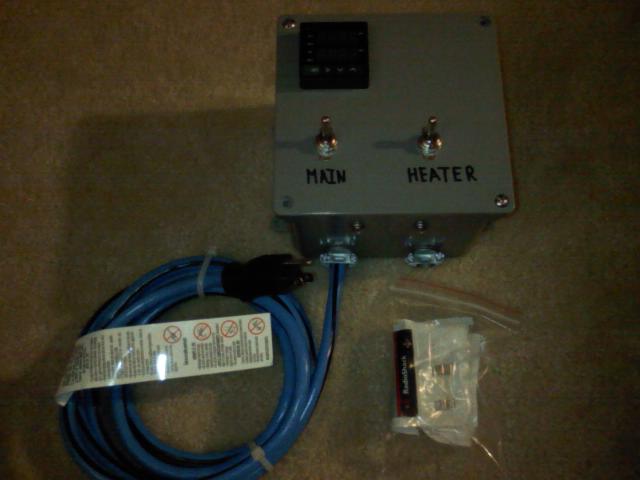
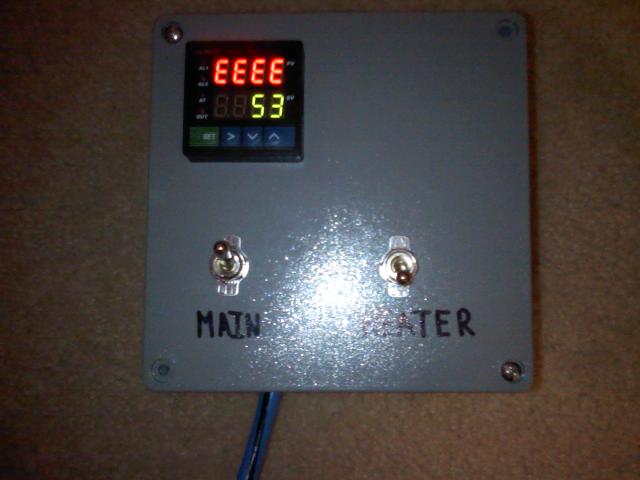
I'm waiting on the correct thermocouple, hence the "EEEE" temp reading. tested and works great! Just needs to be tuned to the specific mold/blanket.
Sorry for the crummy pics, my good camera isn't working too great at the moment...
-
bobbyrobie
- Posts: 124
- Joined: Wed Sep 17, 2008 9:17 pm
Sorry, could have worded that better.bobbyrobie wrote:what type of TC are you using? you can adjust the settings within the PID to different TC's
It's going to get a type K wire bead, but all I have on hand for testing was a type K threaded probe. It tested and worked fine, but then I disconnected the threaded probe when I closed up the box.
-
MontuckyMadman
- Posts: 2395
- Joined: Fri Jun 20, 2008 9:41 pm
seems as though it all works!!
Heat blanket gets real hawt (thanks camhard) and the temp controller is flawless Thanks (krp8128). Wired the TC backwards to start had me scratching my head and then I remembered what you said. "if you get a neg. reading you wired it opposite"
I will definitely break that wire TC.
I can probably just solder it back together after I break that little tip the first time?
-
jvangelder
- Posts: 181
- Joined: Tue Jul 07, 2009 4:41 pm
- Location: Southern NH
Dont solder thermocouples. If you have to join them, crimp them together or something of the like. Thermocouples operate of the seebeck effect, where as current is created by the junction of unlike metals, and that voltage depending on the metals used can be used to calculate tempeatrue.
The more unlike junctions you have, the less accurate the thermocouple will be. Also if its a wire type thermocouple, dont solder the end wires together either, just twist them.
-Jacob
The more unlike junctions you have, the less accurate the thermocouple will be. Also if its a wire type thermocouple, dont solder the end wires together either, just twist them.
-Jacob
-
MontuckyMadman
- Posts: 2395
- Joined: Fri Jun 20, 2008 9:41 pm
That's just the weld bead.MontuckyMadman wrote:OK. The factory TC appears to have a very small soldered connection at the end.
I've made a bunch in the past, and the procedure was to twist the end together then use a welder* (carbon arc?) to just melt the wires together at the cross. The smaller the bead the more accurate the thermocouple.
As others have said, soldering is out. I'm not sure if a simple twist will work, as the more times the wires contact each other the less accurate the reading.
I'm not really impressed with the thermocouple that I sent you, i personally thought it was a shoddy weld and very brittle wires. I'm back in Rochester now, let me check around on campus and see if anyone has a thermocouple welder, if so then maybe i can get a spool of wire and make up a bunch of them.
*The welder that i used was a simple 110v plug in unit. From what i remember there was a carbon rod that stuck up from the top of the unit, this was smoothed to a point using sandpaper. You touched the thermocouple wire to the tip and pushed a button to discharge a capacitor bank and fuse the wires.
-
bobbyrobie
- Posts: 124
- Joined: Wed Sep 17, 2008 9:17 pm