
I am in the process of re-designing my mold, and want to make it adjustable. Looking at some of the pictures here, as well as some preliminary designing, leads me to wonder about the camber.
As the length of the ski is increased, is the caber also increasing? If not, how are you working around such a change?
The pictures that I have been looking at are all off adjustable tip and tail blocks. My thought is that as the blocks are brought away from center (to increase the length), they are traveling down on the curve, which increases the camber.
Adjustable Molds and Camber
Moderators: Head Monkey, kelvin, bigKam, skidesmond, chrismp
yep, I think that happens with every adjustable mold I've seen. Imagining a mold that allow to adjust the camber from positive to even negative values would be nice 
I think that could be done by copying the design of Buuk's core profiler (here : http://www.skibuilders.com/phpBB2/viewt ... 7&start=30 ). The question then would be : is it gonna hold the pressure ?
Do you plan on building one that allow to adjust tip and tails too ?
I think that could be done by copying the design of Buuk's core profiler (here : http://www.skibuilders.com/phpBB2/viewt ... 7&start=30 ). The question then would be : is it gonna hold the pressure ?
Do you plan on building one that allow to adjust tip and tails too ?
I have been thinking along the same lines lately. And, I sketched out a mold that I think should work for vacuum bagging, but it definitely would be strong enough for an air bladder press. I will sketch a picture out and post it up in the next few days. However, I think that Buuk's profiler system should work okay as a mold... so long as you have a couple layers of metal and or masonite between the mold and the ski.
I have also used flat molds made out of 1x8, with the end pieces screwed to the ends. I think you might be able to get some adjustability by using a 1x8 and attaching shims to the bottom of the mold. But, this might end up taking as much work as building a new mold from scratch.
I have also used flat molds made out of 1x8, with the end pieces screwed to the ends. I think you might be able to get some adjustability by using a 1x8 and attaching shims to the bottom of the mold. But, this might end up taking as much work as building a new mold from scratch.


The first one would give you a wavy board under vacuum pressure let alone pneumatic press.
The only successful camber block of this sort I've seen (at Lacroix skis) had adjustable supports on 10cm (41in) centers and a 2cm (3/4inch) thick steel base plate. Also this setup was limited to 50psi or you got waves in the camber!
The idea is sound but the details needs some work IMHO
The only successful camber block of this sort I've seen (at Lacroix skis) had adjustable supports on 10cm (41in) centers and a 2cm (3/4inch) thick steel base plate. Also this setup was limited to 50psi or you got waves in the camber!
The idea is sound but the details needs some work IMHO

The spacing between supports in those sketches is a lot larger than I would actually use. And, I totally agree that the method for the air bladder system would need a lot to get it working safely. Actually reading over my earlier comment, I made a typo, and the word "not" should have been in: "it definitely would (not) be strong enough for an air bladder press" when I was talking about the vacuum bag system. There is pretty much no way in hell I would use the vacuum bag mold idea I drew in an air bladder press. That is asking for stuff to blow up. 
So far, I haven't really put any engineering thought into this system, other than to make a sketch on the back of an envelope one morning at breakfast.
That being said though, part of my thinking was that with a vacuum system the only real force on the mold would be that of the wood core being flexed into the mold. I.E. the vacuum works because you reduce the pressure in the air around the ski, and the atmosphere does the rest. Because atmosphere acts on all surfaces (the top and bottom) of the mold, the forces are balanced out, and the only forces left for the mold to balance are those created by the ski core flexing, which are pretty minimal (and extremely small compared to the forces developed in an air bladder mold).
-
doughboyshredder
- Posts: 1354
- Joined: Mon Sep 17, 2007 7:37 pm
Wow, I am amazed that a 3/4 " thick steel plate would deflect that much with 4" spacing on the supports.Idris wrote: The only successful camber block of this sort I've seen (at Lacroix skis) had adjustable supports on 10cm (41in) centers and a 2cm (3/4inch) thick steel base plate. Also this setup was limited to 50psi or you got waves in the camber!
The idea is sound but the details needs some work IMHO
Anyone know why there is not a similar issue with the topsheet and deflections / impressions from the cat tracks?
Purely with regards to deflection (waves in the camber) could a cured carbon fiber "plate" actually work in conjunction with a steel plate to eliminate the deflection? Carbon fiber is definitely stiffer than steel, but can it handle the pressure?
-
doughboyshredder
- Posts: 1354
- Joined: Mon Sep 17, 2007 7:37 pm
I am building something revolutionary. LOL. Ordered the steel today. Finally figured out what I think will work. I am going to have adjustable bolts with a triple nut design which will adjust the heights of a 1/4" thick x 16" wide steel plate which will have a "cat track" of 1/2" square tubes resting on top of it with another steel plate on top of the square tubes. Essentially a sandwich of steel. Deflection should be minimal with what should actually be stronger than a 1" piece of solid steel. My plates won't be cut till next week so I won't be building for at least a week.
-
doughboyshredder
- Posts: 1354
- Joined: Mon Sep 17, 2007 7:37 pm
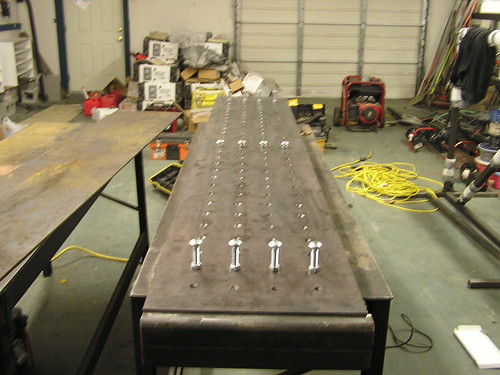
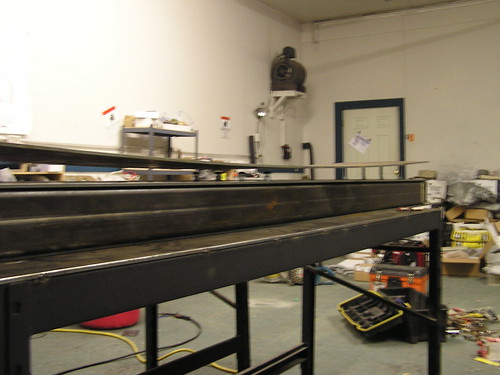
I worked all weekend on the bottom block. All of the steel is cut, the frame is partially welded, all of the holes are drilled for the adjustment plate, and I realized how much more there is to do.
Here are some pics. Like I said, still a long way to go.
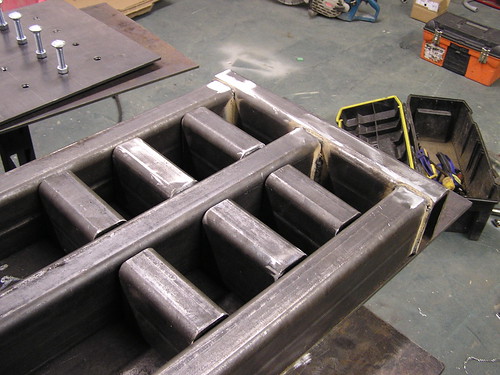
frame for the press
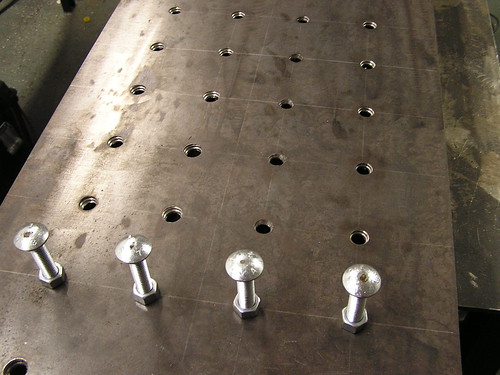
the adjustment plate
the frame, with the adjustment plate, and the floating
Here are some pics. Like I said, still a long way to go.
frame for the press
the adjustment plate
the frame, with the adjustment plate, and the floating
Adjustable Mold
I've spent a lot of time thinking about this too but did not want to be stuck with one camber option. So I kinda went in a nutty direction with three main goals:I am in the process of re-designing my mold, and want to make it adjustable. Looking at some of the pictures here, as well as some preliminary designing, leads me to wonder about the camber.
As the length of the ski is increased, is the caber also increasing? If not, how are you working around such a change?
The pictures that I have been looking at are all off adjustable tip and tail blocks. My thought is that as the blocks are brought away from center (to increase the length), they are traveling down on the curve, which increases the camber.
- 1. Have the ability to totally change the shape the including camber
2. Have it be very cheap to change the mold
3. Have my mold ribs take up as little storage space as possible
Here is a picture of the spine mold I came up with. A few unique things about it is that it's a tub instead of a table, it uses a polycarbonate (aka Lexan) plastic surface, and most importantly it relies on a flexible spine.

Whenever I want to change a shape I just pop in four identical mold ribs and roll the spine over them. Then I put in a copy of my template print for proper orientation and bolt down the polycarbonate sheet (image not bolted down tight).
The clear surface makes it easy to see where my board goes and where my surface might not be down tight enough.
I was worried that I would end up with a wavy base on my boards but so far so good.

It's not a good mass production setup but since I'm just building boards for me and friends it does the job well. Hopefully this idea helps others trying to tackle the same problems.
...P.S. Doughboyshredder that fab work looks killer. I'd like to apply skill like that to my spine mold.
boardcrafter.com
Dante,
Mold looks killer. I've been using something very similar for surfboard molds for a few years. The difference I did was used acrylic instead of lexan. When I started doing skis the acrylic would break every once in a while at the tips (more curve than surfboards). How is the lexan holding up? Would it take multiple bends/straitening without any fatigue effects?
Thanks
Bill
Polycarbonate
I went down the Acrilic road before this and it broke before I could get anything pressed ($70 down the tubes). Before that I had a sheet metal surface but I ran into issues with deformation of the surface. It was not easy to see where the sheet metal was not conforming properly to the mold shape and it also dented too easily which did not allow for many changes. This might not be a common issue but since my spine mold uses a floating surface (I don’t think anyone else does this for skis/snowboard). The bolts would create little depressions. I’ve finally settled on the polycarbonate because it’s clear, flexible, chemical resistant, and strong. It does not dent and is used as the lining for bullet proof glass. It’s a little pricier than some other options but I think the benefits make it worth it (that sheet was about $100 at TAP Plastics).
As for fatigue I’m only three boards into this mold with the polycarbonate surface but the running length, camber, and tip and tail radius have been different for each. There are not signs of stress cracks or any real fatigue. The only wear and tear I see so far is cosmetic since I use a metal scraper to get cured epoxy off of it (I use mold release wax but sometimes you get spots where drops of epoxy stick and you need to “persuade” them off).
As for fatigue I’m only three boards into this mold with the polycarbonate surface but the running length, camber, and tip and tail radius have been different for each. There are not signs of stress cracks or any real fatigue. The only wear and tear I see so far is cosmetic since I use a metal scraper to get cured epoxy off of it (I use mold release wax but sometimes you get spots where drops of epoxy stick and you need to “persuade” them off).
boardcrafter.com
Re: Polycarbonate
and i think the deal is that you`re building snowboards with a much wider radius in tip and tail, compared to skis. so the mold material gets less stressed.
what i didn`t get so far: are you pressing your stuff with vacuum or do you put your mold into a normal bladder press?
what i didn`t get so far: are you pressing your stuff with vacuum or do you put your mold into a normal bladder press?
plywood freeride industries - go ply, ride wood!
bend radius
This is a vacuum mold. Under a bladder press it would get obliterated for a lot of reasons (e.g. only 4 mold ribs, wood spine). As for the flexibility of Polycarbonate I’m convinced you can get a far tighter tip and tail radius than you would ever want for a snowboard or skis. If you have a plastics distributor nearby with a retail showroom I highly recommend going in and checking out polycarbonate.
boardcrafter.com