
I'm a bit confused with the inconsistencies in my pressings. I just finished my second skis (wicked stick /#2) and had problems with the cat track keeping contact in the tip and tail areas. My first skis pressed without any problems (beginners luck) and the snow board was a bust, again pressing problems in the tip and tail areas.
I'm using a cat track set up and the tip and tail blocks are very mild. I use sheet metal on the base and on the top of the molds. My cat track is 1" square tubing. The set up is a follows: bottom mold, sheet metal, lay-up, sheet metal, top mold, and air hose, all inside the press. I have tried to find an earlier post about the cat track dimensions but can't.
When inflating the hose the contact begins in the center of the mold and works it way out. Once the track reaches the tip area it fails to make contact. There is about 3/8 to 7/16" gap in the bottom of the bend from running length to tip.
Anyone have any ideas on what may be the problem? We will be starting a replacement board soon and I sure want to get this figured out.
As allways, Thanks for the help!
rockaukum
Need help with cat track system???
Moderators: Head Monkey, kelvin, bigKam, skidesmond, chrismp
hmm...well i havent quite finished my press yet so maybe im not an expret in this but but i'll try. It would seem to me the most likely cause of that happening is that your bottom mold has enough camber to make up the difference in the middle but when it drops down at the tip/tail the space is too much for the air bladder to make up.Your top mold/bottom mold dont match up right so the gap between the two is not consistent. If you built a top mold like most do, out of 2X4's with no camber then teh gap wont be consistent and at some point it will leave gaps at the tip/tail. Try bringing your top mold down further, and/or (if its adjustable) extending thetop mold out further.
sorry if that doesnt make sense, hope you figure it out.
sorry if that doesnt make sense, hope you figure it out.
Thanks for the reply.
The top mold is contoured to the bottom mold and expandable but designed for this length ski so that I feel it is not an issue. The hose is 5" when inflated, Under pressure and in the mold it is about 4" so there is room for more expansion in the hose (Aprox 1" more).
the more I think about it I feel it may be the size of the cat track tubes beinh too big? Any other takers to trouble shoot this?
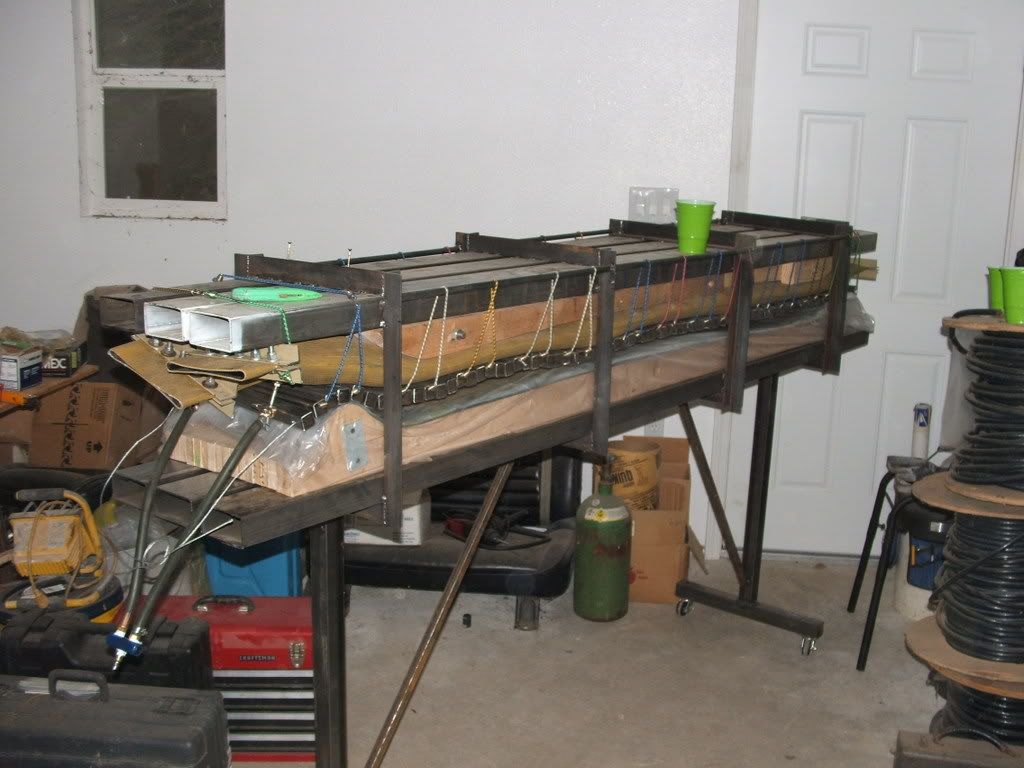
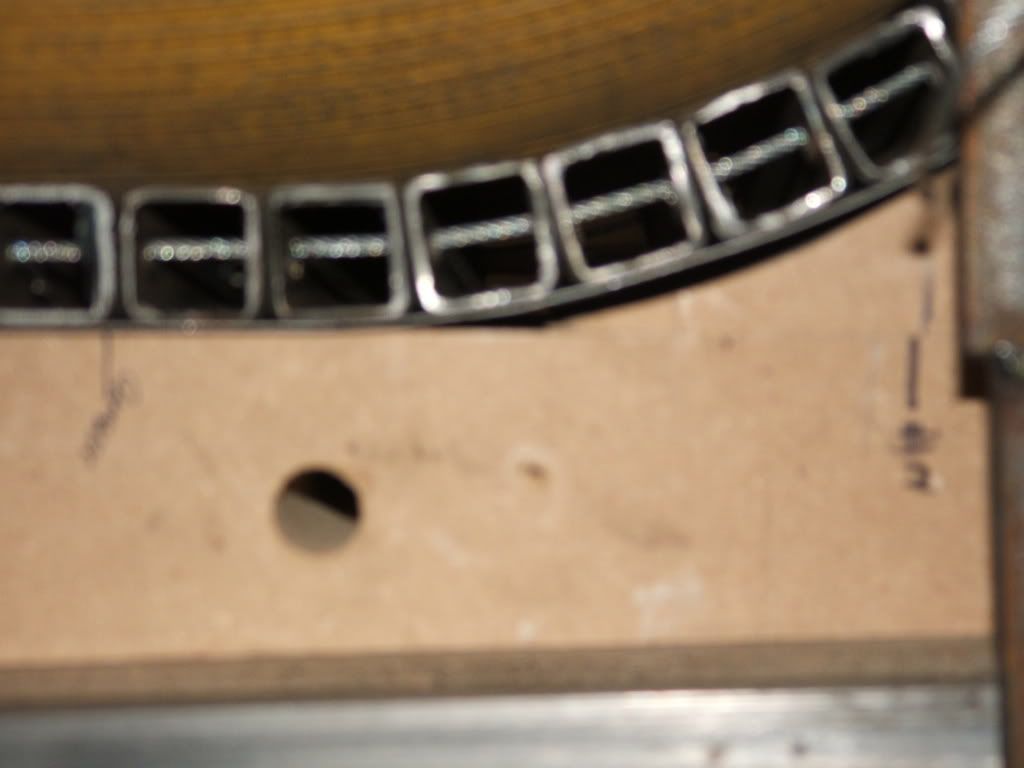
here is a pic of the system uninflated.
rockaukum
The top mold is contoured to the bottom mold and expandable but designed for this length ski so that I feel it is not an issue. The hose is 5" when inflated, Under pressure and in the mold it is about 4" so there is room for more expansion in the hose (Aprox 1" more).
the more I think about it I feel it may be the size of the cat track tubes beinh too big? Any other takers to trouble shoot this?
here is a pic of the system uninflated.
rockaukum
oddly enough the pic is of my first pressing and that one worked out okay. My most recent one had the top mold extended to match the lower mold. For some reason when the hose is inflated, the cat track is loose in the curved area (transition from RL to tip. Good cntact at the end of the ski, tip. there is about three pieces of the track that are loose. I can pound the track down into the mold but I feel this will lead to other issues like missalignment, ect.
rockaukum
rockaukum
-
Cadman
Here is my observation:
1. It appears that the gap between the top and bottom is too wide. 3.5 max between top and bottom would be my guess depending on how much
material is in there.
2. I think your cross tubes are too wide at the tip and tail for the radius you are using on your ski. Perhaps some 1/2x 1 around the tip would work better. The big tube is real good for flatness. Good job there.3. I am guessing that your airbags are too long. The combination of too much gap and too long of an airbag would cause what I call 'bridging". The airbag wants to become a straight tube when inflated. Because you have a tip and tail bent up at the ends, the air bag puts pressure at the ends trying
to straighten itself. The combination of the gap, length and maybe too
much air pressure would cause you problems. (What is your pressure)
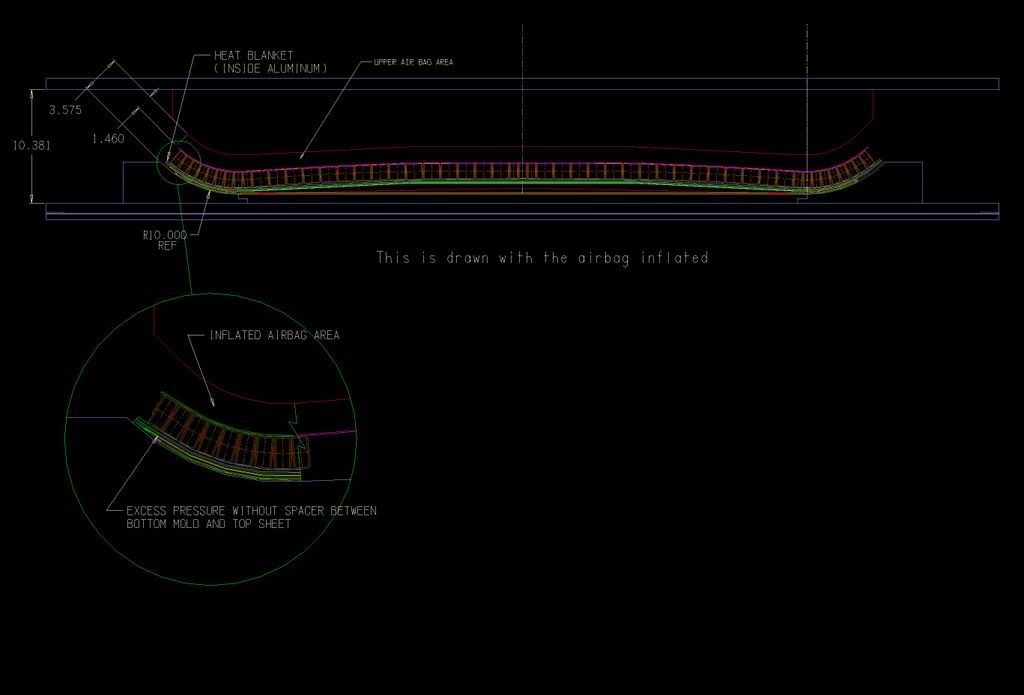
4. One suggestion that I would make on your molds is to carefully figure
what your layup height is going to end up being and make a metal spacer
at the tip and tail ends that keeps the molds from pinching together. If you notice when the molds are closed by the airbag, the topsheet and the bottom mold will pinch together at the ends. This causes excess pressure
on the ski which squeezes all the resin out of the glass which will cause delemaniations.
Perhaps you could post two pictures with a side view with the airbag empty and with everything in the mold with the airbag inflated. I could probably see more of what is happening.
1. It appears that the gap between the top and bottom is too wide. 3.5 max between top and bottom would be my guess depending on how much
material is in there.
2. I think your cross tubes are too wide at the tip and tail for the radius you are using on your ski. Perhaps some 1/2x 1 around the tip would work better. The big tube is real good for flatness. Good job there.3. I am guessing that your airbags are too long. The combination of too much gap and too long of an airbag would cause what I call 'bridging". The airbag wants to become a straight tube when inflated. Because you have a tip and tail bent up at the ends, the air bag puts pressure at the ends trying
to straighten itself. The combination of the gap, length and maybe too
much air pressure would cause you problems. (What is your pressure)
4. One suggestion that I would make on your molds is to carefully figure
what your layup height is going to end up being and make a metal spacer
at the tip and tail ends that keeps the molds from pinching together. If you notice when the molds are closed by the airbag, the topsheet and the bottom mold will pinch together at the ends. This causes excess pressure
on the ski which squeezes all the resin out of the glass which will cause delemaniations.
Perhaps you could post two pictures with a side view with the airbag empty and with everything in the mold with the airbag inflated. I could probably see more of what is happening.
Cadman,
Thanks for the reply. On this recent setup I pressured at 40psi (room temp) for about 30 minutes then increased the pressure to 50 psi. After about 1 1/2 hours I put the press into the oven (room with a pellet stove where the temp gets up to 90 -100*). I left the set up in there until the AM (about 18 hours). This is not normal for me but I had many things going on that day and just could not get back out to the shop until the AM.
What would you suggest for the hose length? Once the pressure is in the hose it would be static pressure and therefor equal in all directions (?). So if the hose is unobstructed would the extra length matter? I will probably shorten them anyway and use one bar to secure both hoses together anyway. Or just make new hoses all together.
I like the idea of the 1/2 x 1" tube for the tip and tail. I was not really keen on spending $ for all new tube material and your suggestion sounds logical to me.
I can try to get a pic of the press form the side and then one inflated showing the gap at the ends. The only problem is the darn dial-up and pictures take a L O N G time. But I'll do it anyway. (no highspeed in our area).
I tried to figure the spacing betweent the top and bottom mold to be close. I believe if I were to get any closer I would have a hard time sliding the set-up in (end load). The tip and tail blocks will hit the hose.
Thanks much for the help and look for the pics sometime late Thursday(I'm still at work).
rockaukum
-
Cadman
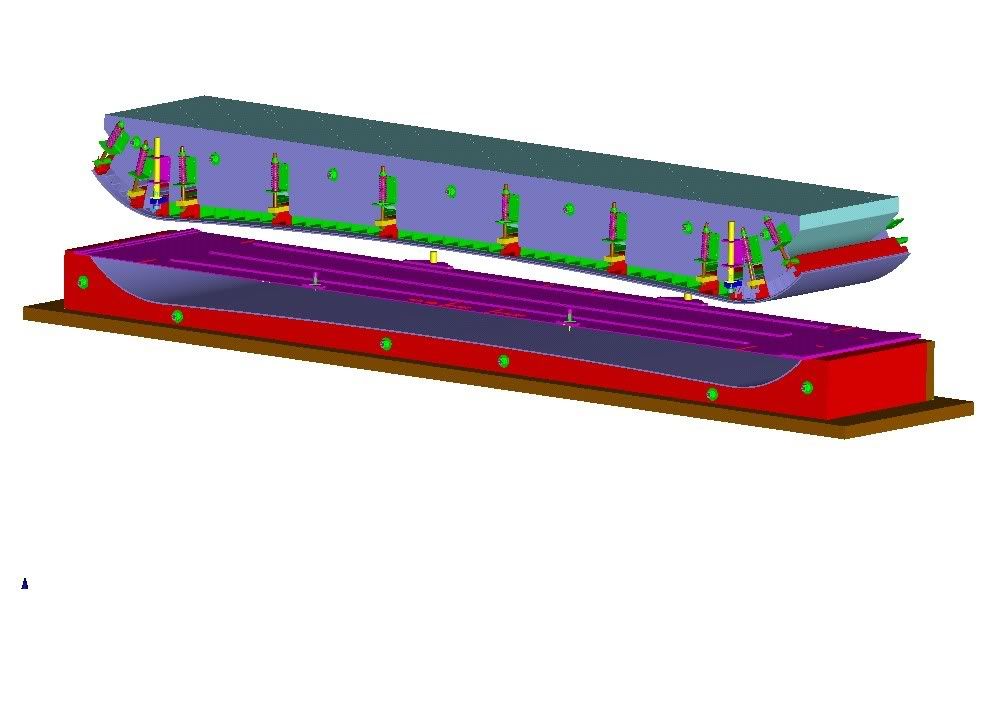
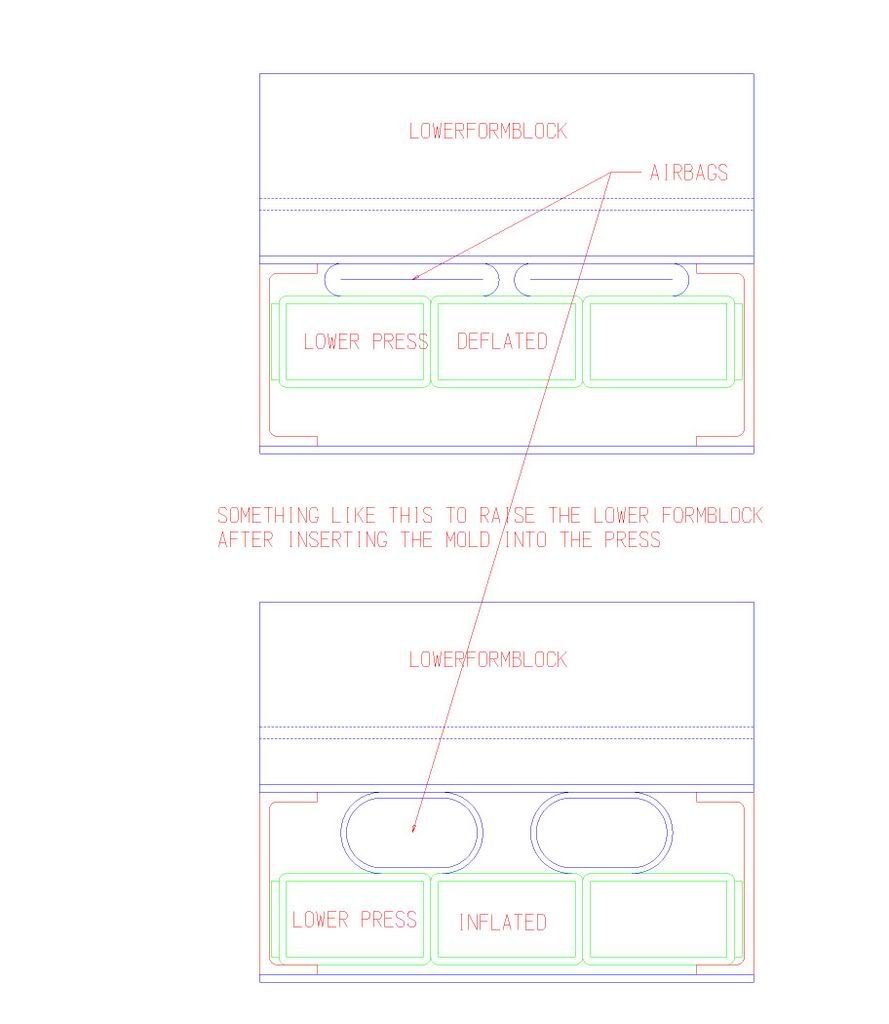
I have seen some press setups where they used an airbag to raise the bottom formblocks up so they could use a flat cassette layup that would
partially form into shape. They had it set up so they could shove some 2 inch round bar through some holes in the bottom tubes to keep the bottom
from moving down and then fired off the top airbags to finish pressing the
upper module and molds together. It is a poor mans way of making a
hydraulic press. The problem of using two opposing airbags without the
round bars is that they fight each other. The beauty was your cassettes
will return to almost flat when you relieve the pressure. Send me your email address and I will send you some pictures of some modules.
 [/img]
partially form into shape. They had it set up so they could shove some 2 inch round bar through some holes in the bottom tubes to keep the bottom
from moving down and then fired off the top airbags to finish pressing the
upper module and molds together. It is a poor mans way of making a
hydraulic press. The problem of using two opposing airbags without the
round bars is that they fight each other. The beauty was your cassettes
will return to almost flat when you relieve the pressure. Send me your email address and I will send you some pictures of some modules.
[/img]-
Cadman
I would guess that you would want to keep the hose from going too much
past the end of the tubes. You may want to put another piece of aluminum
between the tubes and your top mold sheet. If the tube gets too far past the end of the cross tubes, it tends to bridge and will create problems
with pressure down in the bend as you stated.
past the end of the tubes. You may want to put another piece of aluminum
between the tubes and your top mold sheet. If the tube gets too far past the end of the cross tubes, it tends to bridge and will create problems
with pressure down in the bend as you stated.
cadman,
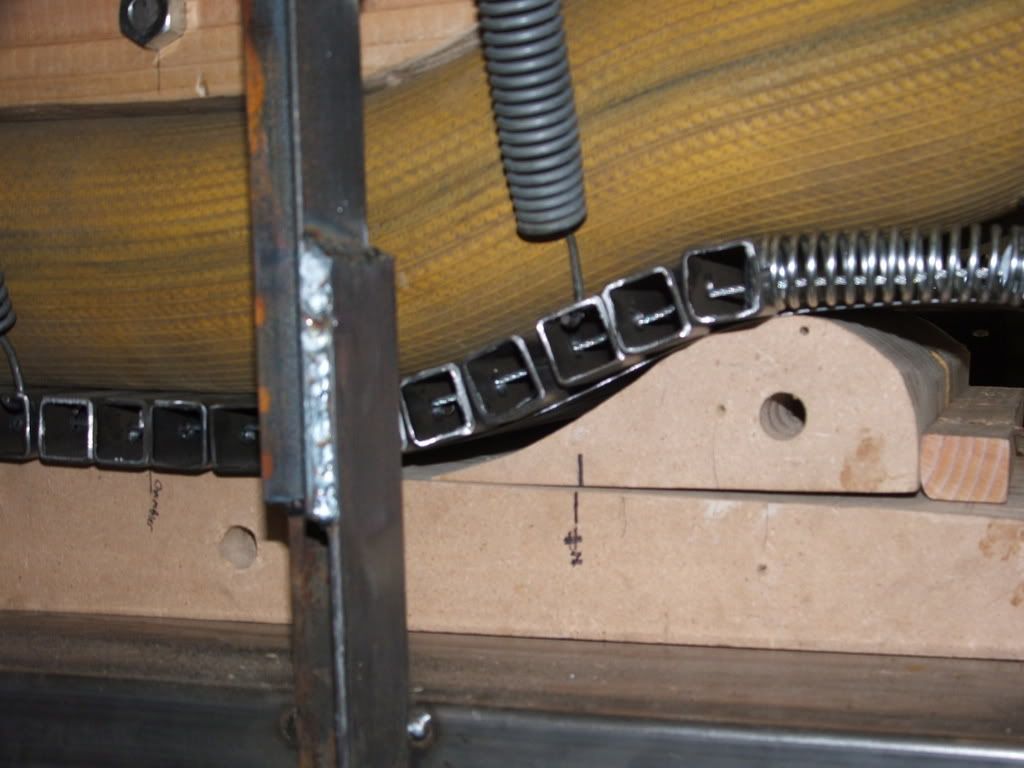
here are some pics of the press (no skis in it). There is sheet metal above and below the ski layup. I'm tending to go for the following two items:
1. shorten the hose length, and combine the clamps to make one unit, and
2. remove the 1 x 1 tubes at the ends and replace with 1/2 x 1 tubes in the area of the tip and tail.
What do you think?
The press uninflated
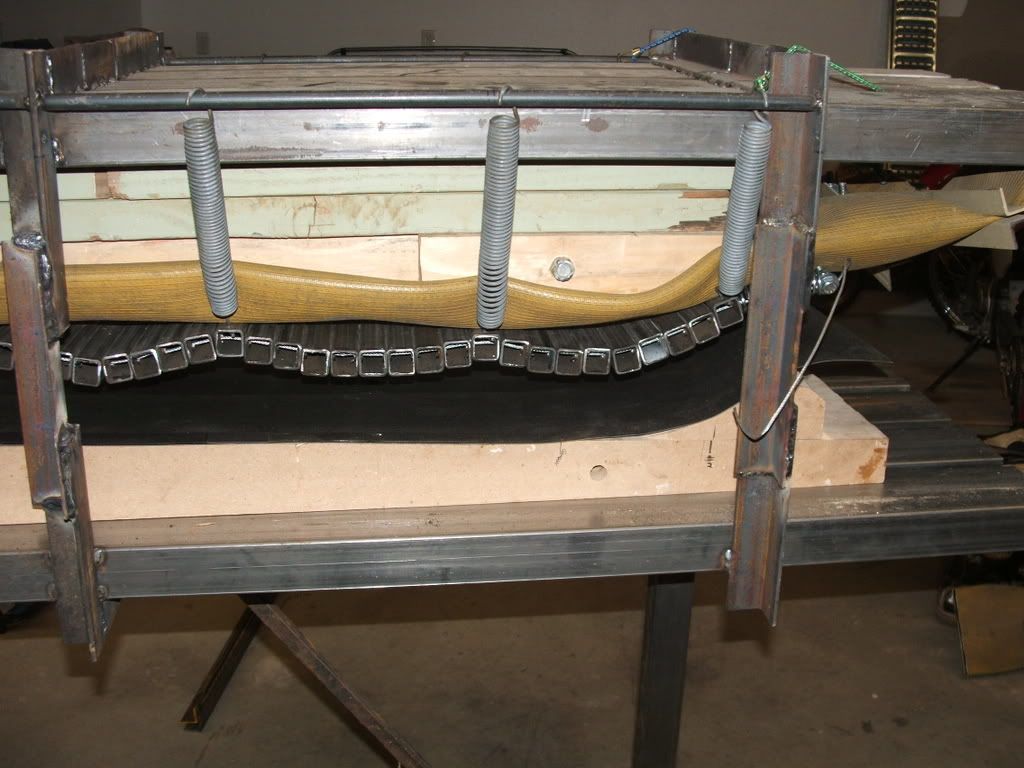
One end under pressure
Other end under pressure
here are some pics of the press (no skis in it). There is sheet metal above and below the ski layup. I'm tending to go for the following two items:
1. shorten the hose length, and combine the clamps to make one unit, and
2. remove the 1 x 1 tubes at the ends and replace with 1/2 x 1 tubes in the area of the tip and tail.
What do you think?
The press uninflated
One end under pressure
Other end under pressure
rockaukum,
it looks to me like the distance from your cattrack to your mold is too large. i'm running 2" right now and it seems to be working really well.
when i did the first test runs after finishing my press, the distance from track to bottom mold was 2 3/4" (with no board). at this dimension i was having the same problem at 40psi. it took about 50-60psi to get the track to competely contact the radius of the tip blocks. adding a 3/4" piece of mdf under the bottom mold made the difference. i believe you mentioned
your hoselines were inflated to 4" when pressing, i feel this provides too little surface area pressing upon your cattrack especially in the tip/tail
radius which requires a little more from my expieriences (surface area X pressure= actual pressure as opposed to what is read on a gauge). i don't feel extra length of the hoselines is a factor as mine are at least 6" longer on each end and have seen a bunch of production press pictures with them hanging past the press frames. i'm running 3/4X3/4"
cattrack elements but i believe 1" tubes is pretty standard for the mass production guys so this should work for you as your tip/tail radius are mellow. hope this helps. this is just my opinion. PM me if you would like to talk more about this.
jason
Hydrant,
Thanks for the reply. Just a few questions for you. When you say the distance between the track and the mould is too large and yours is about 2", how are you loading the mold with the layup into the press? I have cut down the height of my tip and tail blocks quite a bit but with a 2" gap I wouldn't be able to get my layup into the press? I have to end load. This pressing was at 50 psi and the hose shuould inflate to a full 5" so there should enough to close the gap? Maybe I need to install the bottom mold into the press then slip some filler under the bottom mold after to fill the gap? I'll try a that on Sunday to see if it works.
rockaukum
Rockaukum,
I agree with Jason regarding the distance between the cattrack and the mold. Anything over a 2 inch gap seems to make it more difficult for the bladder/cattrack to uniformly comply with the tip and tail curves. I also noticed another possible problem source. I looks like the last cattrack tube and the aluminum bottom sheet are being 'clamped' to the very top of the tip/tail block (by the pressure of the inflating bladder) before the bladder has a chance to push the lay-up down to conform the the tip/tail curve. In order for the bladder to push the layup down into the mold curve, the aluminum sheet and the cattrack need to be able to 'give' a little bit so as to 'slide' down into the mold curve. As I see it in the picture, the cattrack looks like it is quite impinged and unable to slide into the curved mold section. As you said in a prior post, you needed to reduce the height of the tip and tail blocks. If the tip and tail blocks were a bit taller, or the cattrack and the aluminum sheet were a bit shorter, they might conform better under pressure. I have always kept my pressing layers only slightly longer than the ski lay-up and they have always conformed nicely to the mold curves. However, it's easy to see, that as I inflate my bladder, it takes almost the full inflation pressure (50psi) before the tip and tail curves are fully seated into the mold curves. If my pressing layers (1/2 inch thick and similar to a cattrack) were long enough to actually wrap over the tip and tail block tops, I'm pretty certain that I'd be experiencing problems similar to ones you are having.
Yes, it is a tight squeeze to get the lay-up assemble into the press if you just have a couple of inches between the bladder/cattrack and the mold base. I built my press so that I can easily raise and lower the top mold assembly. I like your idea of shimming up your bottom mold after inserting your lay-up... sounds like it should do the trick.
Good luck,
G-man
i agree with g-mans suggestions about reducing the cattrack length and
lower cassette length. as g-man said, i also only extend the cassette and
track past the length of the board about 4cm or so on each end and feel that this allows for better conformance into the tipblocks. the combination of this and reducing the amout your bladder needs to inflate should solve your problems. also as g-man said, making your tip blocks taller may help
by keeping the bladders inline with the radius curvature for a longer distance before they start forming downward around the top of the tipblocks. i would try this last because making new tipblocks is a real pain in the ass.
my press is front loaded so i can get away with the 2". i want to try to get the distance even less eventually but as it is with the board layup in the cassette it is getting tight as it is and takes a little muscle to get the layup
into the press. each board is getting a little easier though as i get more
proficient at the process. in your case with endloading i like your idea of
shiming the lower mold once its in the press. another option could be to
stack the track, bladders, and top mold before hand and load it all at once
(sure to be really heavy), then shim the gap between the top mold and upper press beams with wood, mdf or whatever. i think armada does it this way and has a video somewhere on the forum that demonstrates this
method. with the shimming you should be able to get less than a 2" gap,
i personally feel less is better. playing with the upper mold length will help you get everything really dailed in also, as the bladder expansion space
becomes tighter the upper mold length may become more critical.
just some ideas. i think you are on your way to consistant pressings really soon.
jason
-
Cadman
 [/img
[/imgMaybe you could make some kind of arrangement like the above drawing to allow space to load the mold in and then fire off the lower airbags that
pushes the lower formblock up into place. You could add in some kind of round bar arrangement to hold the formblock up in position so it does
not fight the top airbags or just have more air pressure in the lower ones.
This would allow you to have less space between the mold and the upper
formblock as well as being able to end load your mold.
I would definately not have any crosstubes past the end of the mold or
you will get the "bridging" that the other two posts mentioned which keeps
the mold from closing down in the radius of the tip and tail. The extra gap
above the mold also contributes to the pressure problem.