Mikey's Ski Press
Posted: Thu May 02, 2013 11:45 am
Hey Everyone,
I have been on the site for a little bit now and I would like to share my ski press experience. I wanted to get on this earlier but between work and late nights in my garage....well lets just mark it up to laziness. I have to say in the past few months I have learned a ton from this forum and YouTube University! Thank you to all and I am very excited to give back and learn more lots lots more.
This is my Ski Press
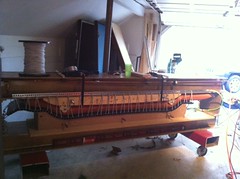
Made from 4 8x8 I-Beams and 2 8x12 I-Beams. Very similar to happy monkey mixed with a few other ideas. After pressing this past winter there are some modifications i want to make during the spring.
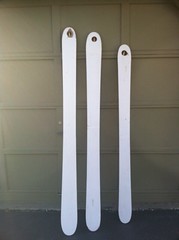
I made three templates this past winter. I am not sure if it was because i am really bad at cutting or did not spend enough time with the fine details but i had some issues. to my eye they would look like good templates but then when i would put the edges on i would see one side had way more side cut then the other side. These are times when i wish i had a cnc machine.
I had some difficulties with edges in the beginning but then after doing it a few times and reading up on it, it sounds like any thing that works for you go with until you find something better.
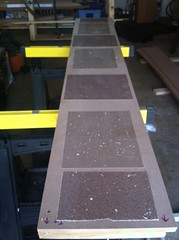
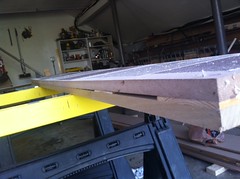
For core profiling I made a planner crib. At first I made a router jig but i had problems getting an even finish. I then went to a planner crib and found that this works best for me.
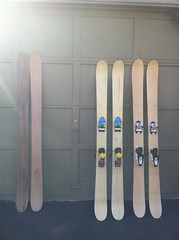
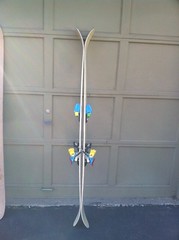
It was not easy for me to get to a ridable pair of skis this year. I had tons of issues from what i call “epoxy pools” (ripples under base and top sheet), concave base, ski was too soft, ski was too hard etc.. most of these issues i was able to fix with timing and temp of heat along with pressure. Still playing around with some things but each pair gets better and better.
I had one pair i was on all season and one at the end of the season where i played around with camber under foot to early rise/ reverse camber. they both skied well and i enjoyed them throughly but i could definitely tell side cuts were a little different.

Like I said I am spending some time right now to configure my shop to make things a little easier. Also i was lucky enough to come across a sublimation printer and right now I am working on a sublimation table to do graphic. I am trying a very simple method where i have hinged two pieces of wood together (closet door size). I am not sure if this will work but basically i am just going to put a heat pad along with the top sheet and transfer paper and just clamp it all together. Eventually i want to build a machine press to do it but i have no clue where to start right now. If you have any input i would greatly appreciate it.
Also on a side note I have been playing around with a name and would like the feed back from some people in the industry. friends and family seem to like it, but random people on the street or at the mountain see it as too negative.. the name is called Frostbite. I have a long way to go before it is ever a company if it is, but I would like to call my workshop/garage something.

Again thanks for all the help.
Mikey Migs
I have been on the site for a little bit now and I would like to share my ski press experience. I wanted to get on this earlier but between work and late nights in my garage....well lets just mark it up to laziness. I have to say in the past few months I have learned a ton from this forum and YouTube University! Thank you to all and I am very excited to give back and learn more lots lots more.
This is my Ski Press
Made from 4 8x8 I-Beams and 2 8x12 I-Beams. Very similar to happy monkey mixed with a few other ideas. After pressing this past winter there are some modifications i want to make during the spring.
I made three templates this past winter. I am not sure if it was because i am really bad at cutting or did not spend enough time with the fine details but i had some issues. to my eye they would look like good templates but then when i would put the edges on i would see one side had way more side cut then the other side. These are times when i wish i had a cnc machine.
I had some difficulties with edges in the beginning but then after doing it a few times and reading up on it, it sounds like any thing that works for you go with until you find something better.
For core profiling I made a planner crib. At first I made a router jig but i had problems getting an even finish. I then went to a planner crib and found that this works best for me.
It was not easy for me to get to a ridable pair of skis this year. I had tons of issues from what i call “epoxy pools” (ripples under base and top sheet), concave base, ski was too soft, ski was too hard etc.. most of these issues i was able to fix with timing and temp of heat along with pressure. Still playing around with some things but each pair gets better and better.
I had one pair i was on all season and one at the end of the season where i played around with camber under foot to early rise/ reverse camber. they both skied well and i enjoyed them throughly but i could definitely tell side cuts were a little different.
Like I said I am spending some time right now to configure my shop to make things a little easier. Also i was lucky enough to come across a sublimation printer and right now I am working on a sublimation table to do graphic. I am trying a very simple method where i have hinged two pieces of wood together (closet door size). I am not sure if this will work but basically i am just going to put a heat pad along with the top sheet and transfer paper and just clamp it all together. Eventually i want to build a machine press to do it but i have no clue where to start right now. If you have any input i would greatly appreciate it.
Also on a side note I have been playing around with a name and would like the feed back from some people in the industry. friends and family seem to like it, but random people on the street or at the mountain see it as too negative.. the name is called Frostbite. I have a long way to go before it is ever a company if it is, but I would like to call my workshop/garage something.
Again thanks for all the help.
Mikey Migs