
to my experience dealing fiberglass baby powder helps substantially to reduce skin irritation. And it's a lot cheaper totwizzstyle wrote:
Wear it when you trim flashing. I don't have one, but it's been on my want list for a long time. I wear glasses and a respirator, but the exposed skin gets pretty itchy afterwards.
David's yet to be named thread
Moderators: Head Monkey, kelvin, bigKam, skidesmond, chrismp
-
MadRussian
- Posts: 712
- Joined: Thu Sep 30, 2010 12:32 pm
- Location: USA
-
knightsofnii
- Posts: 1148
- Joined: Tue Jan 08, 2008 6:02 am
- Location: NJ USA
- Contact:
-
MadRussian
- Posts: 712
- Joined: Thu Sep 30, 2010 12:32 pm
- Location: USA
to my experience baby powder work better than sunscreen and it cheaper.knightsofnii wrote:or even lotions or something like sunscreen,
whatever will block your pores.
and when you wash, dont' use hot water, rinse hands/forearms with cold water.
i get itchy no matter how much i suit up, i've been wearing tyvek painter suits, taping my wrists, wearing gloves, i still get it on me!
Tyvek suit no fun to be in for any period of time. If you tape wrist you should tape gloves to the suit also not surgical type gloves but thicker yellow loose kind.
My personal approach loose close. Longsleeve dress like short NO sweatshirt type cuff , a lot of baby powder on your face neck and arms under the shirt above elbow
Got my bamboo the other day. Its not 100 perfect bit it will do.
Going to get some poplar on the weekend. Going to have a strip of bamboo in the middle for binding pretension, a strip of poplar either side and then another strip of bamboo on the outside each side.
Making my edge bender at the moment. Made a mock up out of some brackets I had but they are really bendy. Got some square tube and am working on that now.
-
twizzstyle
- Posts: 2204
- Joined: Tue Mar 07, 2006 8:25 pm
- Location: Kenmore, Wa USA
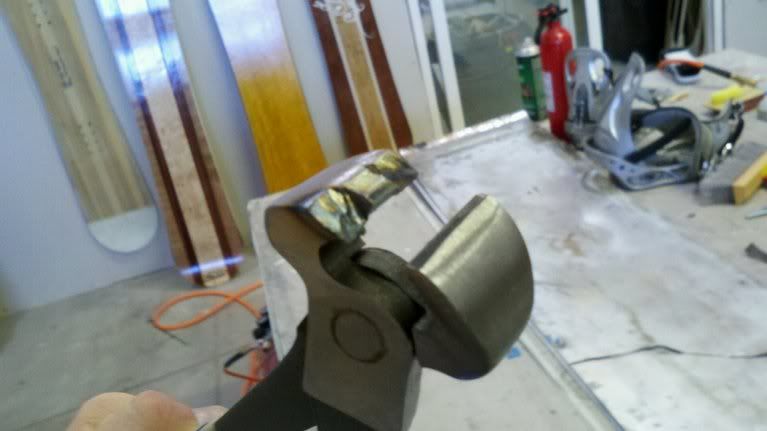
If you want an easier/cheaper option for edge bending, just get some tile nippers and grind them. I built myself a fancy 3-die adjustable edge bender years ago, and now find I'm faster and do a better job with my modified tile nippers. And that cost like $10 total!the.quass wrote: Making my edge bender at the moment. Made a mock up out of some brackets I had but they are really bendy. Got some square tube and am working on that now.
http://i876.photobucket.com/albums/ab32 ... 796265.jpg
(not my picture, I also have the middle of the opposite side ground out)
-
knightsofnii
- Posts: 1148
- Joined: Tue Jan 08, 2008 6:02 am
- Location: NJ USA
- Contact:
I had seen that on here before but liked the look of the vice setup I had seen twizz make. I will grab some on the weekend. Have to go to masters to get some poplar and glue anyway. Thanks!
Might continue making this anyway for fun. My mum's partner has a lathe and said he can spin me up some of the pieces needed however I want them so that is cool. He suggested a spot for bearings as well but that sounds like overkill to me.
Might continue making this anyway for fun. My mum's partner has a lathe and said he can spin me up some of the pieces needed however I want them so that is cool. He suggested a spot for bearings as well but that sounds like overkill to me.
-
twizzstyle
- Posts: 2204
- Joined: Tue Mar 07, 2006 8:25 pm
- Location: Kenmore, Wa USA
Had a nice weekend this weekend. Got to go to Masters and buy some stuff for the project. Got some nice clamps and some pretty good little clamps for sticking edges.
Any aussies on here that are looking for Poplar, Masters has it. They import it through their lowes connections. The guy in the store grilled me about why I was asking for poplar as he was sure nobody would know what the hell it is.
Also got some gorilla glue to glue some stuff together.
Have split my bamboo and poplar and glued it together. Will see how we go. Leaving it all clamped to the bench over night.
I have my router bridge ready to go and may thicknes my first core this week. I am excited and scared
As far as the core layour goes, I have a strip of Bamboo in the middle for binding retention, a strip of poplar on either side about 60mm wide and then a strip of Bamboo on the bamboo each side of that. Fingers crossed that is good.
profiled 2 cores on the weekend. I did the first one and splintered the ends as I went from 1cm it 2mm in one go. Should be able to save it by using tip fills. Am going for full timber in the other one. Learned that lesson and did the next one with a bunch of passes. Worked really well! Was really happy!
Have to work out how I am going to drill out my binding tnuts ad so forth now. Shouldn't be all that hard but want to do it right.
I am ordering my vac pump right now.
D
Have to work out how I am going to drill out my binding tnuts ad so forth now. Shouldn't be all that hard but want to do it right.
I am ordering my vac pump right now.
D
Hey Guys,
So I had a crack at pressing my first board on Friday.
I am not sure I would have called it a success. It seems kinda like it worked.
So I layed everything up and it looked like it was going well. The problem came when I tried to bag it up. I hadn't put a layer of plastic under the board that I could wrap around and some epoxy had gotten onto my double sided tape that was meant to stick the bag down. Once the epoxy touched anything it became almost impossible to get ANYTHING to stick in that spot. I got it under vacuum but it was a good hour after initial layup started. Swearing and throwing of stuff had been going on for a good 20 minutes by this time. Once vacuumed up I rolled it and all seemed to be going well. After about 8-10 hours under vacuum (I thought the longer the better ) I undid the vacuum and let it sit over night.
In the morning I unbagged it and took it out of the mold. From first inpections the base looks nice and flat I won't know till I cut it all out and have a good look. The biggest issue I have come up with is that some of the epoxy looks like the ratio's may not have been 100. I made 3 batches. The first two look like they worked well and the epoxy is rock hard. The last batch was a smaller batch and only got used as a skim coat on the veneer. It's a bit of a waste but I wanted to do it right. After 48 hours it is still slightly sticky to touch on the top. I had to go to the country to visit family so I just left it and hoped to come home with it firmed up. It is less sticky but not glassy by any stretch.
So guys, what are my options?
1. Sand/scrape it all off and varnish it?
2. brush hardener onto it???
4. remove and re-veneer?
5. Something I haven't even thought of that you smart guys would have.
I wanted to post a bunch of pic's but when you are doing this on your own with nobody home it's hard enought getting everything wrapped up let alone working out how to take pics without epoxying the camera to your hand. I have a couple of pics but will post them with the others when I cut it out and fix this current issue. Looking forwards to your answers
So I had a crack at pressing my first board on Friday.
I am not sure I would have called it a success. It seems kinda like it worked.
So I layed everything up and it looked like it was going well. The problem came when I tried to bag it up. I hadn't put a layer of plastic under the board that I could wrap around and some epoxy had gotten onto my double sided tape that was meant to stick the bag down. Once the epoxy touched anything it became almost impossible to get ANYTHING to stick in that spot. I got it under vacuum but it was a good hour after initial layup started. Swearing and throwing of stuff had been going on for a good 20 minutes by this time. Once vacuumed up I rolled it and all seemed to be going well. After about 8-10 hours under vacuum (I thought the longer the better
In the morning I unbagged it and took it out of the mold. From first inpections the base looks nice and flat I won't know till I cut it all out and have a good look. The biggest issue I have come up with is that some of the epoxy looks like the ratio's may not have been 100. I made 3 batches. The first two look like they worked well and the epoxy is rock hard. The last batch was a smaller batch and only got used as a skim coat on the veneer. It's a bit of a waste but I wanted to do it right. After 48 hours it is still slightly sticky to touch on the top. I had to go to the country to visit family so I just left it and hoped to come home with it firmed up. It is less sticky but not glassy by any stretch.
So guys, what are my options?
1. Sand/scrape it all off and varnish it?
2. brush hardener onto it???
4. remove and re-veneer?
5. Something I haven't even thought of that you smart guys would have.
I wanted to post a bunch of pic's but when you are doing this on your own with nobody home it's hard enought getting everything wrapped up let alone working out how to take pics without epoxying the camera to your hand. I have a couple of pics but will post them with the others when I cut it out and fix this current issue. Looking forwards to your answers

Put it somewhere warm for at least a week before you do anything else. It is pretty cold at the moment and if it is less tacky after 2 days then the cure is continuing.
Don't try and add hardener.
Heat and time may set things right.
After that sand it back to the veneer and finish with clear coat.
Don't try and add hardener.
Heat and time may set things right.
After that sand it back to the veneer and finish with clear coat.
Don't wait up, I'm off to kill Summer....
I wouldnt be pressing without heat here in oz till it warms up. I have had no luck with using a skim coat of epoxy on the veneer, leave it dry, sand to perfection and use polyurethane to seal it IMOthe.quass wrote:Hey Mate,
Will do.
My house is really cold so I will have to find somewhere to put it that is warm. Maybe I can get the heater turned on. Might get the dryer out as well.
Domo Arigato Gozaimaaaaass. I used the entropy that doesn't need heat so I thought it would be ok. I had another look today and it looks like it's slowly hardening. I have used a scraper to see if I can scrape some of the tacky stuff off in one patch and have scuffed it up on another. I am going to sand it anyways so it's not a big deal as long as I am not stupid.
Wil keep you updated. Hopefully I will have some sweet pics of my Jarrah veneer board in a week or two.
Wil keep you updated. Hopefully I will have some sweet pics of my Jarrah veneer board in a week or two.