Page 1 of 10
Ski building awesomeness 12/13
Posted: Tue Sep 25, 2012 7:11 pm
by skimann20
Hello All,
Well I pulled the trigger. I Finally took the leap. After reading all that you've all typed I have finally saved enough money to go off the deep end. Thank you all for all the help you have provided so far!
Well here I go...
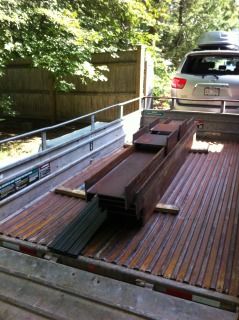
In the beginning, there was steel that I bought from a surplus yard.
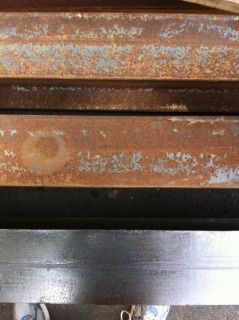
well I wasn't happy with the amount of rust on them so I took a wire brush to them and then treated them with a wash. Notice the top two have not been treated and the bottom one has:
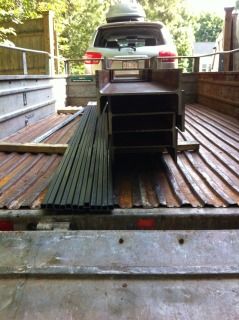
I drug them into my basement, all 315lbs of each beam. My wife was slightly upset with me doing this by myself (actually there she was way more then slightly)... Once I got them down there, I put some paint on them.
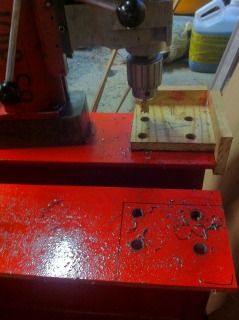
Then it was time to drill them, I didn't want to weld the press because I needed to be able to get them out of the basement if I ever move. So Grade 8 Bolts is the way I went. 5/8" bolts with 11/16" holes. 64 of them... awwwyeah. plus 16 holes for the casters.
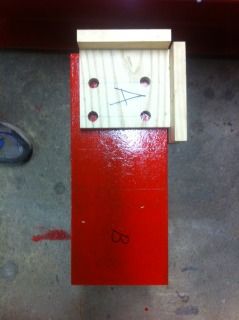
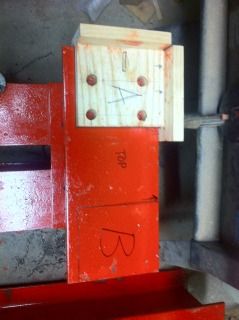
Here is a photo of the mag-driller, I used the template to line up the drill then removed the template before drilling. One side of the template has an "A" and the opposite side has "B" that way everything line up. make sure you use lots of cutting oil, i ran this drill just above 3 on the dial and take YOUR TIME! I rushed the first bit and SNAP!
This was my first crap-ola. I had to rent the drill twice so -$70 not accounted for in the budget and another $42 bit.
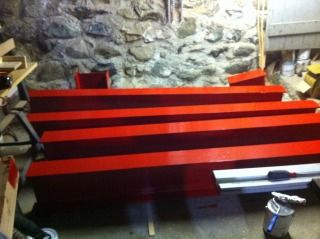
 and drum role!!!!
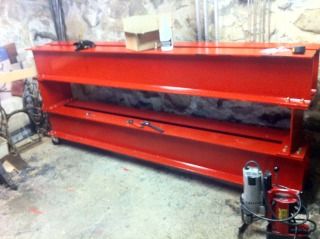
Bam! I'm a proud parent of a 9' L x 16"W x 14"H 1330lb red beast.
More to come.
Cat Track and Fire Hose.
Posted: Tue Sep 25, 2012 8:30 pm
by twizzstyle
Beautiful. Lots of nice new presses popping up this year, I'm getting press-envy

Welcome to the insanity, good luck on your journey, you'll need it!
Posted: Tue Sep 25, 2012 8:36 pm
by Dr. Delam
Nice work! You must be strong like bull to tackle that solo. My press disassembles as well and I have had the displeasure of moving it around a couple times but always with a helping hand.
You'll come to realize that a good way of getting your wife to understand all this ski building nonsense is to build her a pair of skis.
Posted: Tue Sep 25, 2012 8:58 pm
by More
I feel your pain on the hole drilling. The memory is fresh enough to be painful.....
Hawt frame

Posted: Wed Sep 26, 2012 3:38 pm
by skidesmond
Glad to see you finally pulled the trigger! That press kicks ass. Surprised you didn't bust a nut bringing the steel into the basement. And as far the cost over run?, get used to it :-) Looks awesome!
Posted: Thu Sep 27, 2012 6:42 pm
by skimann20
Hey thanks all. Core strength, core strength.

I've already decided to replace the casters. they blow. dang it, didn't follow my number one rule... 1. "poor people" spent money twice.
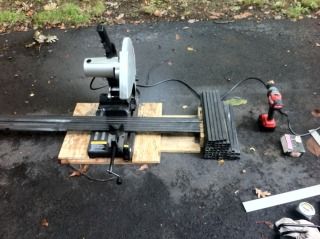
That being said. Picked up a chop saw yesterday for the cat track. Ultra clearance sealed box. Saved over 70%, had to be priced wrong...
booya!
Also picked up:
1.) Heating blanket control box and wire.
2.) (2) SSR
3.) (2) PIDs
4.) Wire for cat track (still need to get the springs, blanked it)
5.) All the fittings for the fire hose, I'm doing push to connect.
On order:
Aluminum for cassettes.
More photos this weekend.
Posted: Fri Sep 28, 2012 4:45 am
by knightsofnii
you're right about poor people paying twice for things...
however,
you're going the right route with the press.
Press should be a custom build... every shop has its own needs and wants and goals...
Someone else building your press should only be done to your own designs and tons of consultation, or else you'll end up with someone else's design's features and flaws.
You'll rebuild it 3 times for sure or perhaps you will nail it, but at least you didn't spend allll up front $ to realize you have to custom build it anyway
.
good job.
Posted: Fri Sep 28, 2012 7:00 pm
by skimann20
So i'm fairly certain I think I've read every post on this forum and have not come across Amperage requirements of ski building. Well I guess i've hit a bump in the road. My 1860 house does not carry the amps that i need for the heating blankets. o crap!
so i was quoted by one company that two 120V blankets will require 2 x 20 amp breakers or 240v would only require 1 x 20amp breaker. on top of this i still would need to supply power to the controller. (I had another company quote 25amps a blanket)
How do I get around this one... (no more room in the panel)
1.) Pay to upgrade the service to my house from 100amp to 200amp, and sleep well about this challenge. I really don't want to go with this option because I'm thinking of selling this house in a year or two and that would be waist of money. Plus I would like to spend this money on ski building not a service panel.
2.) Run the heating blankets off my generator. O boy my neighbors will hate me. But I'm thinking this is a good short term option.
3.) anyone else have a good idea? (besides only using one blanket)
hummmm. This is a good one.
Posted: Fri Sep 28, 2012 8:38 pm
by Cornice
Use 240V it requires way less amperage. Amperage will depend on the size of your blankets. My blankets are 14"x85" in size. They are 240Volts rated at 2083 watts. Sooo...
2083w/240v= 8.68 amps.
I just ran my 240v off my dryer breaker since i have a gas dryer. You also may have a 240v range/oven breaker that you can rob power off of. If you do this just dont run both at once.
The PID controller uses almost nothing probably less then 1amp.
Posted: Fri Sep 28, 2012 9:15 pm
by troublemaker
The heat mats I build pull about 11.5 amps each @ 120VAC, 1400watts and they get plenty hot, right around 220*F. The controllers don't pull any power maybe half amp. And my 240VAC mats pull 6 amps and make 1440 watts. To put this into perspective your wife's blow dryer is around 1875watts. Now you can run 2 120VAC blankets off of a 20 amp breaker but suggest a 25 amp. Remember if your shop has lower voltage say 110-115 VAC your current draw is going to go up (my shop has 117VAC). More voltage less current draw. Also a 240VAC circuit already has two breakers one for each phase, usually 15-20 amps each.
Posted: Sat Sep 29, 2012 4:23 am
by skimann20
Both excellent suggestions.
When they ran the sub panel they put a breaker in for everything under the sun (to code) window ac units, microwave, dishwasher. I think I'll just put in juction boxes off the window ac unit line and maybe the microwave for the power.
Troublemaker: check pm
Cornice: 84"? Would you make it shorter. I was thinking 15"x80" or even 78"
Posted: Sun Sep 30, 2012 9:03 pm
by Cornice
My idea was to have pads long enough to press some speed skis for Arctic man. I doubt i will ever build anything like that. I would rather have 78" pads. Much more appropriate to what i am going to build.
Posted: Mon Oct 01, 2012 6:59 pm
by skimann20
Okay new update.
Time to cut the Cat track. I made a form that attached to my chop saw so that I cut each cat track at 15 7/8". this eliminated measuring them every time and made cutting go so much faster.
and to the guy on Skibuilders that stated he hand cut these... You have arms of steel and i want to buy you a beer.
Next I built a jig to gut the holes in the cat track so all the holes line up. I drilled all 416 holes with this technique and it went fairly fast. (take a guess what this clamp is going to get turned into?)
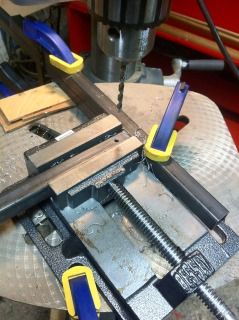
I bought 3/32 wire. it can hold up to 325lbs. I drilled 1/8" holes... word to the upcoming: DRILL THEM HOLES BIGGER!!! Also make sure you drill 4 holes per piece, i know this sounds silly but it is a very monotonous operation and you can miss one and I promise you'll figure it out when you have one side already strung up So i ended up re-drilling my 416 holes that were at 1/8" to 3/8" holes. so 832 holes... Awwww yeah!
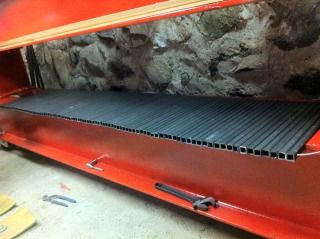
Cat track sitting in press:
Okay had another dip shit moment... My fire hose is 8" wide. I have two. so follow the math: 8 + 8 =16" with me so far? Well I cut my angle iron to seal the ends at 16". crap! so I was unable to seal the ends I have no overlap on the ends. anyone need 1.5" angle iron cut at 16"??? So I moved forward and cut the holes for the air inlets. Here is what I went with:
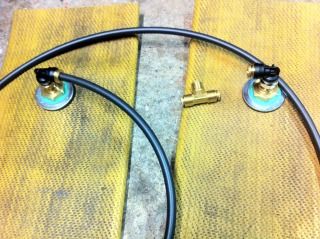
Push to connect is the only way to go in my opinion.
Next steps: the mold. I'm kind of up on the air with this one. Flat if I do one blanket, camber if I do two. I have to make a decision. The budget just doesn't allow for two. I just might have to bite the bullet on this one. i was thinking of adding a signature to my posts: "money spent to date" or maybe a "money spent to date vs tequila consumed"?
General Question:
When you made your bottom section of your adjustable mold, did you mock up a 192 ski side profile to get the large curve for the camber? and then have the tip and tail section just "float" along this curve.
That's what I was thinking.
Until the next update.
Posted: Tue Oct 02, 2012 4:37 pm
by knightsofnii
dont really understand your question about angle iron vs your 2 hoses.
If you're talking about the fact that you have 16" of hose and 16" of iron, and are worried the hose will get pinched/cut from the angle iron... remember your hose is 8" when flat... no? the entire hose will not be pushing your angle irons, you should make a few more (square tubes i mean) that are longer, like 20" so that you can hook up springs/cords to them to pull the whole cat track back up.
Posted: Tue Oct 02, 2012 5:52 pm
by skimann20
knightsofnii wrote:dont really understand your question about angle iron vs your 2 hoses.
If you're talking about the fact that you have 16" of hose and 16" of iron, and are worried the hose will get pinched/cut from the angle iron... remember your hose is 8" when flat... no? the entire hose will not be pushing your angle irons...
No I'm worried that the air will push past the end of the angle iron. It's literally right to end of the hose. I would prefer at least 1.5" past the ends and bolt it down. Does that make sence?