Funny I was charging my camera battery as you guys posted these pics.
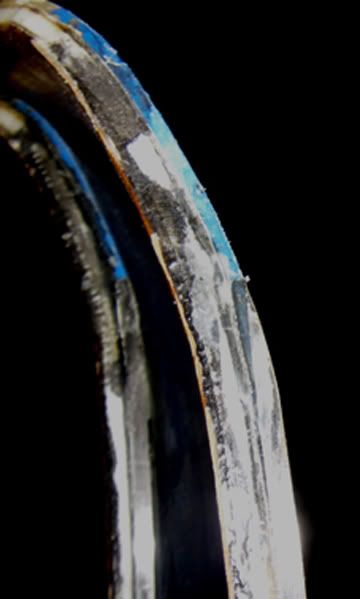
Really bad one from a while ago and my tip rise was very steep. Also my cattrack was 1.5 inch wide sections and my top mold fit poorly. Post grind. Not by me. This base also was thicker than the edge offset by like .3mm perhaps contributing to the edge fall issue.
Side of this pair you can see the grind.
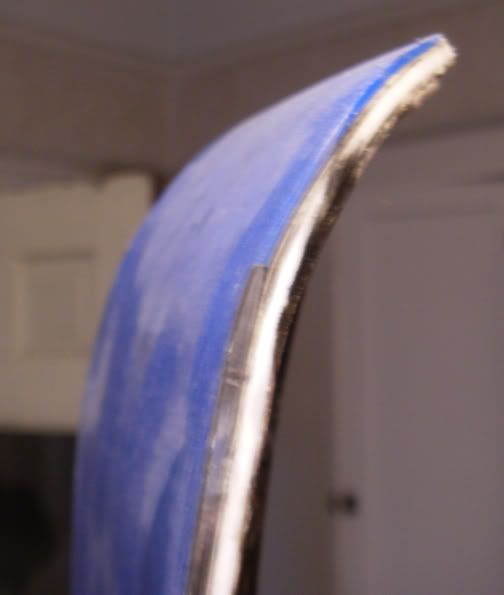
This is fresh from the press, unground, with a .75 inch wide oak cattrack and the fall here is in the tine of the edge. It looks much worse than it is, which is good because it illustrates what the issue is. This base is the correct offset and will grind clean but this is where I'm at now.
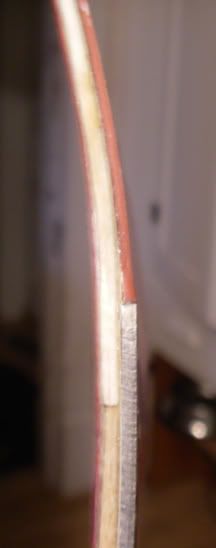
Side and you can see the fall is minimal.
Funny that pic looks like the core tip is thinner than the tip spacer.
MM - Thanks for the additional photos. Looks like we have found the source of the problem. Thanks guys!
In the end it's more cosmetic than anything else as long as it doesn't delam. I guess we're lucky to be at this point in our builds. When you get this close you want everything perfect.
(I'm tempted to try to fix it because the rest of the ski came out so nice, but it looks worse in closeup pics than it really is)
So a new cat track will be in the works before the next ski and careful placement of the layup into the press is on order.
I was planning on running tests w/ 3/4 wrap vs 3 piece full wrap because I thought that may have been a route (root?) cause of the problem, but will defer for now. If the new cat track and proper placement (and teflon?) fixes the problem then it's time to move on.
Yep, we've definitely given this problem a spanking! The cat-track is in play. I am guessing the smaller dimensions without deflection the better. This gives less of a gap between each spar when the tips of the track are pressed into place.
Once I slip roll my cassette, the only thing I could consider is a thin piece of hardboard between the cat-track and the cassette. I think the insulation I am using is my compression layer. Necessary - depending on results ...
Guys, when you go for a 3/4 wrap, are you thinking about whether the point at which the edge set ends is directly underneath a cat-track spar? I noticed that MM ends his edge just before the curve starts to really take effect and has probably annealed the very ends to soften them up? I wonder how much annealing the ends will allow you to extend the edges to a point of your choice?
This is how I position my cassette for consistent positioning - two in total. The peg is quite loose until I'm confident it won't get stuck!
SD, any chance you can talk about you cores - I noticed the dove-tail?
Richuk wrote:... Guys, when you go for a 3/4 wrap, are you thinking about whether the point at which the edge set ends is directly underneath a cat-track spar?....
SD, any chance you can talk about you cores - I noticed the dove-tail?
I never thought about whether a cat-track spar was directly over the end of the edge until now. Having that insulation probably helps is distributing the force. So a few more things to keep in mind for a better ski. I like the idea of the peg too. I have that on my to-do list also. I want to put a stopper on the opposite side of the press to ensure the entire layup is placed in squarely.
As for the core... I used maple and pine. Under the binding area is solid maple about 2 1/4 in wide and 15 inches long. I finger jointed the maple and pine so they'ed fit together. I used a table saw to do the finger jointing. Used Titebond exterior wood glue. Then I glued solid maple on each side of the maple/pine core for finished width of about 5 1/4 inches.
I did not shape the core or cut a recess for the metal edge this time... got lazy. However the results was excellent. The base is flat. Let me know if you have any other questions.
hey chuck, you have like washers or something between your cattrack sections?,
Not to beat a dead horse but regarding edge fall, I pressed some skis for a freind and I made sure to inflate slowly and press the tips and tail sections down when inflating and prebend the tip up and their was absolutely 0 edge fall. This pair was perfect.
I made the mistake of previously trying to keep my cassettes longer and go up and over the tip and tail mold. I guess the metal for this was just too thick and created that spanning and poor compression at the end of the 3/4 wrap.
Hes got a couple sheet of al in there and he puts a cassette in.
Yep - washers as spacers and they help the tips to bend. Well in my mind they did ; ) Springs were going to be expensive, so I used what I had in the garage. I made the mistake of building the cat-track to press one ski, so if I get chance to upgrade, I'll follow the folsom approach, as shown in your pic.
Glad to hear your getting perfect results.
I understand what your thinking about the metal being too thick, but is this the issue. My aluminium cassette is 1.3mm and is too thin - damage.
i think thats underfloor heating foil. pretty weak (usually about 100w/m²) but it works if you insulate your press well and your epoxy doesn't require really high temps.
Richuk wrote:
I understand what your thinking about the metal being too thick, but is this the issue. My aluminium cassette is 1.3mm and is too thin - damage.
.065" is the thickness of the al or 16ga or 1.65mm
It was too thick to overhang passed the tip spacer because I had span. Tough to bend that compound shape of tip rise and over the tip block so I cut it down and now have different cassettes for different length skis, something I was attempting to avoid.
the pic is iggys and when I do this again I will put .065" in the press and make my cassettes with the next smallest gauge maybe 1.3mm. Shouldn't see any damage with those other sheets in there also.
You see all those sheets of al already in the press? = good idea.
Hey SHIF - 160w/m2 per heater, maximum temp 70oC if you are prepared to wait. It was £40.00 for top and bottom heater v's £170.00 for one silicone blanket. Originally pressing at 40oC. I already had the insulation, so not a difficult choice at the time - low cost and low power consumption. Chrismp's heaters appear to be the real replacement to silicone blankets and they have a subsiduary in the US ... gutted. I might have to pursue plywoods carbon heater because I have decided to buy some proper epoxy. I'm gonna ask these guys what if their minimum order and then post to see if there is any interest.