Page 1 of 2
Please critique my profiler design
Posted: Sun Mar 07, 2010 7:05 pm
by johneboy
Pics

Posted: Sun Mar 07, 2010 9:20 pm
by falls
Posted: Sun Mar 07, 2010 9:26 pm
by falls
Posted: Sun Mar 07, 2010 10:14 pm
by johneboy
Thanks Falls,
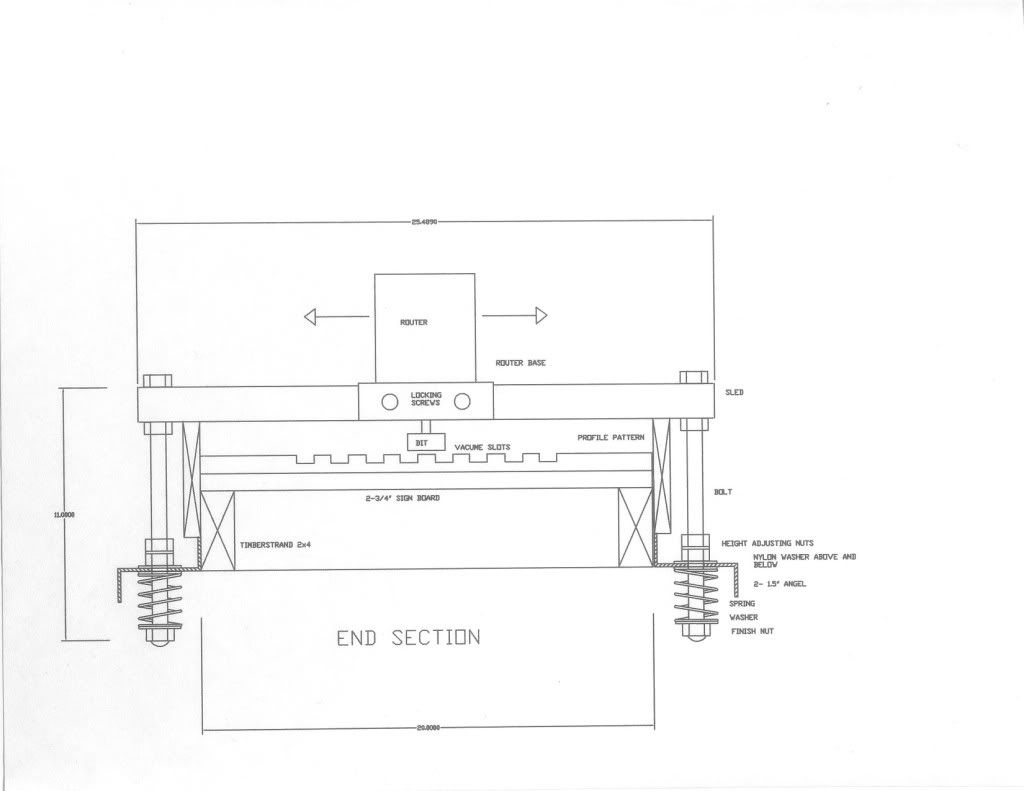
To start with the table. Timber strand 2x4 for framing, stay straight.
1.5" top should be flat and strong. I have a real vacume pump. I was thinking that each channel would have it's own feed that could be open or closed to accommodate different widths. That should hold the material flat and in place.
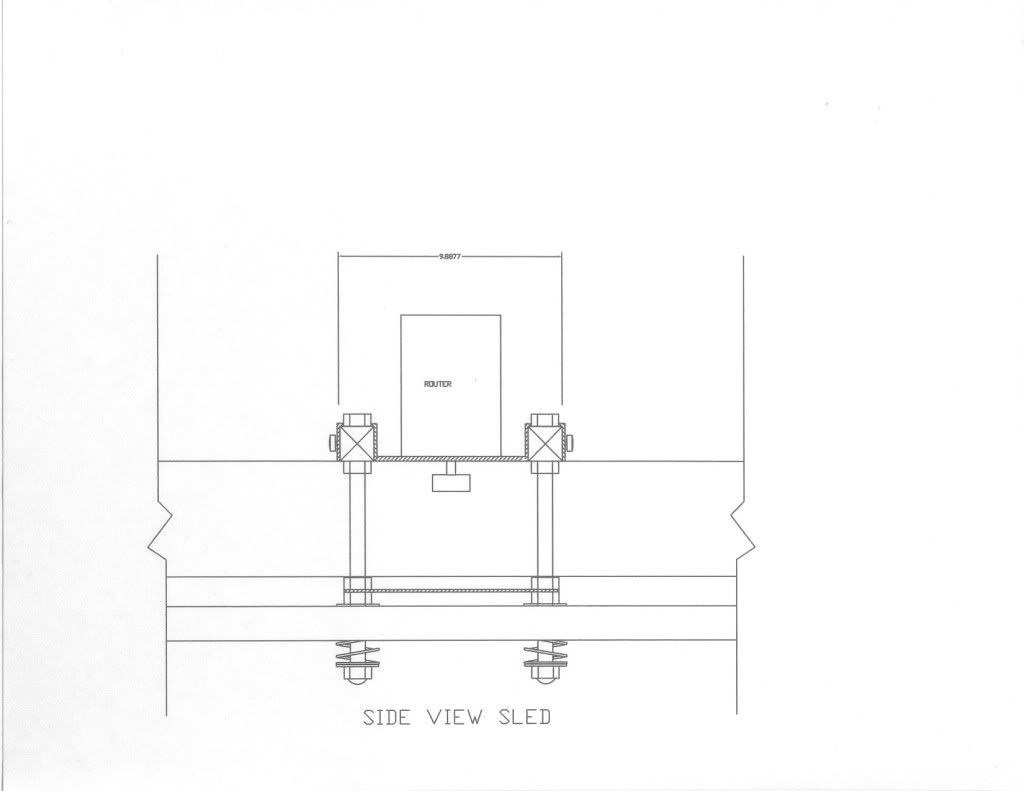
The two 1.5" angle iron (tracks) have a space between them that the 4 sled bolts ride in. They are screwed to the timberstrands and welded on the ends. The 2 nuts above the tracks allow to set the minimum height for tip and tail.
As the sled slides up on the profile pattern the springs compress (hopefully) keeping everything even. The router bed slides side to side in the sled but is locked with the set screws for each pass wich is done legnth wise. Cores will be roughed out with a band saw and power plane so the jig is just used to accurately finnish up. I tried to address the two main issues of an an accurate repeatable cut and holding the material in place.
John
Posted: Mon Mar 15, 2010 1:23 pm
by chaka
I´m planning to build something similar to this soon; springs look like a very good idea to keep router bridge in place. My idea is to build a negative profile mold so i can route flat. Guess i´ll need a huge vacum compressor to hold a 12 mm thick blank core to the negative mold. What do you think abot this?
Posted: Mon Mar 15, 2010 1:35 pm
by Idris
chaka wrote:I´m planning to build something similar to this soon; springs look like a very good idea to keep router bridge in place. My idea is to build a negative profile mold so i can route flat. Guess i´ll need a huge vacum compressor to hold a 12 mm thick blank core to the negative mold. What do you think abot this?
or a few screws

(from below of course)
Posted: Mon Mar 15, 2010 1:35 pm
by Idris
chaka wrote:I´m planning to build something similar to this soon; springs look like a very good idea to keep router bridge in place. My idea is to build a negative profile mold so i can route flat. Guess i´ll need a huge vacum compressor to hold a 12 mm thick blank core to the negative mold. What do you think abot this?
or a few screws
(from below of course)
Posted: Mon Mar 15, 2010 6:53 pm
by johneboy
I found some rollers that will work much better but requied some redesign.
The table is built and I'll post some pics when I finish the jig. This will work much better.
John
Posted: Mon Mar 15, 2010 7:43 pm
by johneboy
chaka wrote:I´m planning to build something similar to this soon; springs look like a very good idea to keep router bridge in place. My idea is to build a negative profile mold so i can route flat. Guess i´ll need a huge vacum compressor to hold a 12 mm thick blank core to the negative mold. What do you think abot this?
I don't really like the idea of routing the bottom. You are leaving end grain exposed that is being flexed. I would much rather have the grain running all the way along the bottom and the end grain on top where it gets squeezed as the ski flexes upward. It may be moot after the FG is applied but I don't want to risk it.
AFA the vacume, I do'nt think it will have to be very powerful, but we'll see when I get it set up.
John
Posted: Tue Mar 16, 2010 12:06 am
by falls
With chaka's plan it doesn't leave end grain exposed on the bottom side of the core. With a negative mold the flat bottom side of the core is forced down in the contour. By running the router flat along the top it removes wood from the ends where they are high on the jig and passes over the centre where it is forced down in the jig. When you have finished the core springs back up and the bottom is flat and the top contoured. This is the same idea as the planer profiler. It took me ages to work out that it worked this way and not upside down.
@Chaka. There is another thread where doughboyshredder has built precisely this router jig profiler. I think the real trick is getting the core to lie in the crib correctly. I am not convinced a vacuum could pull it sufficiently, but would be happy to be proved wrong.
 http://www.skibuilders.com/phpBB2/viewtopic.php?t=2178
Posted: Tue Mar 16, 2010 6:24 am
by johneboy
OK that makes more sense. I still think that having the bottom flat will make it easier to keep it still. We'll see soon how good the vacume works.
John
Posted: Tue Mar 16, 2010 2:03 pm
by falls
The vacuum will be fine for your design I reckon john. If you are having any trouble you can always screw your core ends down in the excess area on each end. I have been told that routers tend to exert most of their force in the side to side direction rather than up and down. The vacuum holds really well for side to side movement.
Posted: Tue Mar 16, 2010 5:00 pm
by chaka
i have already tried bandsaw, router bridge, planner and even sander for core profiling.
As a i see it any of this methods would be accurate enough for me (except for the sander, of course) if i would be able to find a damn way to hold the core to a negative mold. Negative mold is my target, I think that results are better this way cause router or planner (worth to say bandsaw) are designed to make flat surfaces.
Of course, screws are a good option to hold the core to a negative mold, but why not triying vacumm?. I´m not trying to build something where the core has to be screwed or clamped, unclamped and clamped again to be held.
ummmmmmmmm, i´ll keep thinking about this tomorrow on the chairlift.
Please, some more feedback about vacumm will be highly appreciated.
Posted: Tue Mar 16, 2010 6:24 pm
by knightsofnii
just sink 2 screws in the middle of a planer crib, somewhere outside the perimeter of where you're going to cut your shape. Unless you're shaping your sidecut first?
I profile first, then shape. Its a pain in the ass to router out a profiled core, have to do parts backwards, but it makes the other parts of the process easier to manage.
Posted: Wed Mar 17, 2010 12:17 am
by tufty
I've been playing with a method for building the camber into horizontally laminated cores, it involves steaming and laminating the core onto the press blank, attaching accurately cut profile guides to the sides of the blank, then using the tip of a 30€ belt sander fitted with guide bars to profile. You can remove a lot of material fast with a 40 grit belt, and it's a lot easier than buggering about with a router...
This works, but making and accurately fitting the guides is a bear - easier to laminate the cores flat, plane / sand / bandsaw / router to thickness, and then steam the camber into the core.