Page 1 of 2
Vacuum hold down jigs for base cutting
Posted: Wed Mar 03, 2010 2:27 am
by falls
Copy of post from my journal:
After a nervous moment wondering if this idea would actually work with our household vacuum cleaner I am pretty confident it will be a success!
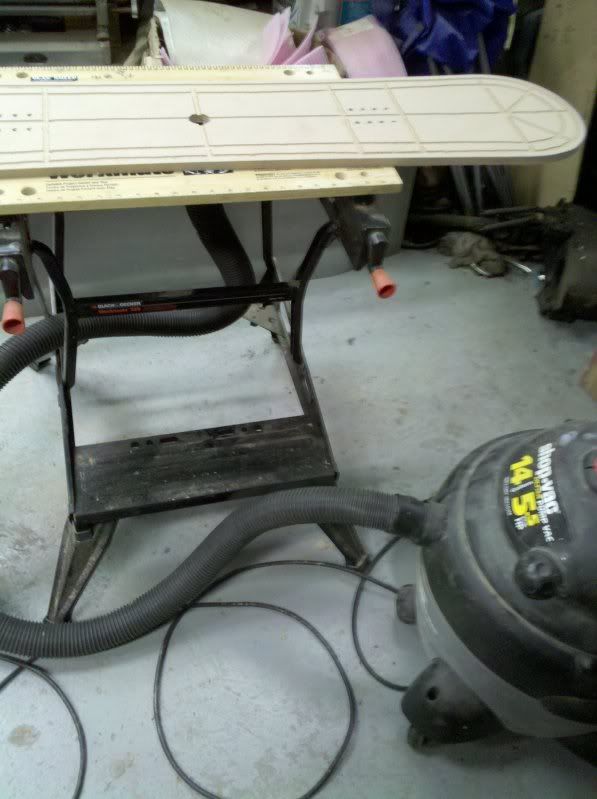
Base material jigs were cut with CNC to create a groove for the router bit to run in against the desired shape outline. On the "island" created in the middle are 5mm deep grooves offset from the edge by 20mm. There is a central hole through the MDF board to accept the vaccuum cleaner nozzle and distribute its suction along the channels.
Like most of my ski building experiments so far it took place in the living room after work. The vacuum holds the base material down very snuggly. In the video you can see the board moving from side to side rather than the base material shifting.
Vacuum is a 2400W cyclonic type (like Dyson brand).
Don't want to cut the base material yet because I am still a bit of a way off pressing a pair and don't want the UHMW to warp before then. I am pretty sure though that the router will cut it neatly without the base material shifting.
Thanks Chris for the CNC work. Didn't need to seal the MDF either.
Vacuum hold down base jig

Vacuum nozzle in place

Vacuum nozzle entering board from below

Base material on top

Video (beware vacuum noise)
http://www.youtube.com/watch?v=-f_AjOAa0aM
Pretty pleased with the project tonight.
Posted: Wed Mar 03, 2010 8:53 am
by knightsofnii
my version, built a couple weeks ago. Recommended to me by another builder who was successful at this. Small world!!!
This was an existing base template I already had, I hot glued a coupling for a shop vac to the hole on the underside. It works ok once the base material is flattened out good. Need to route channels out deeper/wider. I did this by hand by drawing out the paths then using a type of bit that I cant really describe, but it didn't pull too bad so I was able to make a drunken looking path with it

.
Next versions will be done on the cnc.
Posted: Wed Mar 03, 2010 4:10 pm
by falls
On my jigs the channels are 5mm deep and cut with a ball end cutter so they have a semi circular channel.
I got the idea from Kingswood. There's looked like they started out cutting the grooves by hand then went to CNC. They look to have reduced the amount of grooves they use over time to just have one groove following the outline of the ski, offset by about 2cm. Then just a connecting groove down the midline.
I like that great minds think alike (just wish I had the idea on my own!)
Posted: Wed Mar 03, 2010 5:20 pm
by knightsofnii
Yea that's it, the "ball end" bit, mine was real narrow though maybe 1/4" dia.
I actually routered it twice because after the first try it really sucked.
And you're probably right I may have overdone it, at any point if one part of it loses suction, the entire thing is done so maybe fewer, deeper wider channels may be better.
What I REALLY want to figure out is how to make dies, and just stamp out bases perfect every time, real quick. But with the vacuum method, and a NEW CLEAN ROUTER BIT, you can do a good job. You might want to widen that outermost channel, the one that is your routering path, I'd hate to see your bit snag on the outer wall of that thing and screw you up when you're like an inch from finishing up.
How thick is your mdf? I like your design better because it wont get beat up as easily, the thing is well protected when stored, etc.
Posted: Wed Mar 03, 2010 5:28 pm
by knightsofnii
I also see potential warpage issue from the suction near the center hole itself.
I'm thinking maybe make the channels, but end them where you would assume the hole would be, bore the center hole from underneath but not completely through, only through enough to expose the 4 corners of the channels. Either that, or put a recess on top side of hole like we do with insert holes, and put a hard cap there, to divert the suction away from the center of the hole and out thru the channels, to keep from getting a dimple in the center.
Posted: Wed Mar 03, 2010 5:29 pm
by knightsofnii
also, screw a couple blocks of 2x4 to the underside, so you have something to clamp it down to a table with
Posted: Wed Mar 03, 2010 5:45 pm
by falls
It's 18mm MDF (like 3/4" I think), pretty standard thickness in Australia.
I see what you mean about the centre suction maybe causing a warp. I think the easiest for me would be a cap the same diameter as the hole with 4 slots in its sides matched up to the channels radiating away.
It's good having the rectangle with the channel as you said because your actual running edge for the router bearing is protected from knocks etc.
I am thinking of having a hole through the table and just clapmping or screwing the jig directly to the table.
I'm thinking maybe make the channels, but end them where you would assume the hole would be, bore the center hole from underneath but not completely through, only through enough to expose the 4 corners of the channels
I think that's a good idea
Posted: Wed Mar 03, 2010 6:14 pm
by falls
I measured my vacuum channels. The cutter looks to have been 12 or 13mm diameter (about half inch). 5 mm depth.
Posted: Thu Jun 10, 2010 1:27 am
by sir.orange
it seems all of you using mdf as material for the base templates.
i made all my templates out of pp, it s more durable i thought.
now i m wondering if this vacuum method to hold down the base material would also work with a pp template?
pp has not the rough structure compared to mdf, might that be a problem?
Posted: Thu Jun 10, 2010 2:53 am
by falls
pp?
polypropylene?
Posted: Mon Jun 21, 2010 12:31 am
by sir.orange
falls wrote:pp?
polypropylene?
...yes, polypropylene
Posted: Mon Jun 21, 2010 5:28 am
by falls
Yeah I think it should definitely work. If you can mill the pp like mdf you can make the same design. It just relies on the template not leaking too much vacuum. Mdf is pretty porous ie. leaks vacuum, and it still works. I imagine pp would be more airtight than mdf so would prob work even better.
Posted: Mon Jun 21, 2010 5:41 pm
by Alex13
I was surprised to learn how non-airtight MDF actually is yesterday. My uni's CNC machine uses a throwaway MDF base for cutting on (like most probably do) that sits on top of the vacuum holes, the air just sucks straight through the MDF to create the vacuum.
Posted: Mon Jun 21, 2010 7:09 pm
by falls
yeah that is pretty common "bleeder" or "sacrificial" board. thin MDF that lets you rout just deeper than the material you are cutting.
It is amazing that the vacuum holds your piece of MDF through the other.
I'm pretty sure the CNC I use is the same Multicam you have at your uni and the bloke reckons he can hold 6 layers of 18mm MDF and cut them all at once!
Posted: Sat Jul 31, 2010 1:04 am
by falls
http://www.youtube.com/watch?v=_UDVIuOa_Uc
Update. First actual usage of the hold down jig. I placed some 2mm tip spacer around the ends of the template to create a notch for 3/4 edge wrap as my design had a pretty tight radius and I was having trouble getting the edge bent for full wrap. These jigs worked great first time which is a nice change in the amateur ski building world. One trouble was the curly q's started to fill my router groove and I had to tip it out between ski bases.