Page 2 of 2
Posted: Sat Oct 04, 2008 8:48 pm
by knightsofnii
i think the best thing to use as a fence is a scrap piece of ski/snowboard edge. just grind the teeth off where you're going to bend it around the bit.
if you have a bit like a dovetail, that you cant get to rest directly over the edge fence, then lube the crap out of the bit, and lower it down onto the edge and let it cut out a small notch, then back it off a hair, and there you go, a fenced sidewall router. just dont push against it too hard because it will flex.
Posted: Sat Oct 04, 2008 9:03 pm
by ben_mtl
do you have some pics of this setup ?
thanks
Ben
Posted: Tue Oct 07, 2008 6:32 am
by hafte
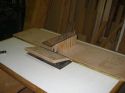
Here are some pictures of my fence setup.
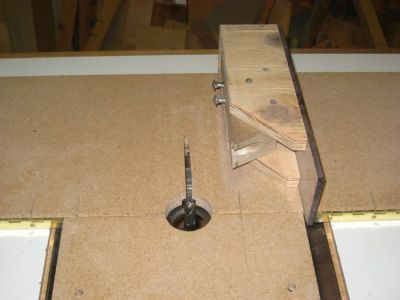
Here is the fence in place and ready to use. Note its not clamped in place to the table.
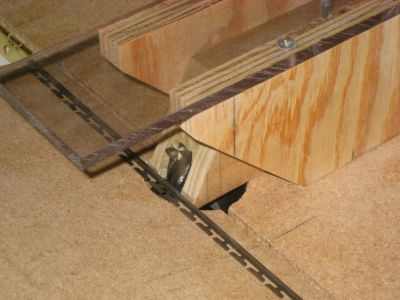
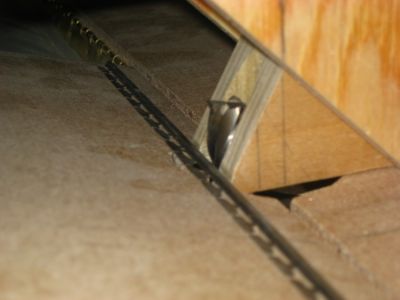
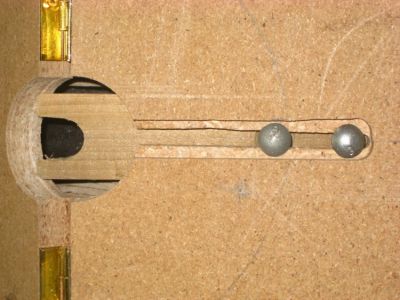
Here are a couple of shots showing the edge riding the guide block. This is how I set up the tool for use. Just make sure the bit does not hit the edge.
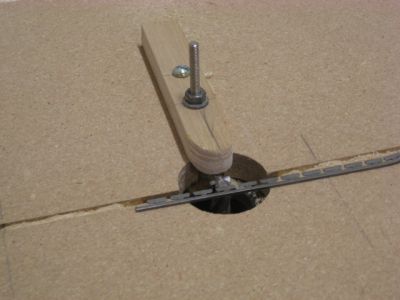
Bottom view of the tilting front table that the ski rides on. The t-nuts and screws are the angle adjustment.
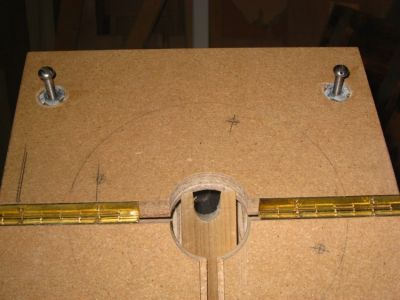
The slot that the guide block and safety/vacuume port ride in.
The guide block/safety /vacuume port before install on the table.
Use two for the table. A gudie pin to cut the groove in the base for the edges.
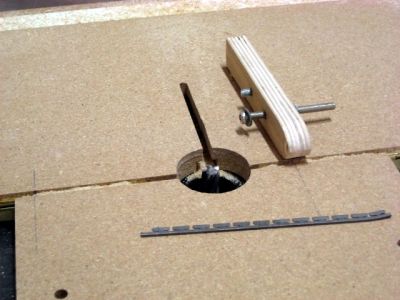
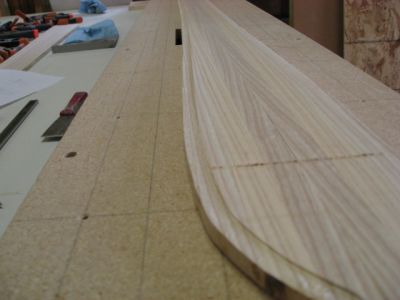
A ski core ready to be profiled after the groove is cut.
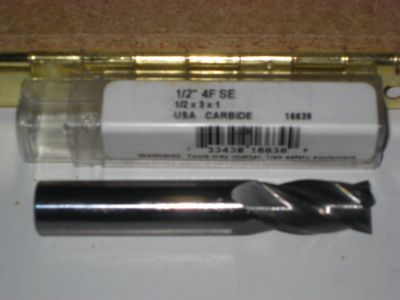
The bit is a 1/2" four flute spiral end mill I pick up at a local industrial supply place. ~$21.00 US Its almost indestructible, but I have burned a couple of them, and they will cut into the edges if the ski lifts off of the table during trimming.
Posted: Tue Oct 07, 2008 1:03 pm
by knightsofnii
how do you get the tilting table style to work, when the ski/board is a few mm wider at the tips than in the waist? seems to me you'd have to hinge it somewhat behind the center of the hole to allow the tips to run off and not get stopped by the flat part of the table.
Also some kind of clamping mechanism to squeeze the ski/board down I would highly recommend, as with camber or rocker your cutter is going to cut different heights against the sidewall without it.
Posted: Wed Oct 08, 2008 12:18 pm
by hafte
how do you get the tilting table style to work, when the ski/board is a few mm wider at the tips than in the waist? seems to me you'd have to hinge it somewhat behind the center of the hole to allow the tips to run off and not get stopped by the flat part of the table.
Yes, I do have to push the block towards me as far as I can into the center hole to keep that from happening. The guide block is adjustable in the track so I can move it forward a bit. So far I get very close but no interference. It has had me sweating a couple of times and may be an issue with a ski that has more side cut than I use. So far the smallest side cut radius on my skis is 21 M.
To accommodate for the camber keep the tilting part of the table short. I think the one there is 10”and should be shorter. There is not much camber in that short distance, so the ski is flat and running along the same part of the block while trimming. I do not try to apply force to push out the camber it just makes me feel like I’m pushing my self into the bit. (did I mention that this and the table saw are the scariest tools in my shop ).
What I do run into is cutting into the edge if the ski lifts up any. That has got me twice on the same pair of skis cause I let the tip drop towards the end of the cut and I was pushing the ski onto the cutter at the same time. Yes, a feed gizmo would be helpful kind of like the skate board wheel thing posted recently.
Setup time and a few practice runs to check for interference issues is key to making these types of home made things work. The videos I have watched show a bit with a custom angle and a bar perpendicular to the shaft of the bit for the ski to run along during the cut. The tech using it started the cut at the beginning of the running length and stopped at the other end. It looked as scary as my gizmo with the open bit.
Hafte
Posted: Wed Oct 08, 2008 1:26 pm
by knightsofnii
i think a fence going around the bit is going to give you better results, or a bearing.
That gap will allow the edge to move toward/away from the cutter microscopically.
The clamp wheel keeps the edge mated to the table surfaces at all times.
I need to rebuild my "automated sidewall cutter", that thing was the shit. It was so close to being exactly what i wanted. Man, if only I had a full machine shop and the budget of a full blown snowboard factory at my disposal. That thing would be the most badass machine ever.
Posted: Wed Oct 08, 2008 1:30 pm
by knightsofnii
all that automated thing needs that I built is the following:
1) suction to keep it clean
2) clamping mechanisms to take out the camber and lock it in place
3) a better router. and a 2nd opposite spin router if possible.
Posted: Thu Nov 26, 2009 5:57 am
by ben_mtl
Digging this post out, no need to create a new one...
I ordered the Grizzly dovetail bit and a couple bearings to give it a try.
First comment is I'm not able to install the bearing realy close to the cutting part of the bit, I have a bit less than a 1/4" of gap between my bearing and the begining of the cutter, because of some radius, I made a quick sketch it's gonna be easier to understand...

My question is do you think it's safe if I stick the bit on a lathe and get rid of this radius so I can place the bearing closer to the knives ? I'm not super comfortable messing with something that turns that fast (used with a router)
Thanks !
Posted: Thu Nov 26, 2009 10:03 am
by Head Monkey
I think you could alter the bit, and using a lathe would be best.
However, why torture yourself?
http://www.skibuilders.com/phpBB2/viewtopic.php?t=1739
If you don't want to get a trimmer with a tilt base, then make your own wedge and attach it to a non-tilt base to achieve the bevel you want.
Posted: Thu Nov 26, 2009 2:17 pm
by Greg
I just made an angled fitting that goes on my router out of a scrap piece of wood. It works like a charm and that way I can do everything with only straight bits and no ball bearings. I don't have any pictures of it, but it is basically a piece of wood about 1 foot long, with an angled groove in it. I just clamp the ski down and slide the router along the ski edge. The groove is cut so that the metal edge never contacts the bit.
I have been experimenting lately with pre-shaping the sidewalls, then laying fiberglass over them on an angle for a fiberglass sidewall effect. Kind of like cap construction. It seems to work pretty well, but it took a little experimenting, and requires a vacuum press.
Posted: Thu Nov 26, 2009 7:40 pm
by ben_mtl
Well I don't really have the money for a laminate trimmer that's why I went with the dovetail bit + bearing : 10$ total, shipping included !
Before machining the bit on a lathe I'll give a try to the angled base... I have loads of scrap material... don't know why !
Posted: Sat Nov 28, 2009 5:38 pm
by MontuckyMadman
I went grizzly method and I removed the excess material using the bit in a drill because like you I was not comfortable with the bit spinning super fast.