
KAJE Snowboards -- Just getting started
Moderators: Head Monkey, kelvin, bigKam, skidesmond, chrismp
-
boardergirl

- Posts: 14
- Joined: Tue Oct 04, 2011 5:42 am
oops... double post. 
Last edited by boardergirl on Tue Nov 15, 2011 8:36 pm, edited 1 time in total.

Wow, that looks awesome!
You really have been doing your homework.
Working in the basement sucks, it's nice to be close to home but the dust and little bits of base material get everywhere.
How did you do your graphics? Waterslide paper?
Keep up the good work.
sam
You really have been doing your homework.
Working in the basement sucks, it's nice to be close to home but the dust and little bits of base material get everywhere.
How did you do your graphics? Waterslide paper?
Keep up the good work.
sam
You don't even have a legit signature, nothing to reveal who you are and what you do...
Best of luck to you. (uneva)
Best of luck to you. (uneva)

Great looking board!
Your first core got "sniped"
You probably already know, but the first few inches and last few inches are prone to this when you pass a plank through the planer. Cutting the sidecut to shape is essential prior to planing the profile because you have to attach your sidewalls. But at the tip and tail, what you want to do is leave the core 4-6 inches too long so the snipe is in this area rather than in your actual core. After you have profiled you trim this excess off and should be left with a nice core. It is really hard (not impossible) to cut a core exactly to size then profile it using the planer method without suffering snipe in the tip and tail. Like the others said the scrap bits of wood extending beyond your core can help reduce snipe, but I think leaving the core a little long then trimming it after wards is the way to go.
You will be suprised how well even 2-2.5mm thick wood will cut with the router to shape the tip of the core after you have profiled (provided you effectively hold it down with clamps to your template (or even sandwhich the core end between your template and another piece of wood)
Again though, awesome looking board for your first go - impressive!
Don't wait up, I'm off to kill Summer....
-
boardergirl
- Posts: 14
- Joined: Tue Oct 04, 2011 5:42 am
Thanks again for the compliments. We're really happy with the results. Now hopefully it'll all hold together with some days riding on it.
@chrismp-- I think our planer is a Grizzly... it's like 20" wide and definitely industrial. We scored it from my in-laws. It used to be used for building cabinets, so it's pretty much huge and mean! Hopefully with all the good advice we'll get it to work a little better on the next board.
@sammer -- we're actually in a devoted shop in my basement... under the garage. So, yeah the dust really sucks, but at least it's not getting into the rest of my house. We actually had Coda print up our graphics. I designed it with Gimp. We really hoped that this board would turn out good so one day we could hang it on the wall. Kinda pricey with the crazy shipping, but soooooo worth it. Coda does a great job.
@falls -- great advice! Thanks. That's actually what we were thinking about trying. How do you hold your core down on the crib? We did the hot glue thing and it seemed to work really well until the last couple of passes. We were actually wondering about cutting the end of the core off on like a 60 degree angle and then matching a similar cut piece of wood on top of that angle to help hold it down... I don't know though. I guess a little trial and error huh? Also, how are you attaching your sidewalls to your core? We epoxied last time, but still don't know it this is the best route.
Anyway, thanks everyone. Pretty stoked to be a part of this forum finally.
we were using a machine similar to this one:

we always taped the core to the crib with the strongest double sided tape that we could find and ran a bead of hot glue around the whole core and the planer would still rip the core off the crib sometimes.
with our new planer we just place a few drops of hot glue on each side of the core so it doesn't slip on the crib and that's it. no snipe and exact profiles every single time. the only downer is that it takes a few more passes cause we can't take off as much material in the beginning.
here's our new planer:
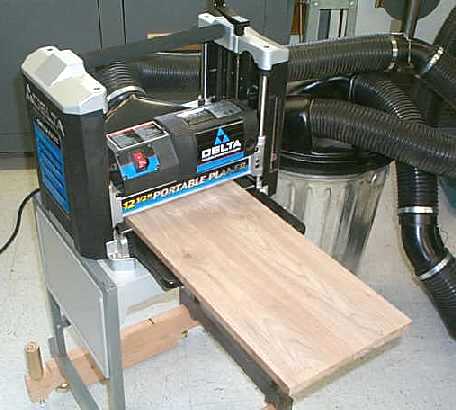
but don't worry, i'm pretty sure you'll be able to get good results with your planer! guys like ON3P use planers similar to yours with great success.
we always taped the core to the crib with the strongest double sided tape that we could find and ran a bead of hot glue around the whole core and the planer would still rip the core off the crib sometimes.
with our new planer we just place a few drops of hot glue on each side of the core so it doesn't slip on the crib and that's it. no snipe and exact profiles every single time. the only downer is that it takes a few more passes cause we can't take off as much material in the beginning.
here's our new planer:
but don't worry, i'm pretty sure you'll be able to get good results with your planer! guys like ON3P use planers similar to yours with great success.
-
skidesmond
- Posts: 2337
- Joined: Tue Apr 07, 2009 3:26 pm
- Location: Western Mass, USA
- Contact:
-
boardergirl
- Posts: 14
- Joined: Tue Oct 04, 2011 5:42 am
OK... so here's last night 's progress on board #3. We're having some issues with the Gorilla wood glue holding very well, so we just threw a little epoxy in the cracks and also on the sidewalls. We're gonna try the sandwich idea with wood on the outside of the sidewalls. And we'll leave it a little long (not much, since it was already cut before we got the good advice.) I guess tonight we'll probably try profiling this baby and we'll hope for the best!


-
twizzstyle
- Posts: 2204
- Joined: Tue Mar 07, 2006 8:25 pm
- Location: Kenmore, Wa USA
-
Huck Pitueee
- Posts: 192
- Joined: Tue Mar 15, 2011 2:51 pm
-
Head Monkey

- Posts: 310
- Joined: Sun Jul 17, 2005 4:53 pm
- Location: Carnation, WA
- Contact:
Looks great guys! Nice work.
Everything I know about snowboard building, almost: MonkeyWiki, a guide to snowboard construction
Free open source ski and snowboard CADCAM: MonkeyCAM, snoCAD-X
Free open source ski and snowboard CADCAM: MonkeyCAM, snoCAD-X
-
FigmentOriginal

- Posts: 140
- Joined: Mon Oct 24, 2011 1:13 pm

I use this thicknesser - 15 inch. Similar to the one ON3P uses, but without the spiral head.

I find it works great
I only do wood sidewalls though
I think the above advice about sidewalls with VDS sounds like the best solution.
Glue the ptex to a thin strip of wood with a layer of VDS between the plastic and wood. Then glue the wood strip side to your core.
Using wood on the outside of the ptex sidewalls I think would be good also.
Don't wait up, I'm off to kill Summer....

-
boardergirl
- Posts: 14
- Joined: Tue Oct 04, 2011 5:42 am