
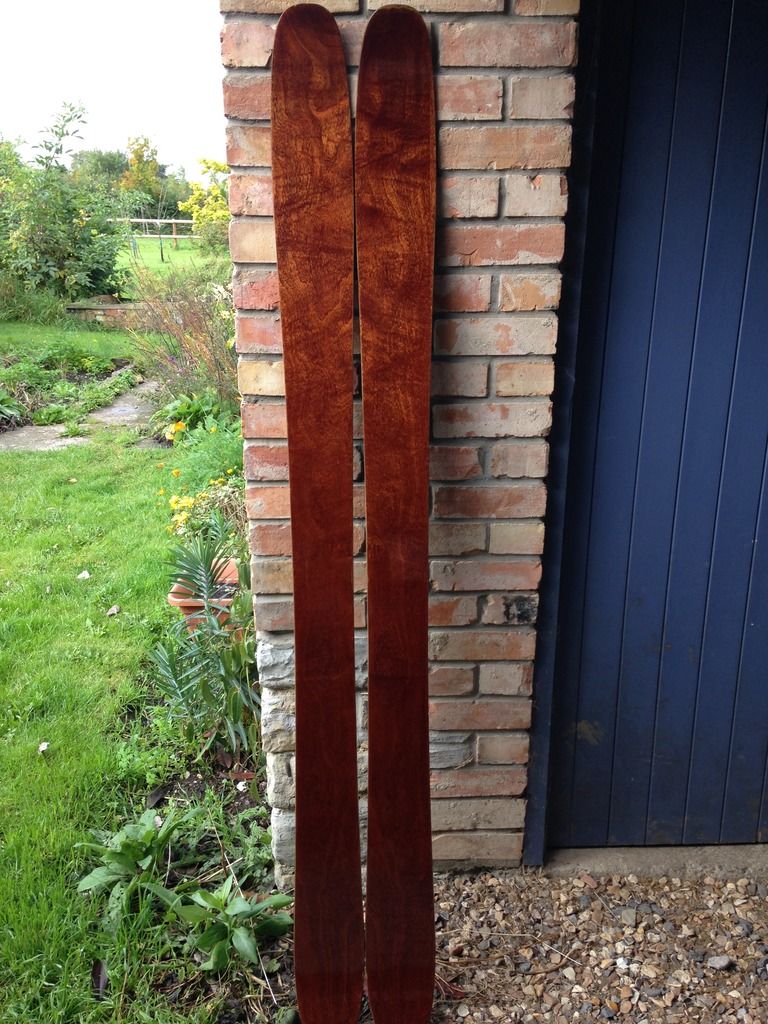
Just made a pair of powder/crud/chop (if there is such a thing) planks using a plywood core.
Core - 2-11-2
Lay up
Base
Damping
15.5oz biax FG
3.5oz UD CF
Core
3.50z UD CF
15.50z Biax FG
Sapele Veneer topsheet
184
143-112-133
Full rocker profile
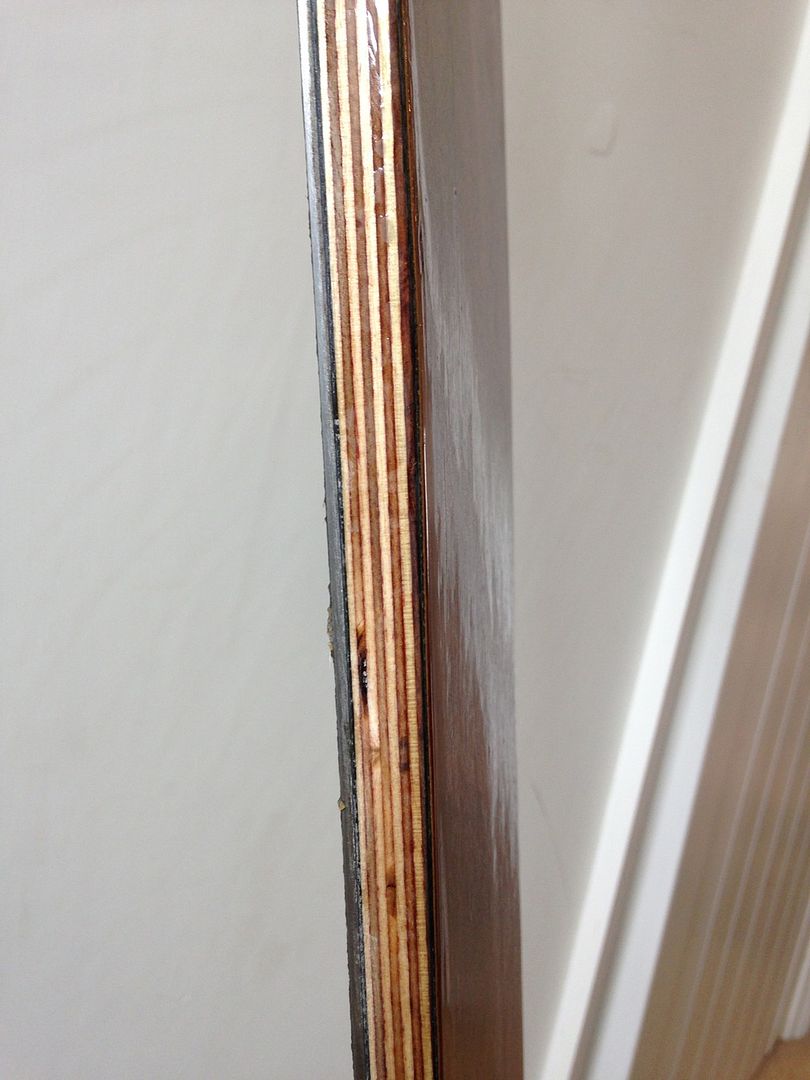
There were no voids in the core after profiling that I could see, although there were a couple of knots. After pressing and de-flashing there were 3 voids in the side walls about 5mm long x 2mm deep which I filled with epoxy.
The cores felt heavier than my ash/poplar ones (just in the hand - I didn't weigh them) and the flex was different - definitely softer in the tips. Skis weigh 2023g and 2017g respectively.
The completed skis feel very nice in the hand and the flex is lovely - soft, but coming on strong as the flex increases with bags of pop. Who knows how they will ride?
http://i685.photobucket.com/albums/vv21 ... G_0004.jpg
http://i685.photobucket.com/albums/vv21 ... G_0015.jpg
The sidewalls are not completely finished - the bases and edges haven't yet been ground - when this is done I will give thema a final sand and one further coat of varnish.
G
Beginners Questions
Moderators: Head Monkey, kelvin, bigKam, skidesmond, chrismp

Realy nice looking skis Gilo.
I think I will start off with ply cores.. As a learning experience.. and for my first pairs of ski / snowboard they say K.I.S.S.
In the "Community skis" video where I got the idea from, he was saying that the plywood cores give more torsional rigidity.
I think I will start off with ply cores.. As a learning experience.. and for my first pairs of ski / snowboard they say K.I.S.S.
In the "Community skis" video where I got the idea from, he was saying that the plywood cores give more torsional rigidity.
I am nobody. Nobody's perfect, so I must be perfect.
-
skidesmond
- Posts: 2337
- Joined: Tue Apr 07, 2009 3:26 pm
- Location: Western Mass, USA
- Contact:
Skis look great. KISS is the way to go until you some experience and work out the details. I bet if you had sidewalls (plastic or wood) the ski would have a bit more stiffness. You might get some damage over time because the sidewall is weak but ski the crap out of them anyway. Nice job for your first pair! Fill the voids and keep the sidewalls protected with a good exterior varnish and you should get many seasons out of them.
I tested my coreprofiler with a piece of plywood because I thought I would be able to see any problems better since the different layers spread out like a physical map after the core is profiled. Worked nice.
I read the datasheets of the bcomp cores. Thats why I stick to ash for this season. Before I canuse them I need a vaccumsystem on my profiler and solve som other problems.
Today I profiled a couple of cores with a routerbridge and it worked out fine.
I read the datasheets of the bcomp cores. Thats why I stick to ash for this season. Before I canuse them I need a vaccumsystem on my profiler and solve som other problems.
Today I profiled a couple of cores with a routerbridge and it worked out fine.
Ok, New questions: brain picking.
I have started designing my ski.
I am an aggressive skier and enjoy carving hard on groomed trails at high speed.
I currently ski the Nordica doberman GS which shreads.
This ski is fantastic on packed runs, but less than useless in powder, crud, soft snow. So I want a ski that is powder orientated, but that can perform well on packed snow also, as wherever I ski powder I am a lot on groomed runs getting there and back.
My only limitation is that under foot I can't go wider than 100mm as I got some Marker Free Ten bindings pretty cheap.
Here is my design so far.
Thanks for the guys who made snoCAD-X
The first core will be made with 12mm Birch Plywood
I will go 3mm tip and tail, and 12 under foot.
I chose 3mm as the Plywood is a little softer than vertically laminated Ash for example.
I will use a 0.5mm veneer top layer.. Not sure if the 3.. core plus veneer will be too much.
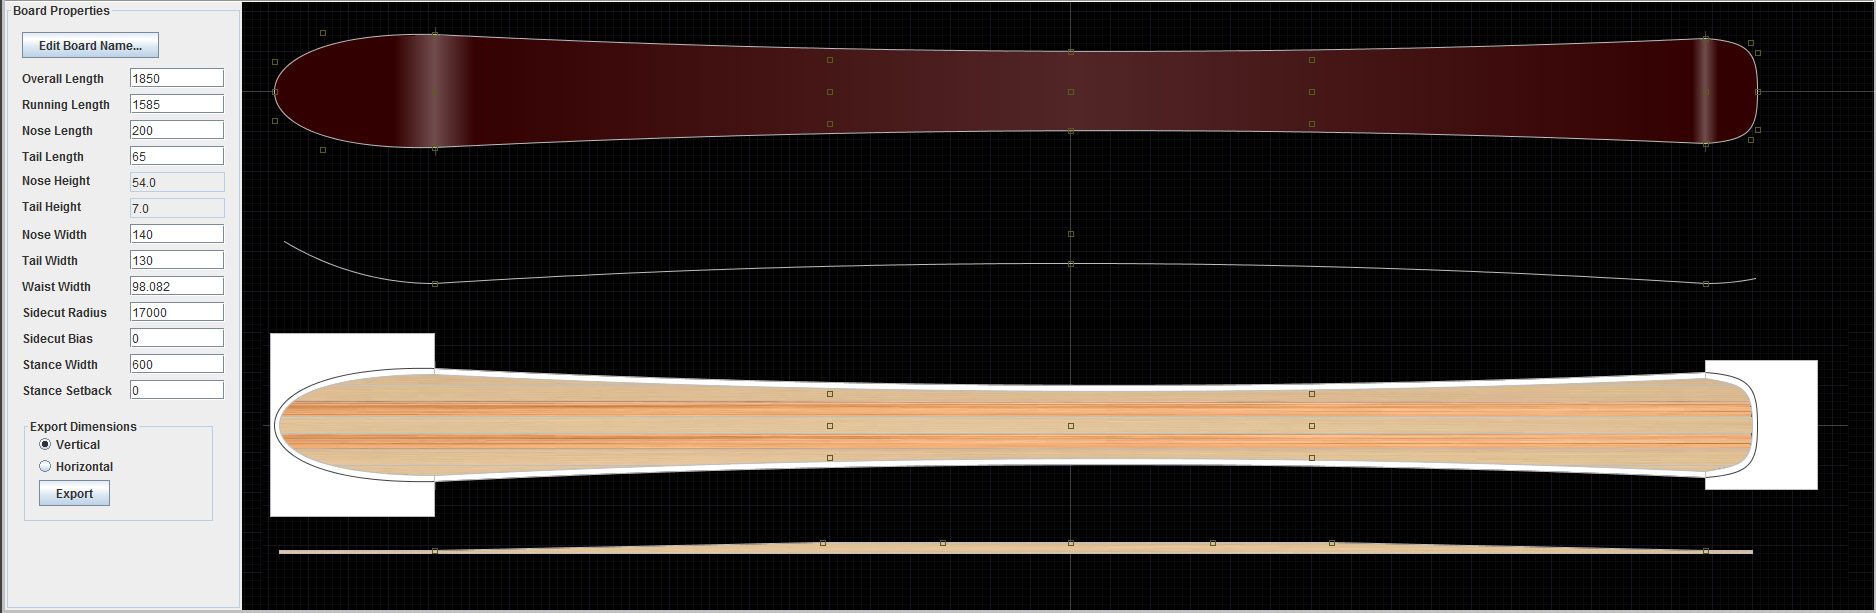
I would like a camber rocker design.
Is a 17m radius too tight for on piste cruising?
Should I make the nose longer here to add some rocker to the front? If so, How do you do that in snocad-X?
I am nobody. Nobody's perfect, so I must be perfect.
Any comments on the above ski. Will it do what I want?
I want to cut out the core and mark the middle of the ski, then take the core to the local sports shop to get them to mark/ drill the holes for the bindings. Then I will transfer these holes to a template and use inserts so I can move my bindings from one ski to the next to make prototyping a bit easier.
My question is.. If I mark the middle of the ski as indicated in SnoCAD-X, is this sufficient for the ski shop to mark the binding locations, if I take my boot in with me.
I will be using a cap construction like in the snowboard I built. So teh Core will be cut out to the dimension of the base and hopefully laminated centered to the ski.
Anything I should consider with binding positions...
Or am I being dumb again, and I should mount the bindings myself?
I am nobody. Nobody's perfect, so I must be perfect.
Nice ski design, very similar to my daily drivers. (see my journal)
Core profile of 12 mm underfoot is fine for this type of ski. 3 mm at both ends seems too thick. 2 mm to match the tip filler is better. 3 mm would be over three times stiffer than 2 mm. The stiffness comes from the composite layers and how far apart they are, top to bottom.
To mark the mid-boot line for mounting I suggest using masking tape on the finished ski and a pen. This is the last step in the build process. Don't mount bindings yourself, let the shop do it with the proper drill jig.
You might want to pick up some adjustable demo bindings. These let you experiment with boot location and also easily share skis with your friends.
-S
Mount the bindings yourself!
The only thing you should get from a sports store is a proper drill for mounting bindings, like this:
http://www.hk-sportservice.de/Bindungsbohrer-36-x-9-mm
Makes life easier.
Because finding the proper mounting template for a binding sometimes aint easy. I once ran in 5 sport shops to find the right one, no one had it. Thats when I started to do it on my own.
If you do everything yourself, also do the mounting :) Just measure very carefully the distances between the holes and make sure you align the holes with the ski middle (in both width and length) correctly.
Regarding you ski design: IMO way too much camber for a off-piste oriented ski. The tip also looks very piste-oriented, not rocker-like. These 2 things make hell of a difference in how the ski performs off-piste.
Hey pmg, let's agree to disagree on mounting bindings yourself. I've done it for demo bindings but I first made accurate measurements of a real drill jig and then machined my own drill template on a mill. These days my local ski technicians will drill my skis for a few beers. Can't beat that.
I agree with you about the excessive camber and lack of early tip rise for an all-mountain type ski. I bet he loses some of that camber in the build anyway, I seem to lose some camber in my press. However his design widths and side cut looks promising.
-S
I agree with you about the excessive camber and lack of early tip rise for an all-mountain type ski. I bet he loses some of that camber in the build anyway, I seem to lose some camber in my press. However his design widths and side cut looks promising.
-S
Oh, I forgot to say.. ignore the camber.pmg wrote:Mount the bindings yourself!
The only thing you should get from a sports store is a proper drill for mounting bindings, like this:
http://www.hk-sportservice.de/Bindungsbohrer-36-x-9-mm
Makes life easier.
Because finding the proper mounting template for a binding sometimes aint easy. I once ran in 5 sport shops to find the right one, no one had it. Thats when I started to do it on my own.
If you do everything yourself, also do the mountingJust measure very carefully the distances between the holes and make sure you align the holes with the ski middle (in both width and length) correctly.
Regarding you ski design: IMO way too much camber for a off-piste oriented ski. The tip also looks very piste-oriented, not rocker-like. These 2 things make hell of a difference in how the ski performs off-piste.
I didn:t work out how to add rocker and camber in the snoCAD-X.
I will add a rocker front and back about 20 - 25 cm, and a light camber in the middle. Similar to the snowboard I just made.
I just measured.
In the press the rocker was 5.3mm, It is now 4.2. So only lost a mm there.
The Camber was 9.4 in the press. Turns out to be 7.5. Though the surface I measured on was perhaps not 100% straight.
I am nobody. Nobody's perfect, so I must be perfect.
Agree :)SHIF wrote:Hey pmg, let's agree to disagree on mounting bindings yourself.
It really depends on the shop you get it done. I dismounted a lot of bindings from skis, and some really really work bad. That's why I prefer to do it myself. Then I can also use epoxy to put the screws in which just holds better than whatever they usually put in (or forget to put in, really looks awful when the core soaks water through the binding holes).
For measuring I always take the real binding and measure it. If you want to make a template of the mounting holes, use one screw to put the binding on the template, then use a wood drill in the correct diameter (usually the holes in the bindings are 5mm or 5.5mm wide) to pinpoint the other holes.
But I agree that nothing is as precise as a proper mounting jig. But my way is precise enough for me.
I don't create a template, but measure and draw it on the ski and pinpoint the middles of the holes. Then I put the binding on it and see if the holes are where they should and correct the pinpoints if needed. If they all look really well, I drill. Never had problems with lacking precision this way.
Sounds like a good process pmg.
My guy just drills the holes, I do the mounting back in my garage. Been using Titebond type 3 glue for the screws, so far its been water tight.
My ski tech works on skis for the US ski team and other top racers. He is fast and accurate with the drill jig. Takes about five minutes to prep two pairs of skis for me.
The benefits of living in a ski town...
-S
That sounds much better. Usually the tail rocker in a ski is less than the tip rocker, as you don't ride switch that much unless you are a park gangster.Akiwi wrote: Oh, I forgot to say.. ignore the camber.
I didn:t work out how to add rocker and camber in the snoCAD-X.
I will add a rocker front and back about 20 - 25 cm, and a light camber in the middle. Similar to the snowboard I just made.
I just measured.
In the press the rocker was 5.3mm, It is now 4.2. So only lost a mm there.
The Camber was 9.4 in the press. Turns out to be 7.5. Though the surface I measured on was perhaps not 100% straight.
7.5mm camber is still much for an off-piste oriented ski. Not too much, but much.
Am building a quite similar ski at the moment, but can't send any fancy computer graphics as all is done without.