Harrison Empires

Document your personal work here. Show photos, movies, and share your secrets.

Moderators: Head Monkey, kelvin, bigKam, skidesmond, chrismp

Post Reply
powdercow
Posts: 76
Joined: Mon Jul 31, 2006 1:35 pm
Location: Orem, Utah

Harrison Empires

Post by powdercow »

It’s been well over six month since I started on this ski building journey, and now it’s finally time to get some of this stuff down and recorded.

To make this a little more fun you should open this link in another window and let it play in the background:


My progress was obviously slow for several reasons, not the least of which is that besides full time employment my wife and I are in the process of completing a total remodel of our house. I also didn’t want ski building to become something ever I had to do, this was purely for enjoyment and learning.

My first step was to read these forums end to end, and make tons of notes. Several times I got lost in the more technical discussions but the base of knowledge was there. Special thanks to Kam, Kam, Kelvin, G-man, Hose-man, Hafte, Head Monkey and the many others who shared detailed insight and experience. As you're about to see I borrowed liberally from your advice and ideas.

Next came sourcing. This ended up taking way longer than expected. If I could do it over again, I would worry much less about getting the best value, and go ahead and buy some things is smaller quantities. As is, I now have over 300 feet of fiberglass and VDS, so I think I am set for a while. Also procuring the right steel for the press proved problematic for a while. My wife got a big kick when I would start to follow a semi loaded with metal. I would be drooling and saying “ooohh . . that is a beautiful piece of steel, I could use that beam for sure”. She was convince that I had gone nuts. I also almost lost a foot trying to pull a scrap i-beam out from under a 30 foot mountain of scrap steel, and the beam ended up being worthless!
A quick list of my suppliers is as follows:

Steel – Metal Mart, good people and sorry you broke your saw on my beam
Fiberglass – Composites One, more good people and sorry I paid you twice and forced you to process a refund
Epoxy and topsheet fiberglass – West Marine
Wood – Lowes and Mac Beath hardwoods.
Firehose – United fire authority, firefighters are always cool guys.

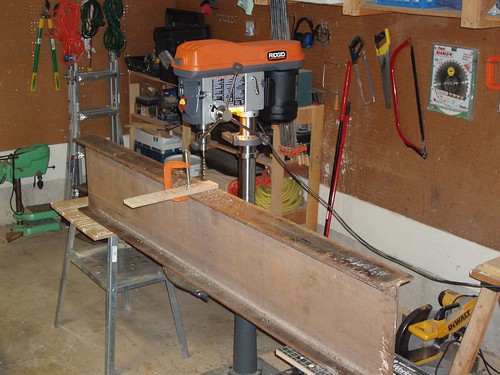
Once I had most of the materials it was time to start work. The basic design for my press was taken from hose-man’s “sideways I-beam” idea. I was really worried about failure and wanted the ability to take the pressure as high as I wanted so I overbuilt a little.
Using the article here:
http://www.rockcrawler.com/techreports/ ... /index.asp
I rounded the shear strength for my 7/16 grade 5 bolts down to 10,000 pounds.
40 bolts holding each side meant my press could withstand 400k of force on each of its halves. With a surface area per side of 1440 square inches that meant that even if my bladders were in contact with the whole side I would still be good to about 280 psi. Since my compressor can only push 120 I feel pretty safe.
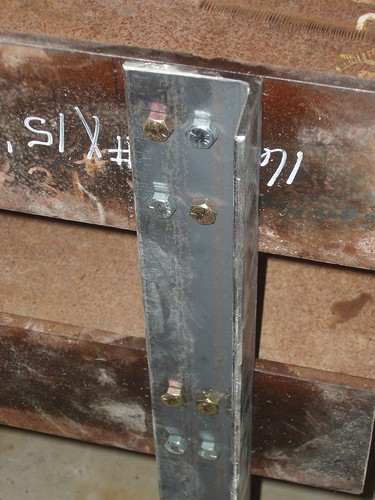
Since I drilled all of the holes before I ever placed a bolt I had to try and line them up as well as possible.
Image

Close up of the joints.

Image


With a little patience and a rubber mallet I was able to get everything bolted together.
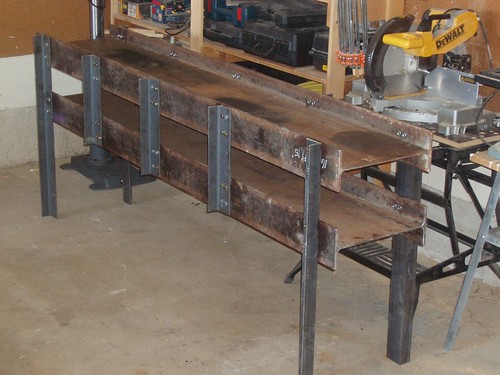
Image

Once I was done the press without mold weighed in at about 500lbs. It is obviously loaded from the end and the opening is 10 inches vertical and 15 horizontal.
I intended to put it on casters but haven't got around to that yet, and I am able to scoot the press around by lifting one end at a time, which is all of the portability that I need for now. The top of the press also makes a nice work surface.

The bottom and tip mold are both solid without any spacing. The tip and tail attachment system is less elegant than I would like but they do the job for now. Mold is designed for 16mm of camber on a 190cm ski but more on that later.
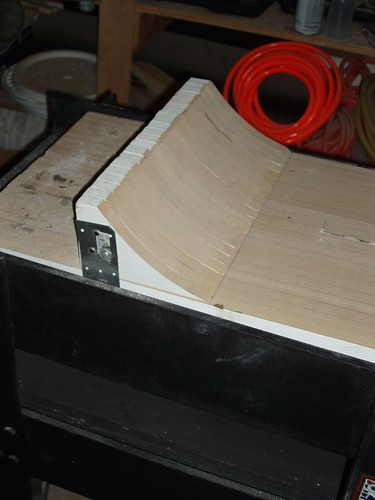
Image

The top mold is spaced and held together by two threaded rods making it adjustable as the ski length changes.
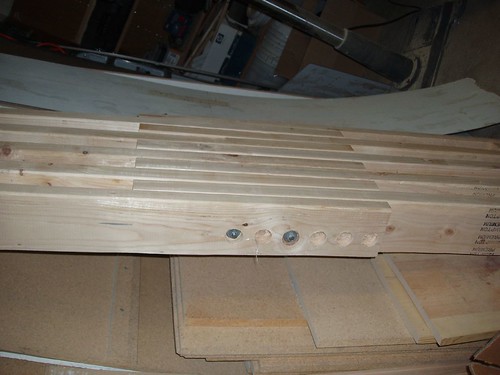
Image

My bladder is a pretty standard affair. After several failures at using silicon I finally ordered the parts from head monkeys bladder instruction and did the job right. I should have done this in the first place and would recommend it to anyone as a bombproof setup

Once everything was put together I just needed a name for my creation. My final inspirational push to complete the press came after watching a snowboard movie premier. The best segment of the movie was set to the music you are listening to now. So I named my press Eileen (she is primarily made from i-beam).
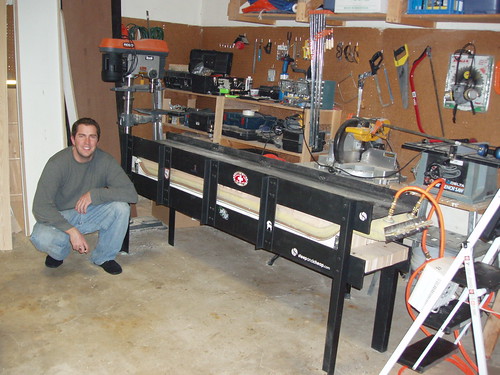
Image
Last edited by powdercow on Mon Apr 02, 2007 8:06 pm, edited 1 time in total.
- Ben
User avatar
RoboGeek
Posts: 239
Joined: Wed Jan 17, 2007 12:08 pm
Location: Middle of a cornfield...

Post by RoboGeek »

very pretty.. well made, and even looks like it could be produced for sale (hint-hint)
I used to be a lifeguard, but some blue kid got me fired.
User avatar
bigKam
Site Admin
Posts: 538
Joined: Tue Feb 01, 2005 5:15 pm
Location: Park City, Utah
Contact:

Post by bigKam »

nice work, Ben! looking forward to seeing your skis..
User avatar
littleKam
Site Admin
Posts: 269
Joined: Mon Dec 13, 2004 7:43 pm
Location: SoCal

Post by littleKam »

great press! probably one of the most appealing I've seen so far. Seems nice and strong but has a clean, lightweight look to it. Just a question - are you worried about the press tipping over?
- Kam S Leang (aka Little Kam)
powdercow
Posts: 76
Joined: Mon Jul 31, 2006 1:35 pm
Location: Orem, Utah

Post by powdercow »

Thanks everyone!

Robo - Making the press was without a doubt the hardest and least fun part of this process. I don't think I would ever want to make more of them.

Kam - I have one pair done and have ridden them a handful of times already. I hope to post about "ruby soho" soon.

Kam - When making the press I thought I would have to make a base for stability. Once it was completed I was amazed at how stiff the legs were and how stable the whole setup was. In fact I have stood on the press to get to the shelf behind it many times.

I still plan to build a base eventually since if the press ever did tip it would fall with enough force to possibly crack my floor (not to mention crush anything in it's way on the way down).
- Ben
G-man
Posts: 600
Joined: Sat Mar 25, 2006 3:58 pm
Location: northern sierra nevada

Post by G-man »

Yes, very nice indeed. Thanks for the Rockcrawler link... just what I've been looking for.

G-man
powdercow
Posts: 76
Joined: Mon Jul 31, 2006 1:35 pm
Location: Orem, Utah

Post by powdercow »

With all of the tools in place it was time to get to the point and build some skis. In keeping with my multimedia effort please play the music in this link in the background while reading this post:


In order to explain the design phase I actually have to make a shocking confession. After 12 seasons on a snowboard, last spring was my first time on skis since I was knee high. As a result, apart from crappy rentals the only production ski I have spent any significant amount of time on are my Blizzard Titan 8.2 (the orange ones). Some might view this as a handicap but I prefer to look at myself as being untainted. Either way my first pair of skis was bound to be shot in the dark. To make things a little easier I decided to take the dimensions of a proven performer, the explosiv and modify it slightly by making it twin tip. The problem is that I forgot to account for the width of the ski edge when making my mold for the base and core. So instead of being 120-95-112 my ski is 124-99-116. I chose 189 for the length because I felt like I wanted a little more length than my current 185 titans.

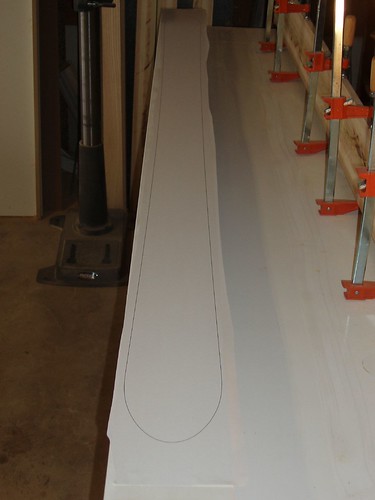
I decided on an ash/poplar combo for the core which was made out of two book matched pieces cut from the same “butcher block”. The idea was to match the flex of the two halves so that the ski would perform consistently edge to edge.

Image

When the two sides were laminated together, the ¾” wood strips were ordered:
ash, poplar, ash, poplar, poplar, ash, poplar, ash
the idea being that the ash would make up the binding mount position and the sidewalls with the lighter poplar in-between.

Image

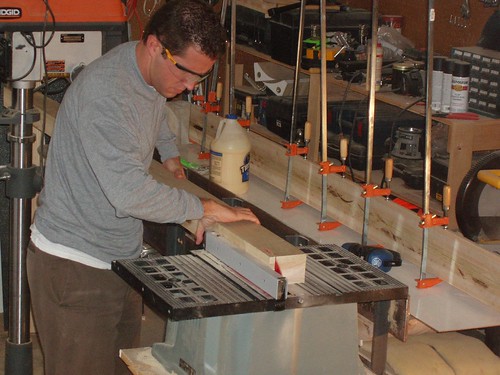
Most of the process went off without a hitch until it came time to attach the ABS sidewalls. I had purchased a 4’x 8’ piece of ABS and ripped the sidewalls from the sheet. I quickly learned that cutting ABS is a messy, smelly, sticky business. I also relearned that my table saw is the least favorite tool I have. I want to replace my lousy pawn shop special but always find something better to do with the money.

Once the sidewalls were ripped I drenched them in epoxy and clamped them down.

Image

Problem is that after drying they popped right back off. After several times of re-gluing I thought I had the problem solved. Then I ran the cores with side walls attached through the planer, and off came the sidewalls. Once more I glued them back on. Then came profile time and surprise, surprise the sidewalls came off again. With the core already shaped I didn’t think I could re epoxy since the excess resin would inevitably need to be planed off. So I made a compromise I wasn’t happy about and spot glued the sidewall on with the idea that during layup epoxy would be forced into the cracks and a good bond would be made.

I also started to flame treat the top and bottom edge of my sidewall and, you guessed it, they started to separate from the core again. I did a superglue patch job and decided to leave the majority of the sidewall untreated. The other problem with my sidewalls is that because I was unable to find half inch thick ABS I had to set my ripped edges on their sides which means to get my sidewalls as thick as I wanted them (about 12mm at the base) I had less than a millimeter of spare material on each side. If my cores got out of alignment at all I would be in big trouble. I also didn’t route a channel for my edges since I was certain that doing so would remove my sidewalls from my core.

For construction I had Durasurf 2001, 1.3mm edges from CDW, 22 oz triaxial braid fiberglass (one layer on top and one on bottom), and a 6 oz fiberglass for the top sheets. The tip and tail spacers would be made out of three layers of the heavy glass. The graphics layer was a fabric I picked out with my wife at the local Joann’s.

With all of these compromises and quick fixes I really didn’t expect the layup process to go well and I had even lower expectations for the final product. I asked my wife to set aside the time and assist me with the whole layup since I was doing both skis at once and wanted the process to go fast. I originally expected her just to mix epoxy and hand me stuff but as soon as she saw what I was doing she grabbed the second spreader and ended up being better at completely wetting out the fabric than I was. When were done she said “that was fun, maybe I should make skis too”.

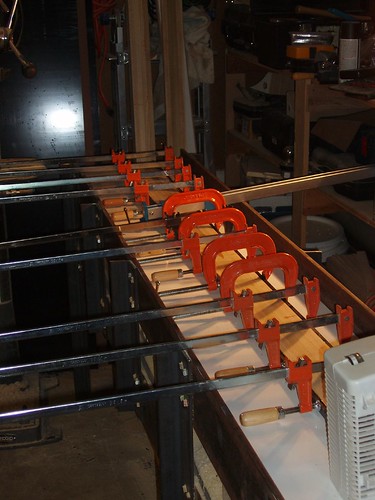
The skis were sandwiched in between two pieces of tile board with the bottom piece fixed to the camber mold with double sided tape and the bases attached to that board also with tape. Getting the whole setup in the press proved to be difficult as the tip and tail attachments kept getting caught on the press bolts, but eventually all was ready for the pressure.

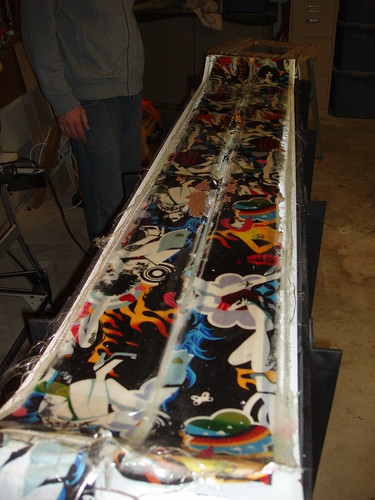
Since I have no way of heating my setup (other than the little space heater you see) I left it under pressure for 14 hours during which time my air compressor only cycled once. I opened the whole setup and found this:

Image

I thought I had the right blade for my jig saw but soon realized that any blade meant for wood, even the expensive Bosch ones, would completely round off after only a few feet of cutting though epoxy and ABS. After getting a blade meant for metal, trimming went much more smoothly.

I used a belt sander to remove the excess material, then a router bit with an 18 degree angle to bevel the sidewalls. I noticed that I was getting a little de-laminating in the tips when sanding so I put some rivets through for good measure. (Pop rivets are messy and weak so I ordered some binding posts from McMaster for the next pair.)
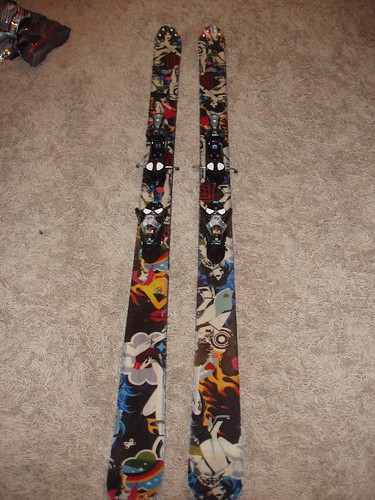
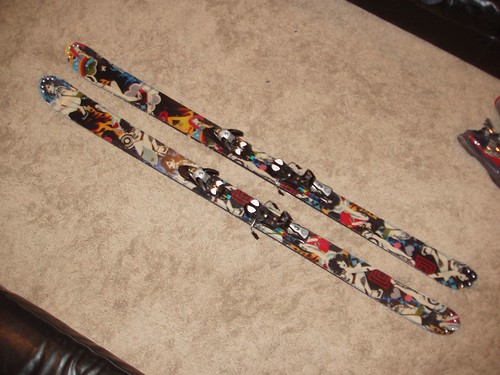
The final product:

Image

Image

One oddity that I noticed is that true to form the camber was not what I was expecting. The tip and tails match the mold perfectly but the ski came out completely flat having 1 mm of camber if anything. I think it might have to do with the temperature since my skis were pressed in a freezing garage with no external heat.

After the bases were ground, the edges were set, some wax soaked in, and demo bindings mounted my skis were ready to ride. I had originally intended to name them something different but after seeing the top sheets and because I rediscovered one of my favorite bands from my youth they had to become “Ruby Soho”.
- Ben
plywood
Posts: 499
Joined: Fri Oct 13, 2006 2:13 am
Location: wilen, switzerland
Contact:

Post by plywood »

not even your press looks great, also the skis came out pretty awesome! totally sick grafics! they look so cool! i really like them. is it any special printet cloth you found or what`s the deal with it?

i`ve got a similar background as yours - snowboarded most of the time and just ridden one ski. so think in the end you`re gonna be lucky to have forgotten to add the edges on the shape when cutting out the bases. wider skis are never wrong. especially in powder you will be glad to have at least 124mm in the front.

the story with the sidewalls is funny to read - that`s why i didn`t use any sidewalls on my projects :D so hopefully they hold. the ski really looks sick, so it would be a shame it something delaminated. i`m still stoked about the grafics!
plywood freeride industries - go ply, ride wood!
alexisg1
Posts: 110
Joined: Fri Dec 08, 2006 12:38 am
Location: Grenoble, FRA

Post by alexisg1 »

very nice ! Good job, and handsome result !
The skis look sick !

I hope we'll have some experts opinion about this sidewalls story as i want to use som in my own project...
hafte
Posts: 204
Joined: Wed Jan 11, 2006 11:40 am

Post by hafte »

Ben, when did you press the skis? I ask because it sounds like you may want to do a post cure on them. Curing epoxy in cold temps will significantly reduce the physical properties of the epoxy. You may be able to gain some camber back in the skis and get better properties out of the epoxy you are using by doing this.

To do the post cure and the next time you do a ski throw a sheet of 6 ml plastic over the press and all to make a tent. Set the heater in the tent (I use two for this). I can maintain 70-90 degrees this way depending on the ambient temps and the size of the space in the tent. I raise the post cure temp to 110-120 by making the space in my tent smaller, and maintain that for several hours. To keep the heaters running during the higher temp post cure I have to be sure that they are taking in cold air or they get too hot and shut down, and I can’t maintain the 110-120 degree consistently. I have run the post cure from 3-8 hours on my skis. The Heavy Doods have maintained 15mm out of the 17mm of camber in the Tool. I kept them in the press while the post cure took place. The Doods were just lying on the tool during the post cure. Remember I vacuum bag my stuff at this time.

The post cure is recommended by the epoxy manufacturer that I use to make the most out of the properties of the epoxy. It really works. I’m currently using Resin Research epoxies. The info I related here is not on their web site. I found out about this epoxy last summer when I was making surf boards. The owner, Greg Loehr, of the company used to post regularly on www.swaylocks.com. Some searches may yield more info that I missed.

Here is some info about RR epoxy. Might be too much to wade through but good stuff.
http://www.swaylocks.com/forum/gforum.c ... 781#271550

More advise on post cure techniques. Bert and others have some great insights to keep things in one piece while doing post cures.
http://www.swaylocks.com/forum/gforum.c ... 781#199663

I can’t wait to get home so I can see the pictures. They block so much stuff here. Just drives me nuts!!!

It is going to snow Thursday. Should be a great weekend on the slopes!

Hafte
G-man
Posts: 600
Joined: Sat Mar 25, 2006 3:58 pm
Location: northern sierra nevada

Post by G-man »

Great read! I hate to say it, cause I know it must have been very frustrating at the time, but your story telling of the ABS problems was quite humorous. Your wife sounds like a great sport.

Yes, the skis look very nice. Isn't it weird how the jigsaw blades wear out so fast? You can cut fiberglass all day with one blade... or cut ABS all day with one blade... same with base and top sheet material. But put them all together, and you can't cut six inches before the blade is toast. I don't get it. And metal cutting blades don't seem to last any longer for me than wood cutting blades do. I have a really old band saw that has a really old blade on it (it's been on there for years) and it cuts through the ski flash like butter. I've used it for a dozen skis and it's still going strong. I'm afraid to change the old blade out for a new one for fear that the new blade will get fried on the first ski.

Regarding heat curing/post curing, I recently made a large 'oven' out of reflective backed foam board with a couple of 250 watt heat lamps inside. I cut a little inspection port where I can look in and check out the temperature on a hanging thermometer. I control the temp with a regular ol' dimmer switch. I get temps of 160 F without any problem, and running two heat lamps is much less expensive that running space heaters. There is something about infrared heat bouncing around on a reflective surface that is really efficient in terms of getting the temp up. Oh, the oven was 8 feet long, 2 feet high, and 2 feet high.

Thanks for the great post and pictures.

G-man
Bibble
Posts: 9
Joined: Tue Feb 13, 2007 4:04 pm

Post by Bibble »

my one question is how the hell did you get such KICKASS graphics?
Tassie Boy
Posts: 12
Joined: Sun Feb 04, 2007 11:47 pm
Location: Tasmania, AUSTRALIA

Post by Tassie Boy »

those are sweet man. i absolutely love the graphics!! :D

Thanks for posting your journal it was good to read.
Keep up the good work :D
Cheers Dylan....

JUST DO IT..
powdercow
Posts: 76
Joined: Mon Jul 31, 2006 1:35 pm
Location: Orem, Utah

Post by powdercow »

Sorry this took so long. It's been snowing almost every day in Utah which for me has a cascading effect of ski all morning so I stay late at work to catch up so I am very tired by end of day. Of course I am not complaining. :D

Hafte - Awesome information there. I really appreciate you taking the time to find that for me. I think I am going to leave the rubies as they are since I have come to love the float they give me, but the info will with out a doubt come in handy in the future. I also like your tent idea, I really want a heat blanket but it is hard to justify the cost right now so a tent might work in the mean while.

G-man- The heat lamp oven is another idea I am going to keep in mind if I can't get a blanket together soon. Also once I started using the metal type jig saw blade (Bosch brand) it made it through a whole ski with out any visible dulling. I would love to have a band saw like yours but I think you have options if the old blade ever dies.

Graphics - I am glad everyone likes the graphics. When my dear old mom saw them all she could say was "there are naked ladies on your skis". They are really nothing special just some cotton fabric we picked up at JoAnns, probably cost $5. I imagine that like me, most of you know your way around a Lowes/ Homedepot but get absolutely lost in a fabric store. A lady friend can help with this, or just wander around and you are bound to find something you like.

Durability - As I said earlier I was really worried about the durability but I must have done something right because after the initial tip delam (solved by the rivets) I can find no signs of failure on them at all. They usually get skied three times a week for a few hours each time (10 or 12 partial days by now) and never come out of my car in between trips (except for waxing) so I am happy with how they have held up.

Topsheets - I am sold on fiberglass for a tip spacer material and will also use it for topsheets on all resort skis. When I get around to making a touring setup I think I will need a topsheet that sheds snow easier so I am not hauling extra weight up the mountain.

Mounting point - I misread some recommendations online and mounted my skis with boot center on chord center. This put me WAY to far forward so I was glad I used demo bindings and had some room to adjust. After my first run I have had them set with boot center -2.5cm to chord center and I still think this is to far forward. On rereading the article I found that they recommended putting the ball of your foot on chord center which is where I am going to try next (I have to remount the bindings).

How they ski - Despite the mounting trouble I have totally fallen in love with the rubies. I have riden them in just about everything now, ranging from month old ice to 15 inches of new. They float pow better than my Titans ever did, they absolutely love to make big, big turns on the groomers and they are also very stable on cut up snow. I really only have two complaints: The tails are hookey, I detuned the tails to limit this but I think until I get my mounting point changed there isn't alot I can do. And they can get a little squirrelly on flat cattracks, which I think is caused by the lack of camber.
- Ben
Post Reply