
Our first try.
Moderators: Head Monkey, kelvin, bigKam, skidesmond, chrismp
Your setup is lookin nice.........One slight off journal question here. I see many Levels sittin on or around peoples presses. My basement has a slight slope in the floor.
How important is it to have the press dead level?
I would guess the concern is that the epoxy might flow in the direction of the slope and create dry spots or uneven curing, but will a few degrees matter? Is it worth shimming my press!
How important is it to have the press dead level?
I would guess the concern is that the epoxy might flow in the direction of the slope and create dry spots or uneven curing, but will a few degrees matter? Is it worth shimming my press!
So this weekend we spent on the project and we got some stuff done.
The closer we get to pressing our first pair, the more we realize how many things we could have done different, and how many things we could have done better. I guess we will have to accept that this will be more of a (hopefully) skiiable sample try.
We glued the edges onto the base usibg epoxy. Bending the edges was a bitch, as expected. And the result was not as good as a would have hoped, but will do for our first pair. Realizing how much easier it was to NOT make a full wrap I decided to end the edged before the tip and tail butOne thing I realized after glueing them was that we should have made the edge of the base where the steel edge go a bit narrower. Like a cut to make the transition from steel edge to no steel edge smooth. (do you follow me?)
How do you guys solve that problem?
We also put the first mold into the press and attached it firmly. Tried the press at our planned working pressure about 15,000kg. It didn't even make a sound, very undramatic but safe I guess. Is this preassure enough? How much preassure do your presses generate calculated in weight for easy comparison?
Last we made the router bridge and started figuring out what core thickness to use. I would love some input. And thoughts here from more experienced people..!
My skis are 160-134-150mm with 40mm full rocker and 35cm of flat under bindings. Our enforcement layers are 600g(21oz)/m2 triax fiberglass
My core is spruce with two oak stripes under the binding screws.
What do you think of 2,5mm running 15cm to 11mm for 40cm under foot to 2mm running 15cm.
Is that totaly off? What changes would you make?
Next weekend we hope to be able to press our first pair, I'm so excited and nervous.
Our press, with my friends snowboard mold fitted and ready to go. The fire hoses will be shortened soon...

My base with edges attached. Note the tyre tracks, thats an interesting story...

The closer we get to pressing our first pair, the more we realize how many things we could have done different, and how many things we could have done better. I guess we will have to accept that this will be more of a (hopefully) skiiable sample try.
We glued the edges onto the base usibg epoxy. Bending the edges was a bitch, as expected. And the result was not as good as a would have hoped, but will do for our first pair. Realizing how much easier it was to NOT make a full wrap I decided to end the edged before the tip and tail butOne thing I realized after glueing them was that we should have made the edge of the base where the steel edge go a bit narrower. Like a cut to make the transition from steel edge to no steel edge smooth. (do you follow me?)
How do you guys solve that problem?
We also put the first mold into the press and attached it firmly. Tried the press at our planned working pressure about 15,000kg. It didn't even make a sound, very undramatic but safe I guess. Is this preassure enough? How much preassure do your presses generate calculated in weight for easy comparison?
Last we made the router bridge and started figuring out what core thickness to use. I would love some input. And thoughts here from more experienced people..!
My skis are 160-134-150mm with 40mm full rocker and 35cm of flat under bindings. Our enforcement layers are 600g(21oz)/m2 triax fiberglass
My core is spruce with two oak stripes under the binding screws.
What do you think of 2,5mm running 15cm to 11mm for 40cm under foot to 2mm running 15cm.
Is that totaly off? What changes would you make?
Next weekend we hope to be able to press our first pair, I'm so excited and nervous.
Our press, with my friends snowboard mold fitted and ready to go. The fire hoses will be shortened soon...
My base with edges attached. Note the tyre tracks, thats an interesting story...
looking at that last photo I have one major question : the side of the base we see on the picture... is it the abraded /flamed side ??? I'm seeing some kind of abrasion texture on it... I hope not.
Send some pics of the pressed board when it,s done ! Keep up the good work !
Send some pics of the pressed board when it,s done ! Keep up the good work !
A bad day skiing is always better than a good one at work...
-
twizzstyle
- Posts: 2204
- Joined: Tue Mar 07, 2006 8:25 pm
- Location: Kenmore, Wa USA
Hi Sonny,
You were asking about how to transition from edge to no edge. I think most people tack on a 2mm thin strip of plastic around the tip/tail. There are a few photo's here and there within the forum.
Finding the right epoxy to bond on the edges is a tricky task. You might find it easier to use PE masking tape, per Boheme skis video. Tape is only 0.07mm thick, so the in-print must be nominal. If you don't like this approach, speak to Bison, they have a great neoprene adhesive, but you will need to use 0.25mm tips. Run a single bead of adhesive along the vertical inner edge, join when wet - so not per the instructions on the packet.
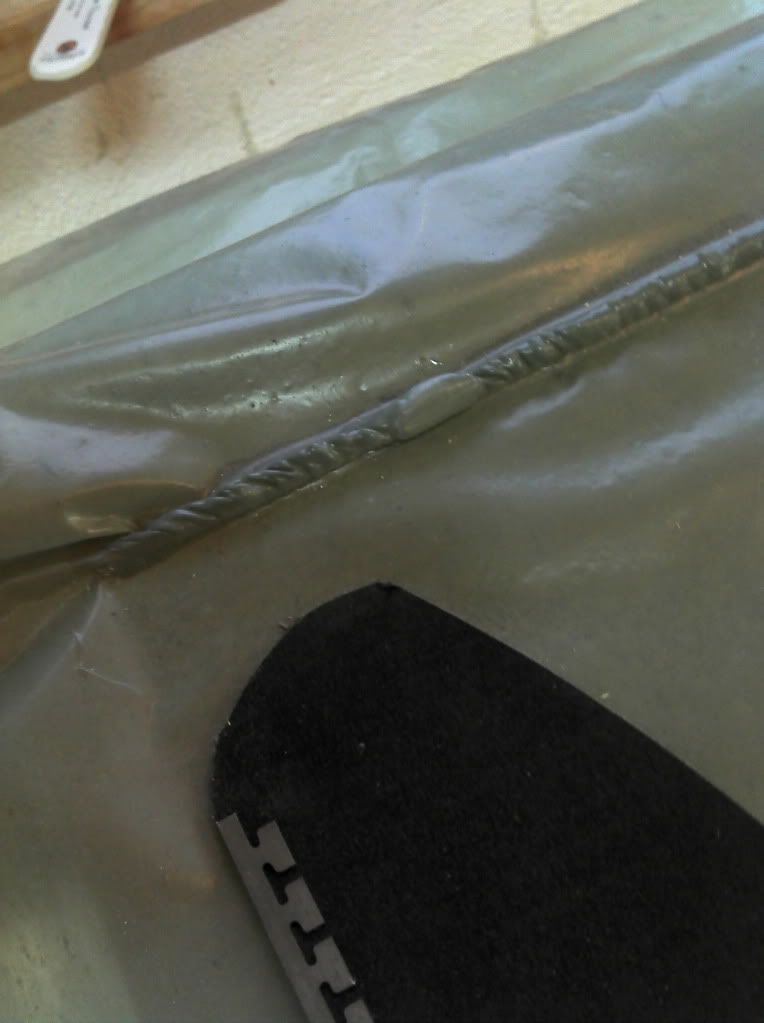


I honestly think our base has the exact same texture on both sides. I may be wrong but i couldn't see any difference, so I hope I'm not wrong.. :Sben_mtl wrote:looking at that last photo I have one major question : the side of the base we see on the picture... is it the abraded /flamed side ??? I'm seeing some kind of abrasion texture on it... I hope not.
Send some pics of the pressed board when it,s done ! Keep up the good work !
Yes, inte alla som har sånna fina spår under sina skidor!OAC wrote:Dubbdäck! :-)
Thanks! Hmm I really hope the tyre tracks will be removed in the first grinding..twizzstyle wrote:Too bad those tires tracks couldn't be permanent, makes kind of a cool base graphic!
The press looks fantastic, you guys are going to get some great results I bet. Looking forward to seeing your first pressing! Good luck!
Yes, both his snb and my skis are built for powder only. We may have over done it and we will soon find out. Hehe.gozaimaas wrote:Your mate like a bit of rocker in his boards hey?
I read your answer several times and i'm not really sure what you mean with the thin strip of plastic but I think I got it,. "AllgäuSki"'s images make sense, thats how i'll do it next time...Richuk wrote:Hi Sonny,
You were asking about how to transition from edge to no edge. I think most people tack on a 2mm thin strip of plastic around the tip/tail. There are a few photo's here and there within the forum.
Finding the right epoxy to bond on the edges is a tricky task. You might find it easier to use PE masking tape, per Boheme skis video. Tape is only 0.07mm thick, so the in-print must be nominal. If you don't like this approach, speak to Bison, they have a great neoprene adhesive, but you will need to use 0.25mm tips. Run a single bead of adhesive along the vertical inner edge, join when wet - so not per the instructions on the packet.
Thank you, thats exactly what i wanted to see. Thats definitely how I'll do it next time. I honestly didn't think about that problem until i had already glues the edges on. With the first pair I guess your bound to make some mistakes, and this was definitely one..AllgäuSki wrote: this is how i do (and i think most people)... include the edge in your first draw, then draw a second line two millimeter more inside, cut along the second line and there you go...
edit: not sure if i made that point easy to understand, so i had my cat do a drawing with her tail to illustrate...
-------------------------------------------
This last couple of days we have made some progress!
Me profiling one of my cores into the desired shape.

Gustaf my friend, profiling his snowboard core into final shape.

Gustaf, cutting the fiberglass into stripes for his snowboard.

The shiny fiberglass blanket..

# We managed to profile our cores into the final shapes.
# We bought proper gas-protection masks. Do you guys use eye protection glasses?
# We cut tip/tail spacers for our snowboard/skis
# We are currently pressing a sample piece to see that everything works as it's supposed to.
# We had a friend make a top "cassette" (is that what you call it, the sheet of metal on top of the top sheet when you put the skis in the press?) Also, how thick metal do you use for this? Our cat-track is 30mm square pipes..
Tomorrow it's D-day. We are pressing our first snowboard and I am so looking forward to that. Any final tips before we try this?
Does anyone know what aprox pressure you apply per cm^2 to your skis or snowboards when pressing them? We are trying to figure out how much force we should apply in the press.
Can you put on to much epoxy and ruin the board, or will the pressure take care of that?
How much epoxy will be enough for one 170cm powder snowboard?
-
amidnightproject
- Posts: 378
- Joined: Wed Nov 04, 2009 10:59 am
- Location: Portland Area, Maine
- Contact:
I press at 80psi. Because i've found that is what seems to work best for my heat and epoxy combo.
Too much epoxy won't ruin your board. It will just make it heavier if you don't get a lot of squeeze out.
As for epoxy, mix it in small batches as you go so you dont over estimate Just have some cups ready to go with epoxy measured out already so that all you have to do is add hardner and mix.
Good luck! have fun!
-
amidnightproject
- Posts: 378
- Joined: Wed Nov 04, 2009 10:59 am
- Location: Portland Area, Maine
- Contact: