
finally recovered from my cores being to narrow. I ripped the ptex SWs off and went with wider tiger maple wood sidewalls. I have them re-profiled and have the locating pins in place on the bases. Pretty much everything is set to go. So with fingers crossed I should be able to press tomorrow afternoon.
For those that read this, what are folks using to seal their wood sidewalls? I'm guessing tung oil but I did not research this as I was not expecting to use wood SWs.
WhiteRoom skis
Moderators: Head Monkey, kelvin, bigKam, skidesmond, chrismp
Fighting gravity on a daily basis
www.Whiteroomcustomskis.com
www.Whiteroomcustomskis.com
Boiled linseed oil works great.
4frnt recommends not sealing their wood sidewalls.
They say that if you get a cut or nick in the finish it will let water in, then the sealant holds it in and the wood rots.
Not sure I'm buying that, but the last pair I built with maple sidewalls didn't get treated.
We'll see what happens.
sam
4frnt recommends not sealing their wood sidewalls.
They say that if you get a cut or nick in the finish it will let water in, then the sealant holds it in and the wood rots.
Not sure I'm buying that, but the last pair I built with maple sidewalls didn't get treated.
We'll see what happens.
sam
You don't even have a legit signature, nothing to reveal who you are and what you do...
Best of luck to you. (uneva)
Best of luck to you. (uneva)
You can make a 50/50 ski wax and white spirit solution. First time, apply when warm with a cloth. Put more on than you need and let it soak in overnight.
The cooled liquid is there to be used as a cream you can apply as and when.
Personally I have found this a quick way to get a thin layer of wax on the base too.
The cooled liquid is there to be used as a cream you can apply as and when.
Personally I have found this a quick way to get a thin layer of wax on the base too.
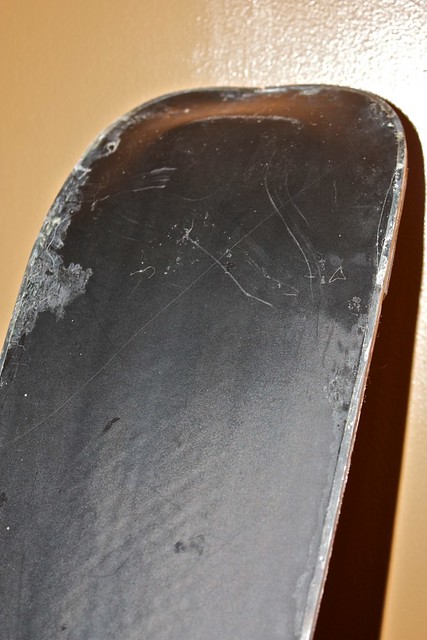
1st pair s out of the press and looks ok. definitely some improvements to be made. But the press and my heat system worked great and the layup went ok. the bases on the tail look indented around the tip fill, not exactly sure what happened there. the tops look good and as far as I can tell the alignment looks but I won't be able to tell until tomorrow when I flash them out. Super stoke right now. Pics later.
Fighting gravity on a daily basis
www.Whiteroomcustomskis.com
www.Whiteroomcustomskis.com
-
MontuckyMadman

- Posts: 2395
- Joined: Fri Jun 20, 2008 9:41 pm
i think too little pressue in the tail. the base isnt so much in dented as it just not flat. you can see a gap between the glass and tip fill at the very end that I'll have to inject some epoxy into also.
the tops came out great and the sidewalls are good also minus a couple slips with thr router.
I'll post pics after work.
the tops came out great and the sidewalls are good also minus a couple slips with thr router.
I'll post pics after work.
Fighting gravity on a daily basis
www.Whiteroomcustomskis.com
www.Whiteroomcustomskis.com
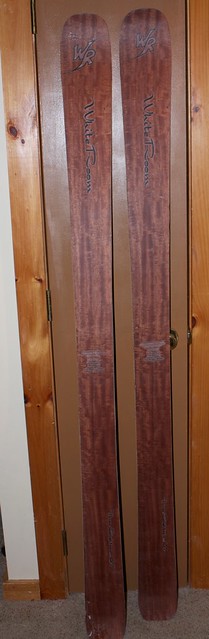
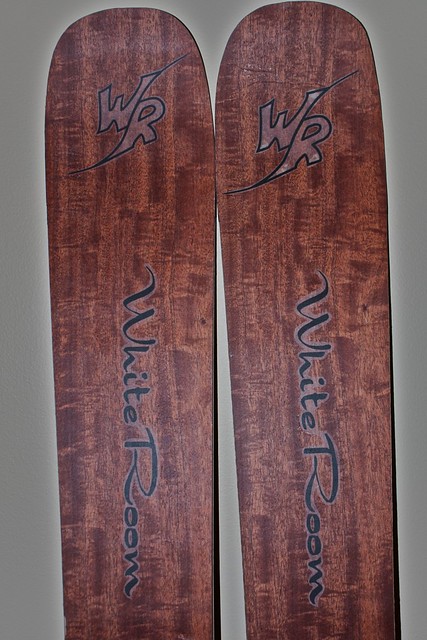
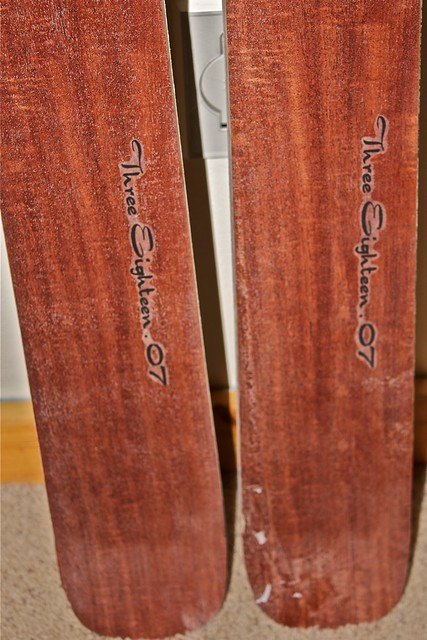
pics
first pair
tip and graphics
tail and graphic
base defect
I fixed the sidewall router defects with JB weld epoxy wood putty. Seems to be holding. It is a 2 part putty epoxy that is rated for exterior wood. So we'll see how it holds up on snow.
I'll sand and finish the tops and sidewalls tonight with McCloskey's Marine grade spar poly. I also have to inject some epoxy into some voids at the tail due to the poor pressure there.
I might be able to get them a base grind and mount tomorrow. I have to figure out how to grind/sand the tail defect. I may just do it manually. Does anyone have any suggestions for that?
I give myself a C grade for this pair as a lot of stuff went well and they will be skiable but there is a lot of room for improvement especially in the tail mold pressure and the edge fit at the tip and tails
All in all I learned a lot and the next pair will definitly come out better.
Fighting gravity on a daily basis
www.Whiteroomcustomskis.com
www.Whiteroomcustomskis.com
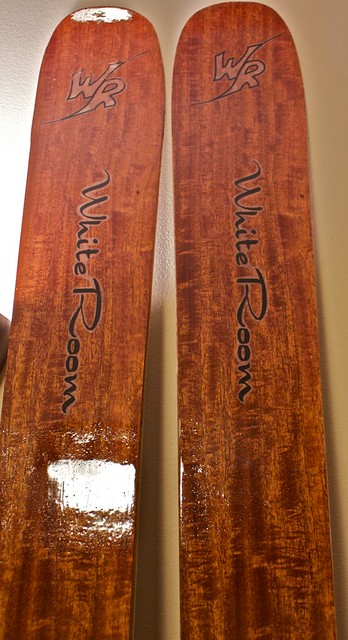
more pics with finished tops/ sides
tails and tiger maple SWs
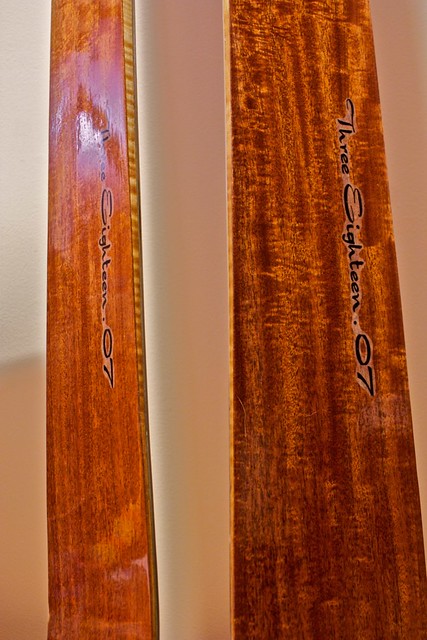
tiger maple sidewalls look sweet
nice glossy finish
Dimensions
185cm
138/104/125
23M radius
weight: 4lbs 3 oz each/ 8lbs 6 oz for the pair
tiger maple sidewalls look sweet
nice glossy finish
Dimensions
185cm
138/104/125
23M radius
weight: 4lbs 3 oz each/ 8lbs 6 oz for the pair
Fighting gravity on a daily basis
www.Whiteroomcustomskis.com
www.Whiteroomcustomskis.com
-
skidesmond
- Posts: 2337
- Joined: Tue Apr 07, 2009 3:26 pm
- Location: Western Mass, USA
- Contact:
Nice work! I like the tiger maple sidewall. I use exterior grade poly on my top sheets and side walls. I guess you could use boiled linseed oil first or tung oil. Then when that's soaked in follow up w/ poly. But that seems like a lot of extra work and time since the linseed/tung oil take time to dry properly.
Get a base grind on them. They normally run them over the machine 2-3 times. Afterwards you'll be able to see how flat the base really is. My first couple pairs weren't super flat (slight concave) in the tip area even after a base grind. But they still skied great.
As for the tail/base defect, as long as the voids are filled to prevent water from seeping in I wouldn't worry about it too much. That's not going to grind out. It's your first pair and that won't effect the performance of the ski. IMO, I would ski the hell out of them first, take note what you like/don't like for the next pair. Then try fixing the defect by peeling it apart, fill it w/ epoxy, clamp it back together (with c-clamps), then clean it up. I used my first pair as experimental skis for testing repairs, etc.
the bases are a bit uneven. I think i might have used too much epoxy and some ot trapped at the edges. Also I can't be sure I had a truely flat core after my sidewall error.
The tail defect does not come apart they are bonded well, it was more of a pressure issue that caused them to not be flat.
If there is anything that I will be truely critical of it will be the camber. I ended up with at least 5 mm more than my mold. This was a heat issue. My bottom TC was not placed well and was reading only mid 80's F when I know it was more like 160 or more by the feel of the alu skin on my fingers. The uneven heat gave me super camber. They will probably ski great on firm snow but will likely dive in deeper stuff.
At the shop now waiting for Marker Jester demo binders. The flex feels nice but that may be due to the camber.
I'm going to ski the crap out of them and then put another pair together with some adjustments.
Fighting gravity on a daily basis
www.Whiteroomcustomskis.com
www.Whiteroomcustomskis.com
Well I've started work on a new design and recut My original mold to have less camber. I have new templates printed and I'll begin work on my new mold this weekend.
New design will have rocketed tip/tail and positive camber under foot. It will Also have mixed sidecut ala Aramada jj or Rossi S7. my design comes Somewhere in between those models.
I also found that the right clamp is everything when routing out molds. I bought a set of single handed Irwin speed clamps and cut the time it takes me to cut 1 rib of a mold in half. I had been using some el cheap F clamps for this with much frustration.
Fighting gravity on a daily basis
www.Whiteroomcustomskis.com
www.Whiteroomcustomskis.com

I'm currently in varied states of construction of 5 different pair with 4 different models. 3 rockered pair with some minor differences in widths using the same camber design. 1 traditional design fatty and a race design for my nephew who is going to race for his high school this winter.
I'm hoping to press all 5 pair in the next 3-4 weeks. My cores and sidewall s are coming out good and my edge bending is improving. So far everything seems to be progressing better than with my first pair.
I'll post pics as thing develop further.
I'm hoping to press all 5 pair in the next 3-4 weeks. My cores and sidewall s are coming out good and my edge bending is improving. So far everything seems to be progressing better than with my first pair.
I'll post pics as thing develop further.
Fighting gravity on a daily basis
www.Whiteroomcustomskis.com
www.Whiteroomcustomskis.com