
Thanks for the info. I made my templates basically the same way (using a piece of wood as a guide on the paper template) but I did the entire ski. Then trace out the routed template on my table, flip over the template, line it up and on the tracing and sand where needed until both sides matched, time consuming.
My last template was cnc'ed for $50. I'm going to have more cnc'ed and hopefully get a price break. Should be able to 7-8 templates from a sheet of mdf. MDF isn't that expensive but I know the guy needs to make a buck too.
Ski building so far
Moderators: Head Monkey, kelvin, bigKam, skidesmond, chrismp
-
skidesmond
- Posts: 2337
- Joined: Tue Apr 07, 2009 3:26 pm
- Location: Western Mass, USA
- Contact:
You'll have a better result if you spend $3 at your local fedex or kinkos and have them print a full size paper template. The split template method tough to get lined up correctly. Then spray adhesive it to some MDF and then shape.
Fighting gravity on a daily basis
www.Whiteroomcustomskis.com
www.Whiteroomcustomskis.com
-
skidesmond
- Posts: 2337
- Joined: Tue Apr 07, 2009 3:26 pm
- Location: Western Mass, USA
- Contact:
-
n.marshall
- Posts: 30
- Joined: Mon Aug 30, 2010 7:29 pm
Exactly. I sharpen the pencil that I am using for and spend lots of time clamping the wood down before sinking screws into it.skidesmond wrote:Placement of the strip of wood is critical.
After doing this batch of skis, I would rather not start a business. I like the problem solving side of ski building, not the repetitive manufacturing side.chrismp wrote:the last photo kinda reminds me of ON3Ps first batch of skis. and look where they're now! way to go!
Thats a great idea, I will have to try that next time around.Richuk wrote:You'll get a better result (almost perfect) if you use a piece of PE or even a strip of wood:
Do your guys' split templates print out different than what you put into the program? I use a tape measure to get the right width's and lengths, and the paper just for a guide.Vinman wrote:You'll have a better result if you spend $3 at your local fedex or kinkos and have them print a full size paper template. The split template method tough to get lined up correctly. Then spray adhesive it to some MDF and then shape.
Make sure your printer isn't set to scale your image, I've ran into this before.n.marshall wrote:
Do your guys' split templates print out different than what you put into the program? I use a tape measure to get the right width's and lengths, and the paper just for a guide.
Otherwise they should print to scale.
When taping together the split template I stretch a length of black thread from one end of my table to the other (really tight) and use that to line up the center line.
Tape each piece to the table then to each other.
I use a scrap of the printout to measure the lines that run across the paper to make sure the ends are the correct distance apart.
Then spray glue that to a piece of 1/4" hardboard to make the pattern.
I usually cut out both sides and around the tip, then decide which side is easier to sand.
This gets screwed to the mdf at the intersections of tip tail and middle.
Trace one side with the router then flip it and use the same screw holes to hold it down for the other side.
Once in a while the tip/tail need a little sand after but in most cases turn out good.
I can't believe how fast your pumping them out by the way.
Looking good!
Thanks for posting.
sam
You don't even have a legit signature, nothing to reveal who you are and what you do...
Best of luck to you. (uneva)
Best of luck to you. (uneva)
-
n.marshall
- Posts: 30
- Joined: Mon Aug 30, 2010 7:29 pm
How flat do your guys' bases come out? Is there something that I should do differently or should the guys at the local ski shop spend more time grinding them down?
That was after they tuned them up. The skis look a lot better with wax, but still not the quality you see from new skis in a shop.
I finally posted up pictures and descriptions of all the skis here
http://cascadecustom.wordpress.com/reviews/
Hopefully the skiers review them so you guys can get the info also.
My first though is are you routing out your sidewalls to accommodate the thickness I the edge teeth? I use a .9-1.1 mm rabbet.
Second thought is do you apply pressure before turning your heat on?
I pressurize for 10 Min prior to heating to allow the epoxy to squeeze out and just sort of flow though the glass. I think it might allow everything to flatten better.
I just got my last 3 pair back from the shop and after wet belt sanding and stone grinding they look pancake flat.
Fighting gravity on a daily basis
www.Whiteroomcustomskis.com
www.Whiteroomcustomskis.com
-
n.marshall
- Posts: 30
- Joined: Mon Aug 30, 2010 7:29 pm
Last fall, I cut a rabbet about 1 mm deep. My skis came out a little bit base high, and the shop people told me they were afraid to grind through the base, even though they only did a couple of passes. That's why this year I only cut a rabbet of about 0.6 mm, so the skis would come out edge high and it would be more visible how much material is being removed. I think next year I am going to go back to cutting a deeper rabbet, since those bases came out looking better.Vinman wrote:My first though is are you routing out your sidewalls to accommodate the thickness I the edge teeth? I use a .9-1.1 mm rabbet.
Second thought is do you apply pressure before turning your heat on?
I pressurize for 10 Min prior to heating to allow the epoxy to squeeze out and just sort of flow though the glass. I think it might allow everything to flatten better.
I just got my last 3 pair back from the shop and after wet belt sanding and stone grinding they look pancake flat.
Usually I would turn the heat on before doing the layup so that it was fully heated up before the ski goes into the press. My idea was that I am laying up one ski at a time, and I want both skis to enter the press at the same temperature.
I have done it the way you explain, and when I layup one ski, put in the press, the heater reads 20 degrees celsius, then turn the heater on, it goes up to 80. Let the ski sit for thirty minutes, turn the heat off, it slowly cools down to 40 degrees. Pull ski 1 out, layup ski 2, put in press, heat reads 35 or so, then turn on the heat. So one ski started at 20 and one at 35 which I was afraid could affect the rocker/camber.
Now that I think about it, your way makes more sense. Press it flat, then turn on the heat so the epoxy kicks.
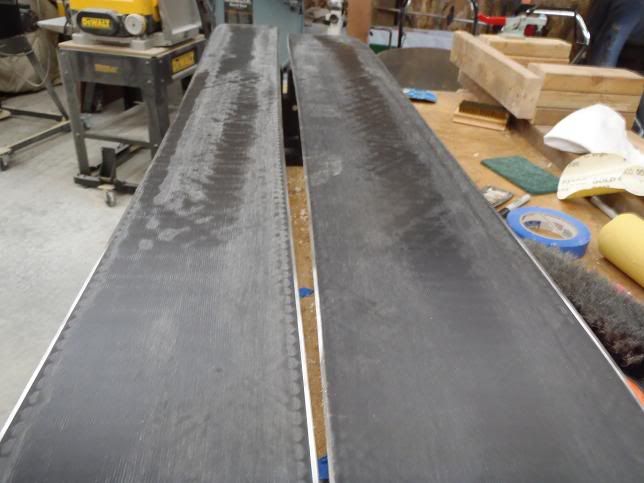
Could be a few things, like Vinman is saying ... just wondering how much pressure are you using? Looks like telegraphing through the base, which is a surprising - too much pressure and heat?
As you are making skis for friends, it's probably worth asking what you have done to resolve the dry fibre issue?
Have you double checked your mdf mould - too much heat and pressure and they will suffer quickly, particularly if the AL sheet is under 3 mm? This might explain why you have so much epoxy remaining on the edge set. Equally, it could be the rebatting - too much and it allows for pooling of epoxy?
I'm assuming the edge set and the base material are well matched?
Once you've worked out how to balance your materials, you'll get it down to three passes and then you are done.
Hope some of this helps you resolve this issue.
Vinman - Have you considered staged pressure and heat ramping? A less viscous resin will wet out fibres aid bonding. What is the thickness of you tines, rabetting at 1.1mm is a lot ( i think). Do you want a slightly lower pressure in this area?
1.1 is a bit much. I measure the thickness of the edge teeth plus the thickness of the VDS. My rabbets are more like .9mm. I adjust based on how flush the teeth are with the raised edge of the rabbet.
After I pressurize for 10 min I turn on the heat and let it ramp up to temp without any steps. I will manually control top to bottom heat differential wit my separate on/off switches for my blankets. I try to keep things within 5 deg F while both blankets ramp up to temp.
I press at 60psi
After I pressurize for 10 min I turn on the heat and let it ramp up to temp without any steps. I will manually control top to bottom heat differential wit my separate on/off switches for my blankets. I try to keep things within 5 deg F while both blankets ramp up to temp.
I press at 60psi
Fighting gravity on a daily basis
www.Whiteroomcustomskis.com
www.Whiteroomcustomskis.com
-
MontuckyMadman

- Posts: 2395
- Joined: Fri Jun 20, 2008 9:41 pm
doesn't look like they ground them enough. You have to remember most shop guys aren't used to grinding fresh skis. Anytime they get a ski it has been through a robot like 5 times already.
Or the epoxy is kicking in the base prior to enough pressure being applied.
Or edge rabbit issues.
If i didnt know any better I would say you were not using a cattrack. Its iggys press what say he?
Or the epoxy is kicking in the base prior to enough pressure being applied.
Or edge rabbit issues.
If i didnt know any better I would say you were not using a cattrack. Its iggys press what say he?
sammer wrote: I'm still a tang on top guy.
-
n.marshall
- Posts: 30
- Joined: Mon Aug 30, 2010 7:29 pm
I have been running 50 psi, since that what it seems like most people are doing on here. Maybe I will try building skis with less, it doesn't seem necessary for them to be under that much pressure.Richuk wrote:Could be a few things, like Vinman is saying ... just wondering how much pressure are you using? Looks like telegraphing through the base, which is a surprising - too much pressure and heat?
As you are making skis for friends, it's probably worth asking what you have done to resolve the dry fibre issue?
Have you double checked your mdf mould - too much heat and pressure and they will suffer quickly, particularly if the AL sheet is under 3 mm? This might explain why you have so much epoxy remaining on the edge set. Equally, it could be the rebatting - too much and it allows for pooling of epoxy?
I'm assuming the edge set and the base material are well matched?
Once you've worked out how to balance your materials, you'll get it down to three passes and then you are done.
Hope some of this helps you resolve this issue.
Vinman - Have you considered staged pressure and heat ramping? A less viscous resin will wet out fibres aid bonding. What is the thickness of you tines, rabetting at 1.1mm is a lot ( i think). Do you want a slightly lower pressure in this area?
dry fibre issue? not sure what you are talking about... if you are referring to the white spots on the base those get darker and it all looks consistent once I wax them. I just have the shop grind them down but not wax them so I save a bit of money.
I started doing a 0.6 mm rabbet since thats what I measured the thickness of the edge tines+vds to be. When the ski is finished you dont want it to be edge high, so that is a reason to cut the rabbet a little bit deeper than the tines.
I know that some of the spots of the middle of the base is from using too much spray adhesive to hold the base and edges in place, but other than that they should be flat throughout.
MontuckyMadman-
Yup using a cat track. After cutting the edge rabbet I would check it by hand to make sure that the depth felt consistent throughout.
Do you press your skis and then slowly ramp up the heat? I want to try it out, see what the base and epoxy does.

Sounds you're taken care of all the obvious stuff I was talking about.
On your first page, there's quite a bit of whiteness around the tips, a bit of fluff when cutting out the tips, whiteness over the CF tape and when you have double up for the binding plate, it's turned it opaque - which is unusual.
As you are putting a lot of effort into this and getting some great results, it seems a shame not to raise it. May be is just the camera? I'll photograph something later and post the result.
Later: https://picasaweb.google.com/1104837200 ... directlink