
Thats right, there is no VDS between the sidewall and the core, the VDS is on top of the edges.
I did NOT sand the core/sidewall after it was profiled, I guess I just assumed the profiling with the router made it rough enough (but its pretty smooth).
So maybe just sanding the core really good, and flame treating would be enough to help with the mechanical bond.
Just keeping the sidewall on the wood core while profiling is hard enough.
I worry about water getting into wood sidewalls - have you guys not had any issues with that at all?
Ski Haus ski builders
Moderators: Head Monkey, kelvin, bigKam, skidesmond, chrismp
nice work!!!
Your basic approach looks great. You'll undoubtedly work out the kinks in subsequent attempts.
How edge high were you?
Were you edge high all the way across the ski or only in the middle? What would a cross section of the base have looked like?
A better way to fix your edge high situation is to cancel the convexity with a ton of baseweld material before grinding. This would have been less than ideal with your 2 tone bases.
If you had put a straight edge across the base of the ski how much space would've been between the straight edge and the base?
Ski shops have base welding guns that heat the base material by melting it into the base. It is superior to ptex sticks. I bought some from a shop and it came in 2mm thick cords. I melted it into the base with a soldering iron. I also bought some that was formulated to stick to metal edges. I have used that to fill in gaps between my edges and base material.
check out: http://www.slidewright.com/base_repair.php
http://www.slidewright.com/proddetail.php?prod=KW341
To use this to correct a concave ski would require the kind of equipment a ski shop would have. A soldering iron would be inadequate for this type of job.
Also Check Splats posts in this thread:
http://www.tetongravity.com/forums/show ... hp?t=25467
ok some pictures to better illustrate...
in this one you can see the area that is concave after the base grind the lighter colored area in the middle of the ski...

its not too concave any more... but its still there...

a little bit of a closer shot

the thing i don't understand is that we routed the out a channel for the edges as seen in the below picture. it was the same thickness (to the touch) as the edges... maybe we need to route into the core more and not just the ptex....

in this one you can see the area that is concave after the base grind the lighter colored area in the middle of the ski...
its not too concave any more... but its still there...
a little bit of a closer shot
the thing i don't understand is that we routed the out a channel for the edges as seen in the below picture. it was the same thickness (to the touch) as the edges... maybe we need to route into the core more and not just the ptex....
If you routed the same thickness that's fine but did you routed more than the edge teeth's width (going inboard on the core) ?
Don't forget that you have a quite thick layer of fiberglass (+ VDS) between your base+edges and your core.
On my cores I routed slightly deeper than needed and about 3mm more inboard. At least I assumed the gap would be filled with epoxy. Bases came out flat, except on tip and tails but this was my mistake (didn't want to route those channels on tipspacer and forgot to add material to compensate, next time I might add a layer of triax on the tips on the inside of the edges contour only)
Your skis look great! Clean looking work.
Before you rout the relief for your edges, place your ski over it and trace out where the edges are going to be. rout accordingly. When you finish, check to make sure everything lines up by setting the base with the edges on top of the relieved core. You should feel it fall into place.
Too bad about the delam... If you can get the sanding and flame treating to work then go for it again. Try testing on a small sample like you did the binding inserts to dial it in.
Wood sidewalls work great for all mountain skis, I lost a ski last season on a pow day in December or January and didnt find it till July, and it held up fine (Lost and Found). Im not sure how well the wood would withstand the impacts from rails though. You may end up splitting the wood.
Brian
-
twizzstyle
- Posts: 2204
- Joined: Tue Mar 07, 2006 8:25 pm
- Location: Kenmore, Wa USA
I'll add to, and perhaps correct, some of what Kevin said.
I don't think the routing was the problem. The depth of the routing was damn near perfect, and it was definitely in far enough. By routing just through the sidewall up to the wood core, this left about a 1/8" gap or so between the edge teeth and the wood (if that makes sense) to give room for the fiberglass and VDS.
I think it was just the mold. After gluing all the MDF together, I sanded it nice and smooth with a belt sander, but I NEVER checked if it was flat across the width, we just never thought about that. It looked good to the eye, so I called it good. Big lesson learned there.
I still have yet to check if our press frame is perfectly flat on the bottom too. We have 3 of those steel beams, and if the middle one is sticking up just a little bit, that could have caused the MDF in the mold to bend around it (which would also explain the mold splitting like it did).
I'm in the process of leveling a new mold with a belt sander, straight edge and a level. It is amazing how many irregularities there are once the mold pieces are glued/bolted together.
The irregularities creeped into my process when I used a single piece of mdf as a template for the mold. I think the template distorted slightly when I screwed the template onto the pieces to be cut.
The irregularities creeped into my process when I used a single piece of mdf as a template for the mold. I think the template distorted slightly when I screwed the template onto the pieces to be cut.
what makes me wonder... why is it still concave after basegrinding? how did you grind it?
believe me, the skis that get out of industrial production look terrific. they`re far away from being flat and sometimes you can even see an impression of the edges because they don`t router out any gap in the cores and just use extreme pressures to force the things together... and after grinding they get perfectly even and flat.
so how can it be that skis which look way worse than yours get flat and yours don`t? how did you sand them?
sorry if you may already discussed this issue, didn`t follow up the whole post...
plywood freeride industries - go ply, ride wood!
Reading this post with interest and would like to bring a possible solution(?) for the base mold. At least a solution that I am going to try out. My current base mold is not perfectly flat and I was going to try to build another one. However, I will try this (as seen on others on the site), I am going to cut a piece of MDF wider than than the mold and place it on top of the mold. My hope is that the flat piece of MDF will somewhat smooth out (or bridge) any imperfections. I will have to make new tip blocks to accomidate the thickness of the flat piece of MDF.
On the subject posted by Plywood re: our bases not being sanded flat. I think the ski shops are cautious and don't want to run the risk of going too far with the sanding, thus ruining the ski. I had one shop (reputible) say they almost blew up their machine trying to sand my skis. After talking to another shop, I came to the belief that this guy either didn't know what he was doing or was geting out of finishing the job.
Just thoughts and looking for other ideas...
ra
-
twizzstyle
- Posts: 2204
- Joined: Tue Mar 07, 2006 8:25 pm
- Location: Kenmore, Wa USA
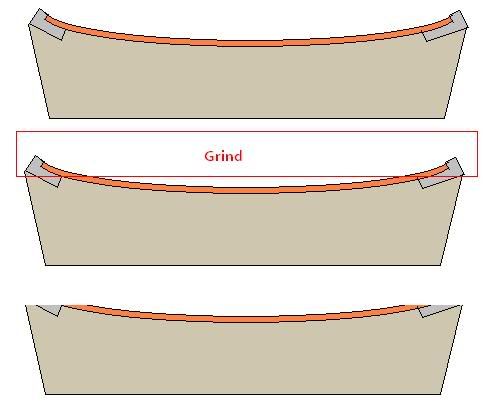
You can only have as much concavity as you have thickness of base material. So if you have 1.2mm thick p-tex (like I do) then you can only have 1.2mm deep concavity, at that point in order to grind the edges down far enough for the base to be flat, you will have ground completely through the p-tex on the sides, and the edge teeth will start showing (as was my case).
I sanded down at home a lot with my bench belt sander before taking it into a shop, just to do most of the grinding work for them.
We have sheet metal on top of our MDF on the bottom mold, but its not thick enough to counter act any concavity in the mold.
I made a picture to illustrate (this is extremely exagerated obviuosly). Shows how with a very concave base, more so than the thickness of the base material, you start grinding into the edges.
-
knightsofnii
- Posts: 1148
- Joined: Tue Jan 08, 2008 6:02 am
- Location: NJ USA
- Contact:
i was about to tell you to check your molds, but looks like youre already there.
How about this: are you using a cat track? or just an airbag over top?
If you dont use cat track, the un-restricted airbag will push down everywhere and will still squish the edges into the base.
though there's pros and cons. With cat track, the bars will only push down to the two highest points(across), if your rails are the thickest part, the bars will stop there and not push as hard in the middle. If there are two middle spots thicker than the rails, the bars will stop there and the rails wont get squished as much.
So, with cat track, you have to work hard to ensure that everything lines up correctly, and everything is a good height.
How are you attaching your sidewall? Are you using sidewalls? wait, yes you have ptex sidewall.
Did you attach it prior to thickness profiling or after thickness profiling?
We used already profiled cores/sidewalls, and found problems like this if we didnt have the sidewall lined up EXACTLY to the core, if it was shifted forward or back to far, then serious noticeable teeth marks, plus other voids and other pressure issues.
Doug