
or you could get some real flat wood timbers or something maybe to brace it, then the molds would go against the surface of that...??? just thoughts, it could very well be fine left alone
Shopvac's Skis
Moderators: Head Monkey, kelvin, bigKam, skidesmond, chrismp
-
knightsofnii
- Posts: 1148
- Joined: Tue Jan 08, 2008 6:02 am
- Location: NJ USA
- Contact:
you'll have to make molds burly enough so they dont warp or shear in the other directions if you add those extra top/bottom load distributing uhh...things... you might want to build them with something other than strips of mdf
or you could get some real flat wood timbers or something maybe to brace it, then the molds would go against the surface of that...??? just thoughts, it could very well be fine left alone
or you could get some real flat wood timbers or something maybe to brace it, then the molds would go against the surface of that...??? just thoughts, it could very well be fine left alone
Doug
-
MontuckyMadman

- Posts: 2395
- Joined: Fri Jun 20, 2008 9:41 pm
Yep, did it like illustration A = retarted
I had pine 2 x 4's laminated together for my top mold and profiled and it cracked right around 50 psi with a dry test, lengthwise. I only have a single ski mold, very loud snapping and scary. The cordura held just fine.
By doing it like shopvac and plywood figured it out, works at least at 40 - 45 so we know. IT WILL deflect and warp eventually. Its just not a fully ridged structure like steel.
I keep seeing railroad ties everywhere and think there is a low cost, or ahhh free, application waiting to be used.
That's right DBS I say take railroad tyes.
I found some channel stock steel for my bottom under my bottom mold and I elevated it in legs. So its real easy to load. Just slide the bags on, no moving the mold. I 'll take pics.
The single ski skibuilders cage press is an extreme bitch to load that's why I made a simple fabric one.
That and shopcav can't sac up and break the cordura.
The cordura bags I make are actually 2000 denier. Two layers or 1000 D.
Strong like steel, warp like fabric.
Seriously, any one who wants these let me know. These things work great for 40 PSI pressings and you get well laminated skis.
New skis are done and mounted today. These are going to be a lightweight spring/summer pair. They are 2450 grams with G3 bindings and 1800 grams before we mounted them. We also pressed these at 50psi to try and squeeze a little more epoxy out. The cordura bags are still going strong.
Specs and info:
183.5cm long
120-92-108
1.2mm base material
VDS
22 oz triax from Raka w/mat
poplar and ash wood core pppappp (mostly poplar with only one strip of ash in the middle)
22 oz triax
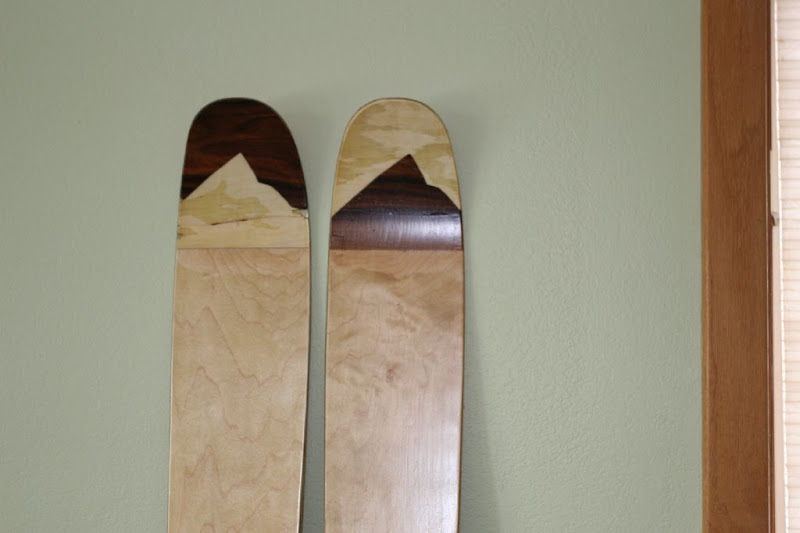
maple veneer with a paper backing and a our first attempt at marquetry in the tips.
tip and tail spacer was just cut straight across again like all of our other pairs of skis.
2-12-2 with no flat area for bindings, just made it taper straight from 2 to 12 back down to 2.
Same 26cm early tip rise with 12.5cm early tail rise.
Turning radius is around 23m
4-5mm camber in each ski for a total of 8-10mm. Perfect!
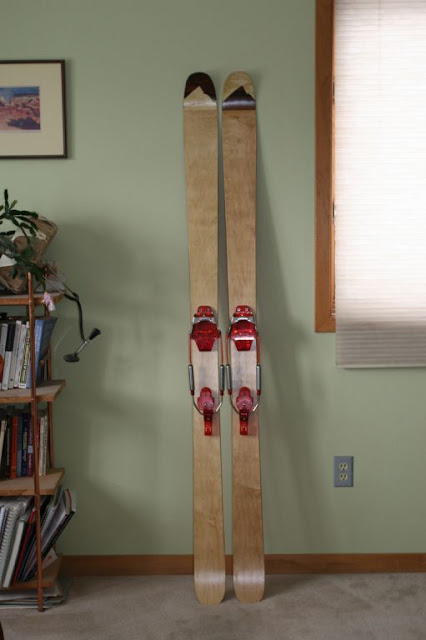
We changed our crib for profiling the cores and made these much softer which in turn makes them a lot lighter than out last couple pairs of skis. We also placed some stainless steel screen were the bindings get mounted because we were worried about the bindings holding in the poplar. Taking them up to Loveland tomorrow after a couple feet of presumably wet snow. Should be fun. In other notes, I am not sure I will buy any more veneer with a paper backing. I read a post a while back where somebody was having water seep into the boards where the hemp fibers were exposed. I think something similar could be happening with the paper on the veneer. We have sealed the skis with 2 coats of tung oil and 2 coats of helmsmann polyurethane spar varnish so I hope that won't happen, but who knows. I will try and make a more complex marquetry on future skis. That was fun and I think it came out looking good.
Specs and info:
183.5cm long
120-92-108
1.2mm base material
VDS
22 oz triax from Raka w/mat
poplar and ash wood core pppappp (mostly poplar with only one strip of ash in the middle)
22 oz triax
maple veneer with a paper backing and a our first attempt at marquetry in the tips.
tip and tail spacer was just cut straight across again like all of our other pairs of skis.
2-12-2 with no flat area for bindings, just made it taper straight from 2 to 12 back down to 2.
Same 26cm early tip rise with 12.5cm early tail rise.
Turning radius is around 23m
4-5mm camber in each ski for a total of 8-10mm. Perfect!
We changed our crib for profiling the cores and made these much softer which in turn makes them a lot lighter than out last couple pairs of skis. We also placed some stainless steel screen were the bindings get mounted because we were worried about the bindings holding in the poplar. Taking them up to Loveland tomorrow after a couple feet of presumably wet snow. Should be fun. In other notes, I am not sure I will buy any more veneer with a paper backing. I read a post a while back where somebody was having water seep into the boards where the hemp fibers were exposed. I think something similar could be happening with the paper on the veneer. We have sealed the skis with 2 coats of tung oil and 2 coats of helmsmann polyurethane spar varnish so I hope that won't happen, but who knows. I will try and make a more complex marquetry on future skis. That was fun and I think it came out looking good.
Last edited by shopvac on Sat Apr 18, 2009 4:42 pm, edited 3 times in total.
-
doughboyshredder
- Posts: 1354
- Joined: Mon Sep 17, 2007 7:37 pm
lol, let me guess, you read my rants over at TGR. Too funny.MontuckyMadman wrote: I keep seeing railroad ties everywhere and think there is a low cost, or ahhh free, application waiting to be used.
That's right DBS I say take railroad tyes.
I looked at railroad ties at one point, but the wood is shit. Completely treated (which may outgas) and there are full length cracks throughout.
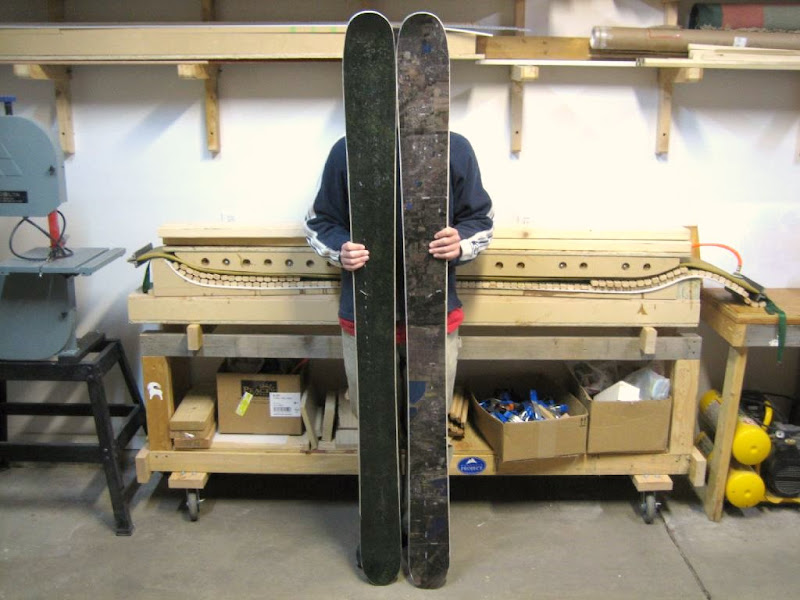
6th pair finished
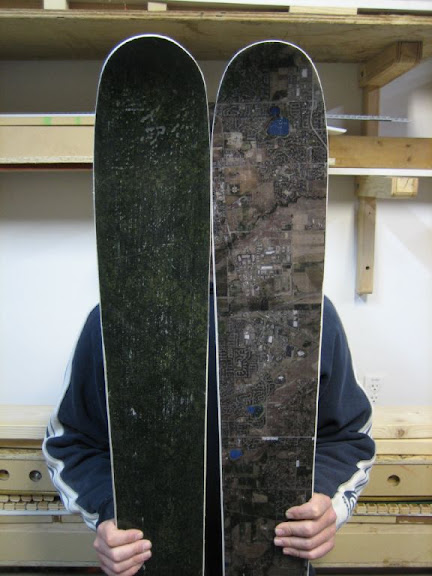
We built another pair over the weekend and finished them tonight. They turned out pretty nice with no major problems. These have a green leaf print on one and a google earth type map printed on regular paper (from one of the big plotters you see). They have 34cm of tip rocker and 15cm of tail rocker.
186.5cm long - 4 to 5 mm of camber on each ski.
156-128-144
1.5mm blue bases (VDS above the edges)
22 oz triax
poplar and ash wood core with wood sidewalls
22 oz triax
topsheet (fabric and printed map)
They have a nice flex and should float in powder. Pressed at 45psi for 24hrs in the cloth ski press.
those are freaking giants, nice job on the graphics.
Fighting gravity on a daily basis
www.Whiteroomcustomskis.com
www.Whiteroomcustomskis.com

like he said he had it plotted. that means it was either printed by a large laser or inkjet printer.
most copy shops have one of these to print large photos and most of them also offer an option to print with uv-resistant inks if you want to be on the safe side.
still, using your printer at work should do the trick if you use a regular topsheet since these block uv-light (given that your work unit can print papers this large).
so you could just print one at the highest resolution possible on normal paper (not coated photo paper!) and include it in your layup.
paper and ink information
So we finally figured out what the paper, ink, and printer we used on one of the skis we built. They now have a coat of Helmsmann on top to protect them a little bit more. They look really good and so far they haven't changed color or become darker. I will let you guys know how the topsheets hold up this season. It wasn't plotted in one log strip. The guy we built the skis for cut it up and had to piece a couple pieces together. I think you can print longer on some of these big plotters without any troubles. I may try this on our next set.
Ink: HP Design Jet 1000 series
Formulated to provide professional results that are always clear, always sharp. HP-engineered to work as a modular ink system with HP 80 Printheads and Printhead Cleaners. Perfect choice for users who produce precise black-and-color line drawings or high-quality color renderings, maps and graphics. Available in two sizes—350 ml and 175 ml.
Paper: 3650MT - Rl 36" X 50 Yd 18# 2" Core Inkjet Translucent Bond
Translucent sulfite bonds are designed primarily to create inexspensive masters for short-run diazo reproduction. They feature a bright-white appearance while naturally permitting UV rays through the paper.
Printer: HP DesignJet CM1055