Shopvac's Skis

Document your personal work here. Show photos, movies, and share your secrets.

Moderators: Head Monkey, kelvin, bigKam, skidesmond, chrismp

User avatar
shopvac
Posts: 160
Joined: Sun Oct 12, 2008 2:23 pm
Location: Colorado

7th pair almost done

Post by shopvac »

We built another pair over the past couple days for a friend.
They are 170cm long 138 - 111 - 122 (more like 5 dimension skis though)
Turning radius is 19.3m, sidecut is 9.5mm, and running length = 121cm.
The tip rocker is 34cm from the very tip, and tail rocker is 15cm
The cores were poplar and ash profiled at 2 - 11.5 - 2mm thick in the shape of a triangle (no extra flat area added in).

Layup was the usual with 22ox triax and Raka epoxy cured in the press for 24hrs each ski. Cut it out with the bandsaw today and belt sanded the tips and tails and the sidewalls. The veneer is Pau Ferro again just like our very first pair. They still need a couple coats of helmsmann and a full tune at the shop.

The proud new owner:
Image

Image

Holding them up to see the profile:
Image
Last edited by shopvac on Sat Jan 16, 2010 6:54 pm, edited 2 times in total.
User avatar
vinman
Posts: 1388
Joined: Fri Nov 09, 2007 4:16 pm
Location: The tin foil isle
Contact:

Post by vinman »

They look great. I love the veneer. Is the shape kind of like the rossi S7? I'm designing a similar 5 dimension ski. Bug looking to do mixed camber also, regular camber under foot rocker tip/tail.
Fighting gravity on a daily basis
www.Whiteroomcustomskis.com
skidesmond
Posts: 2337
Joined: Tue Apr 07, 2009 3:26 pm
Location: Western Mass, USA
Contact:

Post by skidesmond »

Nice Ski! I like the veneer top sheets. A nice clean look. Gives a classy look instead of the flashy look of a commercial ski. They'll definitely stand out on the mountain. Where do you get your veneer? I found a site http://www.theveneerstore.com/ they seem to have a wide variety material and some really nice figured wood. I plan on making my next pair with a wood top sheet.

I noticed you don't do a full wrap around with the metal edge. I know that can be difficult to get a good fit around the tips and can be time consuming. Do you have any details you can pass on how you use your template in your pics and still get a nice fit? Is your template notched near the tip to accommodate the metal edge? Any info would be helpful.

Keep up the good work!
plywood
Posts: 499
Joined: Fri Oct 13, 2006 2:13 am
Location: wilen, switzerland
Contact:

Post by plywood »

the veneer looks awesome!
how did the pau ferro veneer hold up on your first pair? lots of chipping or no deal at all?
plywood freeride industries - go ply, ride wood!
User avatar
shopvac
Posts: 160
Joined: Sun Oct 12, 2008 2:23 pm
Location: Colorado

Post by shopvac »

Thanks for the comments.

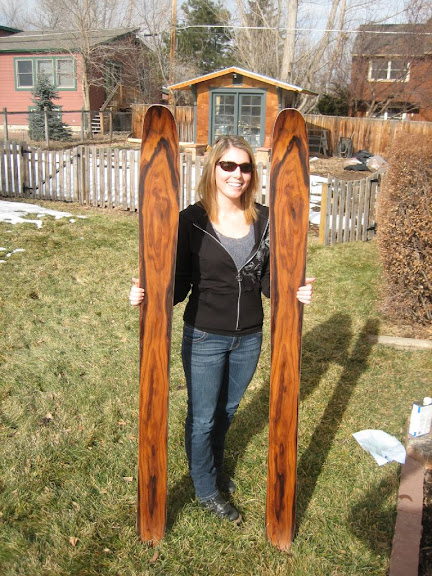
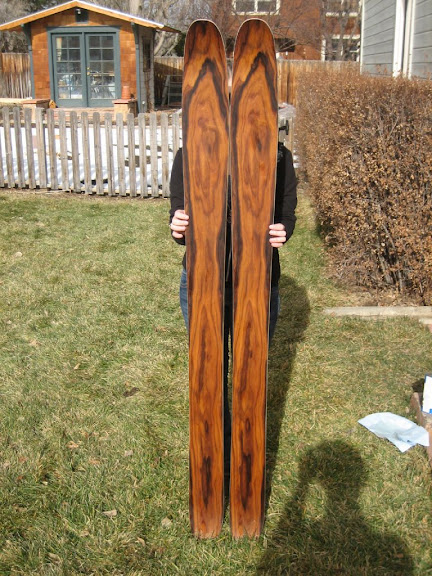
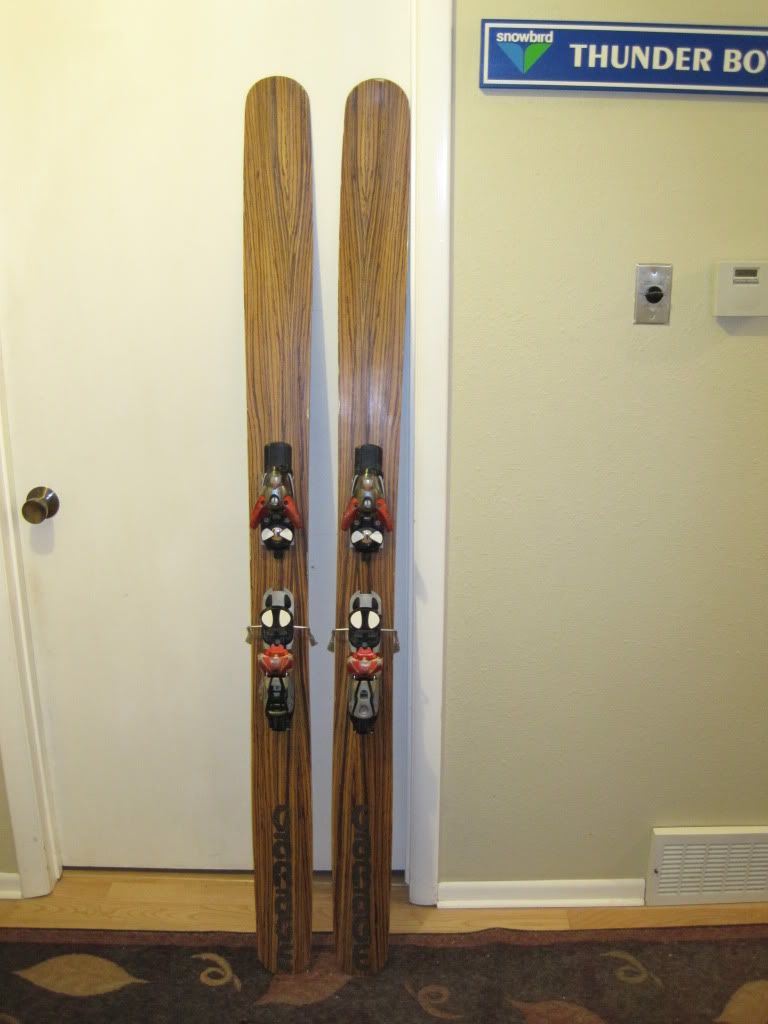
vinman - the skis are very similar to a rossi s7. I think the s7 is 145-115-123 (in 176cm long) and ours is 138-111-122 (in a 170cm length). The camber and early tip/tail rise looks similar to our other friend who is on the s7's. Our ski didn't come out with much camber unfortunately. We only have 1 camber mold and it was designed for 190's so you can imagine how much less camber there is on a 170.

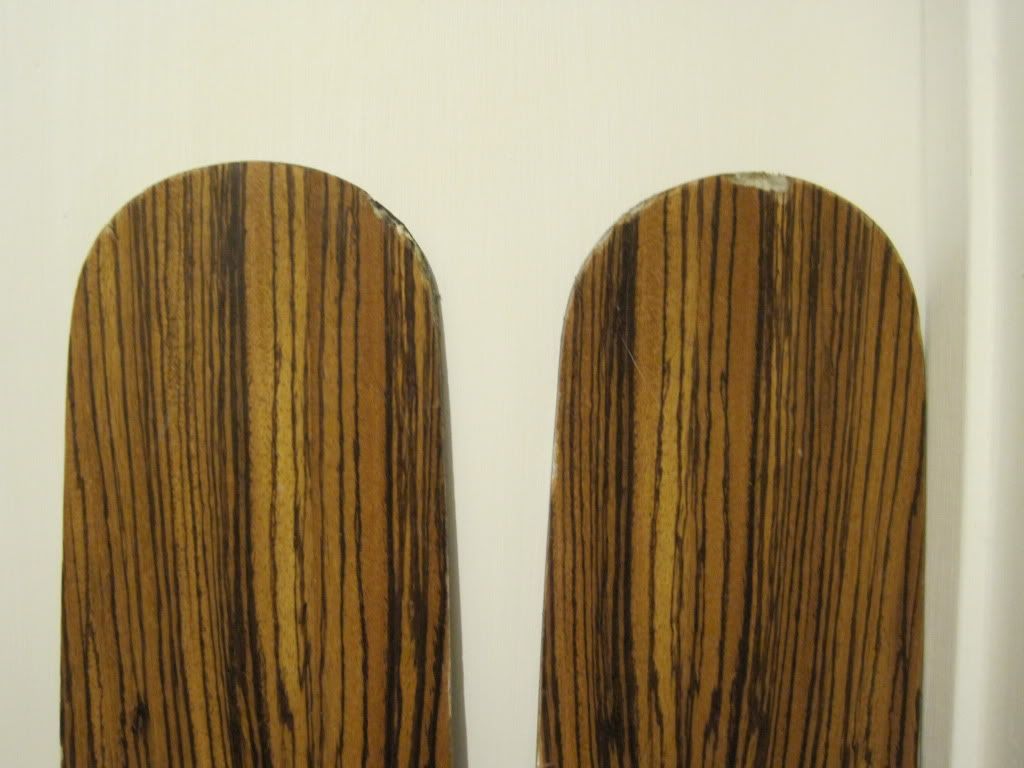
skidesmond - We got a ton of veneer from certainly wood http://www.certainlywood.com/. They have a really nice "sale" selection that we went through. The website is really nice with full length pictures (scale most of the time too). I think the best veneer we found turned out to be the cheapest (aspen and paduk, that were $6 and $12 per pair for the topsheets). I would guess you can get some really nice veneer from about anywhere. We have used paper-backed veneer on one pair of skis and I don't think I will do that again (a little more prone to chipping I think).

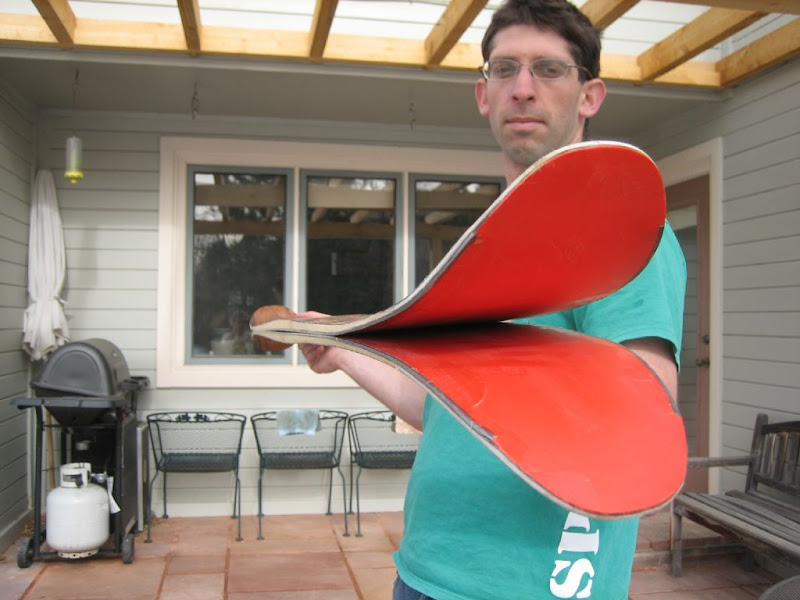
We don't do a full edge wrap for the reasons you mentioned. We actually have never even tried so I don't actually know how hard/easy it would be. We seem to have enough troubles getting the edge fit on the 3/4 wrap. What we do is have our CNC'ed templates have a 2.2mm edge notch starting 4cm from the tip and tail. The CNC leaves a round radius (because they use a 1/4" bit). We also use a 1/4" or 1/2" flush cut pattern bit when we cut the base material out. We then take a utility knife and cut the notch in the base material. This isn't bad at all. I know it is kind of hard to see, but you look near the front of our template you can sort of see the notch in the 3/4" MDF template.

Image

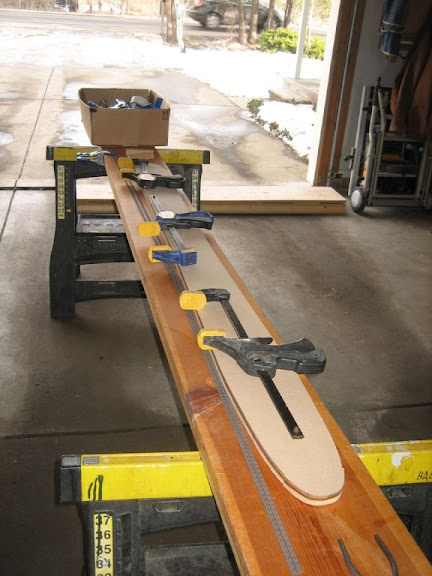
If you want a better photo, let me know.

I was thinking you could always just add a 2.2mm thin piece of material onto your already existing template (like a think piece of plastic or something). I would probably do this if I already had templates cut out without the notch. If you have any specific questions let us know. We can try and help you out. I think ON3P also does what we are doing as well as a bunch of builders on here.

Plywood - The fist pair is mounted to the wall as they are so stiff they are unskiable. So, we don't really know how they held up will chipping but all of our other skis we built uses the same thickness veneer and it seems to be doing about as good (maybe a little worse) than some of the other skis we have bought in the past with "real" topsheets. The amount of round-over or bevel makes a pretty big difference on the chipping. Overall, I am very happy with the veneer topsheets and I think we will keep using them for future skis. We do put a fresh coating of helmsmann on each summer though...
User avatar
falls
Posts: 1458
Joined: Tue Oct 27, 2009 5:04 pm
Location: Wangaratta, Australia

Post by falls »

How is the durability in the tips without a full edge wrap shopvac?
doughboyshredder
Posts: 1354
Joined: Mon Sep 17, 2007 7:37 pm

Post by doughboyshredder »

falls wrote:How is the durability in the tips without a full edge wrap shopvac?
IMO tips with a full edge wrap are less durable because the edge in that area will always be getting dinged and hit on things. Without an edge it is a lot easier to keep that area in repair.
skidesmond
Posts: 2337
Joined: Tue Apr 07, 2009 3:26 pm
Location: Western Mass, USA
Contact:

Post by skidesmond »

shopvac wrote:.... I was thinking you could always just add a 2.2mm thin piece of material onto your already existing template (like a think piece of plastic or something). I would probably do this if I already had templates cut out without the notch. If you have any specific questions let us know. We can try and help you out. I think ON3P also does what we are doing as well as a bunch of builders on here.
Thanks for the info. I can see the notch in your template. Thanks. As I was reading your reply I was thinking of adding some PTEX base material (or something...) to my template, so we're thinking along the same lines. I didn't want to cut a new template, adding material is the way to go.

On my first pair of skis I did not do a full wrap, nor did I make any accommodations for the notched area. I just pressed it altogether. It held but looked sloppy. Then I did a full wrap on my next 2 pairs and they came out OK, but it was a lot of work.

I will have to add additional material (ptex, fiberglass, vds, ...?) in the tip area to make up for thickness of the edge that I'm leaving out and spend a few more minutes finishing the tip area. I think it will be a good trade off.

Thanks for the tip on the veneer website. I will check it out today.
iggyskier
Posts: 274
Joined: Sun Apr 30, 2006 10:25 pm
Location: Portland, OR

Post by iggyskier »

3/4 wrap = decrease delam issues. Full wrap edge restrict the flex of the tip, so instead of energy being released by a slight increase in tip/tail flex, it ends up breaking down the bonds of the epoxy increasing the risk of delams. K2 actually did a study on it in the 80's (believe so) that concluded this (at least that is the rumor, never seen it definitely), but they still go with a full wrap + rivet I believe because most people see full wrap as more durable.

There is a reason Igneous, Moment, ON3P, etc do it. Other companies combat the issues using a 4-piece edge, which we've thought about but haven't had time to experiment with. You will see that on armada and several other companies.

I set up our templates without the edge notches cnc'ed. Used to do it that way. Easiest to do it with some sort of squared off surface attached to the MDF (try tipspacer + get creative). If you are doing 2-3 pairs, maybe not a big deal, but when you are doing 100+ pairs off the same template, it is way easier if you actually have square surfaces to follow.
skidesmond
Posts: 2337
Joined: Tue Apr 07, 2009 3:26 pm
Location: Western Mass, USA
Contact:

Post by skidesmond »

iggyskier/shopvac - Excellent info! Regarding the 3/4 wrap, I figured it was a way for the manufacturers to do a quicker lay-up and then add a "tip protector" for looks and to keep the tip from delam. I've also noticed rivets in some skis too. But knowing there's some validity for the 3/4 wrap other than it's quicker is a relief.

I toyed around with the idea of making a seperate metal edge for the tip and then have another metal edge run the length of the ski. It would be a 3 part metal edge system. But bending the metal edge for the tip would still be a PITA.

My next pair of Section8s will use the 3/4 wrap. Thanks.
powderho
Posts: 108
Joined: Sat Apr 11, 2009 7:02 am
Location: Sandy, UT

Post by powderho »

It's crazy how similar those skis are to the ones I build a month ago for my girl. These are 130-110-120, 20m turn radius. Poplar core with ash sidewalls profiled to 2-10.5-2.5 with a flat area of around 6 inches. I used 22oz triax on the bottom with 19oz triax on top. The topsheet is paper-backed Zebra wood veneer. I like the wood topsheets, but really for me it's an easy way out dealing with the graphics.

Image

Here are the tips after around a dozen days on them. They do chip pretty easy. I suppose you could put a clear topsheet over it to protect it.....but I didn't want to add the weight, or price. The pair weighed in at 8.7 lbs on the official bathroom scale.
Image

I'm sort of surprised to here all the support for the non-full edge wrap. I only do it because it's way easier. My skis get trashed in a hurry. Between smashing into rocks and trees and walking in the tram line, they don't hold up.
User avatar
falls
Posts: 1458
Joined: Tue Oct 27, 2009 5:04 pm
Location: Wangaratta, Australia

Post by falls »

Image
Iggy, is that aliuminium or plastic on the ends you used?
Do you just run the router past it over the bump? Is there still some trimming with the craft knife afterwards?
I'm having a bit of a hard time working out how the circular router bit could form a 90 degree angle.
iggyskier
Posts: 274
Joined: Sun Apr 30, 2006 10:25 pm
Location: Portland, OR

Post by iggyskier »

falls wrote: I'm having a bit of a hard time working out how the circular router bit could form a 90 degree angle.
It can't. Route + razor blade and you are done. That is why I find it easier if there is no curve there at all. Straight section allows me to cut straight to the template, then follow the template to the cut and.....

Image

of course...it isn't that easy every time. Takes some practice and I still screw them up from time to time. But the setup I described helps a lot.

The biggest thing I have been pissed about recently has been collection of the curly-q's while routing bases. I have a dewalt 2hp plunge router that has collection thru the handle. We were running these awesome spiral router bits that shot the curly-q's up and it collected maybe 95% of them with a decent shop vac and a hanging collection set up.

But the spiral bits are like $85/pop and we just do too many skis. So now using a straight flush trim with inserts, and jury rigged a collection set up, but it maybe collects like 40% at best. It is way more affordable, but I hate having that crap everywhere.
User avatar
shopvac
Posts: 160
Joined: Sun Oct 12, 2008 2:23 pm
Location: Colorado

Post by shopvac »

Powderho - those look so sweet! Do you have a profile shot? The tips and tails don't look like they have much turned-up-ness which would be nice for pow. We do the 3/4 edge bending because is it easier (even though we still suck bad at bending edges and getting super awesome edge fit).

Falls - thanks for posting that photo. That is exactly what I was talking about. Iggy does what we do, only better.

Iggy - you get such good edge fit. I wonder if the flush cut bit we are using isn't sharp enough or something. We aren't very good with bending the edges either. I think we have a new plan of attack we will try next time though. I hate having the curly-q's too and we only make a few skis a year. I can't imagine what it would be like if you were making 100+. I would probably make a ball pit like they have at McDonald's you could jump into.

I was wondering how thick your bandsaw blade is, how many teeth per inch, and how often you switch it out for a new blade?
User avatar
falls
Posts: 1458
Joined: Tue Oct 27, 2009 5:04 pm
Location: Wangaratta, Australia

Post by falls »

Practice for the edges I reckon but I'd say all the clamps help too!
Image
Post Reply