
HOSE-MAN's JOURNAL - chronicling my ski build
Moderators: Head Monkey, kelvin, bigKam, skidesmond, chrismp

Snow started falling & I got a little side tracked. Lately we haven't had much new snow & it's been warm, then cold so the snow sucks and I remembered that I have a little project to work on.
My bother now lives nearby and has been involved in the process. He is this skinny guy you may see in a picture.
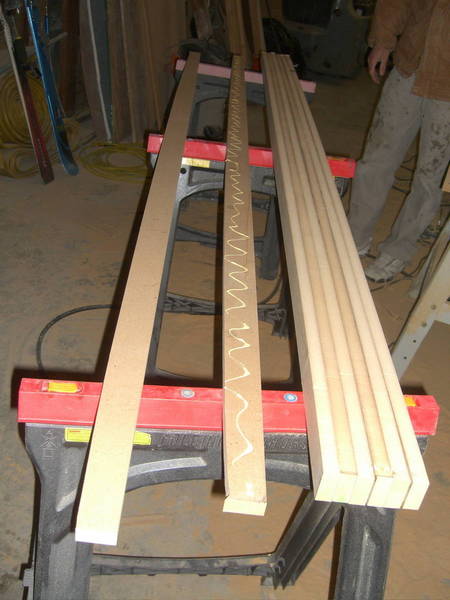
We've built the camber bed and the tip and tail blocks for the cassette. We just flexed a strip of MDF to create the radius which has about 15mm of deflection over 170cm of running length. We sampled some of the ski's we own and this seemed like a good intermediate camber amount.
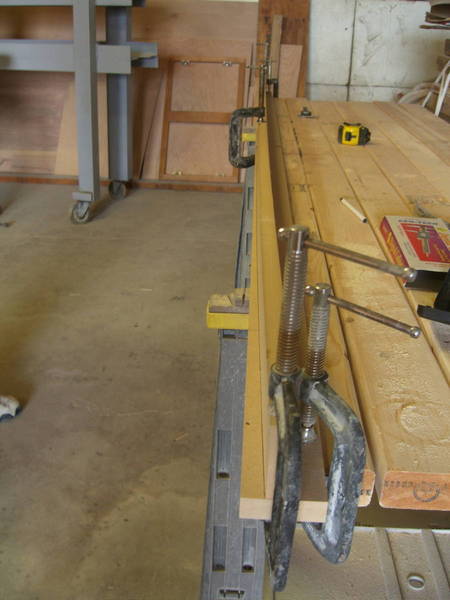
The flexed mdf strip is clamped in place to trace the radius.
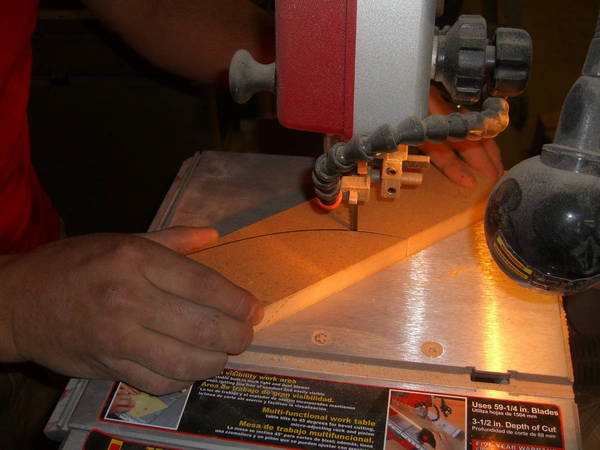
That line is then cut to create our template for making all the other camber strips (that guy is skinny)
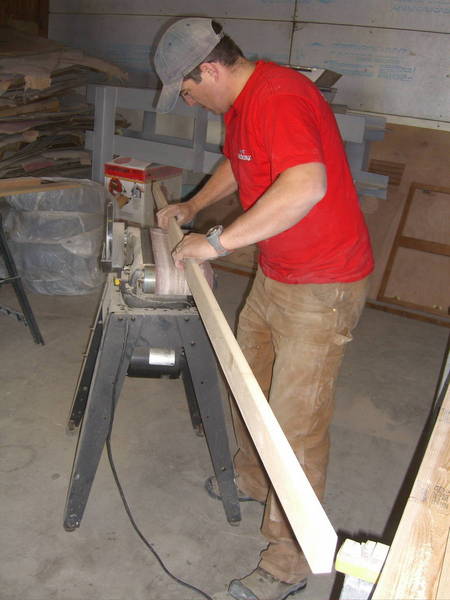
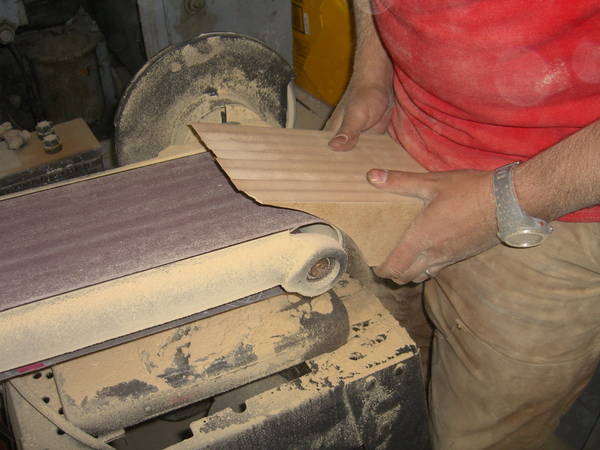
This guy isn't as skinny. Smoothing out the radius of the camber template.
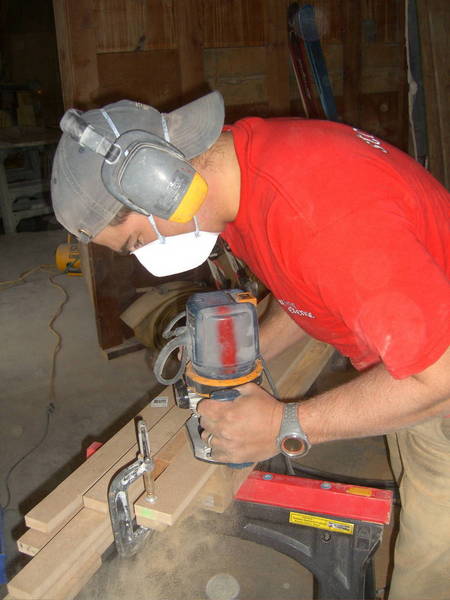
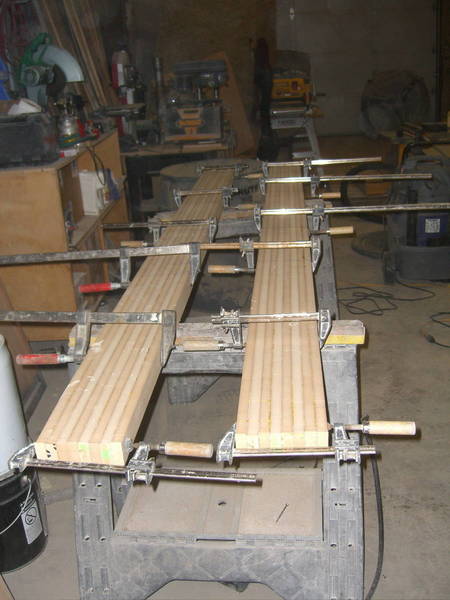
We clamped a strip of MDF over the template piece and routered it with a flush cutting bit. Repeating that several times created the strips for our camber bed
My bother now lives nearby and has been involved in the process. He is this skinny guy you may see in a picture.
We've built the camber bed and the tip and tail blocks for the cassette. We just flexed a strip of MDF to create the radius which has about 15mm of deflection over 170cm of running length. We sampled some of the ski's we own and this seemed like a good intermediate camber amount.
The flexed mdf strip is clamped in place to trace the radius.
That line is then cut to create our template for making all the other camber strips (that guy is skinny)
This guy isn't as skinny. Smoothing out the radius of the camber template.
We clamped a strip of MDF over the template piece and routered it with a flush cutting bit. Repeating that several times created the strips for our camber bed
Determining the tip radius was a little tough. We ended up using a section of a oval from a bathroom sink template. The tip/tail shape we use is slightly progressive.
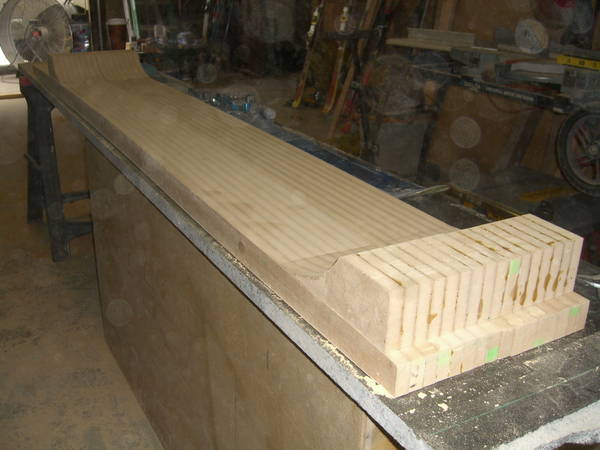
all the tip bock pieces glued and clamped together (4 sections)
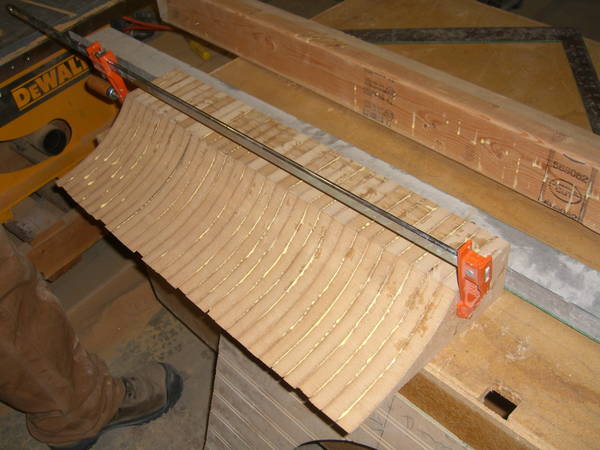
Once the glue dried the strips were all a little uneven so some sanding was in order.

edited to fix spelling error
all the tip bock pieces glued and clamped together (4 sections)
Once the glue dried the strips were all a little uneven so some sanding was in order.
edited to fix spelling error
Last edited by hose-man on Mon May 01, 2006 6:39 pm, edited 1 time in total.
Next is the upper portion of the cassette. This just takes up space so that the pneumatic bladder has something to press against. It needs to be roughly the same shape as the lower cassette and adjustible because we want to make skis of different lengths.

The interlocking legs of the upper cassette allow the length of the unit to be adjusted to fit whatever length we set the lower section at.
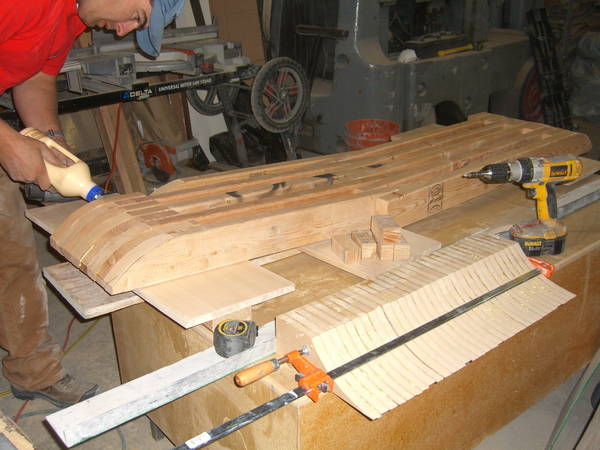
The interlocking legs of the upper cassette allow the length of the unit to be adjusted to fit whatever length we set the lower section at.
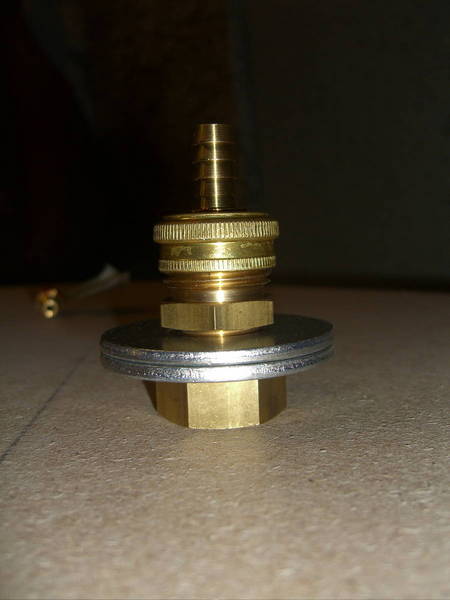
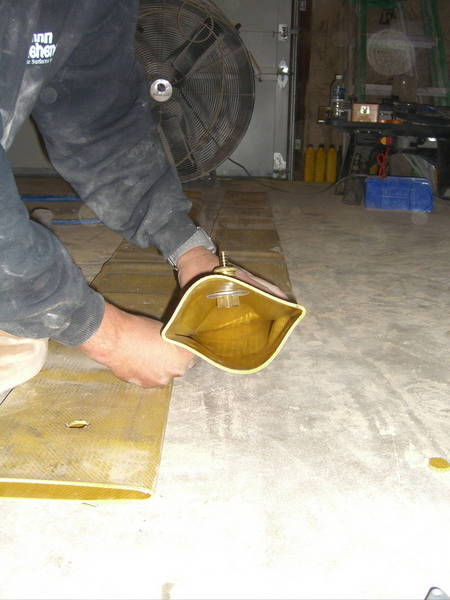
Brass fittings and washers make up the through-hose fitting for getting air into the bladders. All are available at HomeDepot or Lowe's.
Cutting the hole:
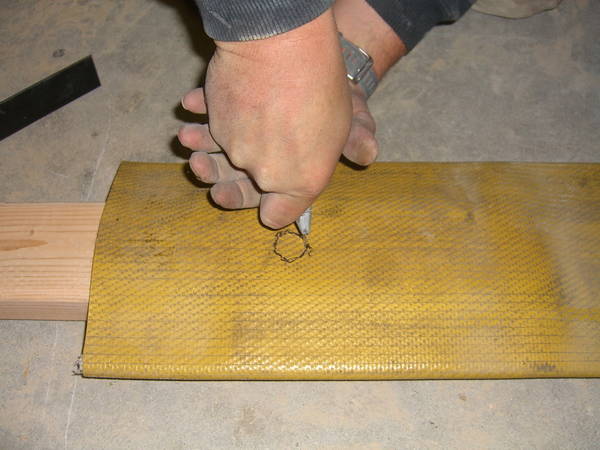
coupling is in place. Silicone caulk was applied to both sides of the coupling before assembly.
Clamping the hose ends. Loads of silicone applied here as well.
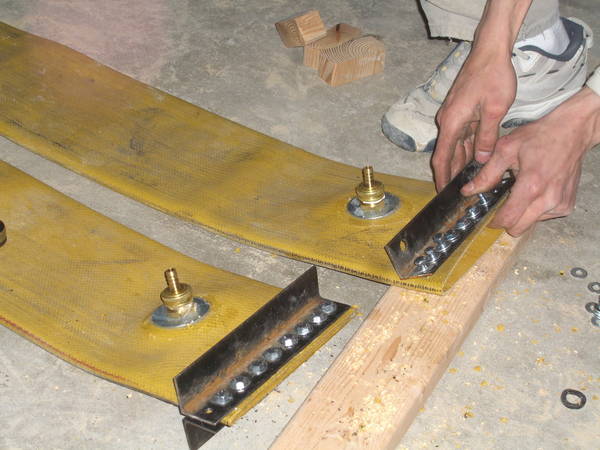
24hrs later we tested them. No leaks up to 80psi

Cutting the hole:
coupling is in place. Silicone caulk was applied to both sides of the coupling before assembly.
Clamping the hose ends. Loads of silicone applied here as well.
24hrs later we tested them. No leaks up to 80psi
A week ago we built an oven to enclose our press frame and placed salvaged resistance heating coils inside. We easily reached a temperature of 190 degrees F which should be pleanty for our epoxy combination. You should see my electrical meter spin while the heater is on though. It consumes 10x the electricity as our normal consumption. These dang skis just got more expensive. I have some images of this ghetto version of a heated press, but they're not with me.
We planed the cores for the first pair of skis this week. We used the thickness planer method that Little Kam described in his article. We had a little problem with the ends of the core chipping badly.(pic will follow soon)
We planed the cores for the first pair of skis this week. We used the thickness planer method that Little Kam described in his article. We had a little problem with the ends of the core chipping badly.(pic will follow soon)
Hi hose-man. Nice work really!! We have the same hose as you but in our way to build our press as cheap as possible (all the materials we´ve used come from our building work) we have used a inner tube valve from a bike. I hope it will work because they are built to work up to 65 psi. I don´t know if it will withstand more pressure but we´ll check it. If not I think we will have to buy valves like you have used.
So us more pictures because it could give us ideas.
Here are the valves.

So us more pictures because it could give us ideas.
Here are the valves.
We are getting very close to being able to press our first skis!!!
Here's what's been going on lately........
Our first core is alternating strips of Maple and Poplar. The planks are glued together & now I'm planing them to get them square. Very nice effect with saw dust on the camera lens don't you think?

Now strips are being ripped to glue together as a symetrical core, just like they described in THIS article.

Once the core strips are all laminated together we planed the cores using the thickenss planer method that Little Kam describes HERE. Our results were good, but we experienced some chipping of the core as the end of it ran under the knives of the planer. We had better success with the second core when we glued the core to the jig so that it couldn't bounce up into the knives & be chipped. Planing wood that thin is difficult. Luckily all the chipping was outside of the finished area of the ski core so nothing was lost.

Here's what's been going on lately........
Our first core is alternating strips of Maple and Poplar. The planks are glued together & now I'm planing them to get them square. Very nice effect with saw dust on the camera lens don't you think?
Now strips are being ripped to glue together as a symetrical core, just like they described in THIS article.
Once the core strips are all laminated together we planed the cores using the thickenss planer method that Little Kam describes HERE. Our results were good, but we experienced some chipping of the core as the end of it ran under the knives of the planer. We had better success with the second core when we glued the core to the jig so that it couldn't bounce up into the knives & be chipped. Planing wood that thin is difficult. Luckily all the chipping was outside of the finished area of the ski core so nothing was lost.
My first shape is going to be the same as my 185cm salomon pocket rockets. My thinking is that this is a familiar shape to me & I will be able to guage the flex character of the core profile we've chosen compared to a known ski. Our core is 10mm this under foot with the underfoot platform extending 12cm ahead of center and 20cm toward the tail. there is a linear taper to 2mm at the end othe the running length of the ski. Kam and Kelvin should recognize this profile since I've stolen it from the dimensions they list on many of their skis.
Preparing the base was a snap. I just clamped my Pocket Rockets to the ptex and used a utility knive to cut the shape out. Once i had this slightly oversized ptex form i carefully trimmed the with of the metal edge off the entire perimeter of the base. Occasionally checking the shape against the actual ski. Then I used one base as a template to trim the other.

Next came bending the edges....

We used a torch to wreck the temper on the steel of the edge & then used a combination of techniques to round the ends over. First we used a modified pipe bender to put a basic radius in the metal edge
INSERT IMAGE OF MODIFIED PIPE BENDER HERE (i'll go take a pic in a few days)
Then two pair of pliers were used to tighten or loosen the radius as needed to match the shape of the ptex.
Do you remember the way LibTech used to finish the edges of their boards? (maybe they still do this, but it's been a while since i've snowboarded) After the end of the running length the edge just tucks into the core. It doesn't continue around the end of the board. On some of their clearer bases you could see about three or four of the "teeth" of the edge as they curl in toward the middle of the board.
I considered doing this, but then thought that was kind of a easy/wimpy way out so I did the full wrap metal edges. i may try this method in the future. it won't be as durable, but it would be lighter, faster, and easier. Cost/benefit ratio is pretty tight there.....
Here's the end of one of the bases with the full edge wrap.

As an experiment we located the seam between the two pieces of edge materal exactly in the center on two of the tips and off set the seam 4-5cm on the other two seams. It will be interesting to see if one is more durable than the other.
Lastly we pre-bent the edges into the bed of the press.

After bending the tip & tail into one of the base/edge assemblies we realized that we need to leave the other one flat until we finish preparing the cores. We still need to router a chanel in the perimeter of the core for the edges to nest into. I expect that this will prevent some of the base concaveness that some people are reporting.
Preparing the base was a snap. I just clamped my Pocket Rockets to the ptex and used a utility knive to cut the shape out. Once i had this slightly oversized ptex form i carefully trimmed the with of the metal edge off the entire perimeter of the base. Occasionally checking the shape against the actual ski. Then I used one base as a template to trim the other.
Next came bending the edges....
We used a torch to wreck the temper on the steel of the edge & then used a combination of techniques to round the ends over. First we used a modified pipe bender to put a basic radius in the metal edge
INSERT IMAGE OF MODIFIED PIPE BENDER HERE (i'll go take a pic in a few days)
Then two pair of pliers were used to tighten or loosen the radius as needed to match the shape of the ptex.
Do you remember the way LibTech used to finish the edges of their boards? (maybe they still do this, but it's been a while since i've snowboarded) After the end of the running length the edge just tucks into the core. It doesn't continue around the end of the board. On some of their clearer bases you could see about three or four of the "teeth" of the edge as they curl in toward the middle of the board.
I considered doing this, but then thought that was kind of a easy/wimpy way out so I did the full wrap metal edges. i may try this method in the future. it won't be as durable, but it would be lighter, faster, and easier. Cost/benefit ratio is pretty tight there.....
Here's the end of one of the bases with the full edge wrap.
As an experiment we located the seam between the two pieces of edge materal exactly in the center on two of the tips and off set the seam 4-5cm on the other two seams. It will be interesting to see if one is more durable than the other.
Lastly we pre-bent the edges into the bed of the press.
After bending the tip & tail into one of the base/edge assemblies we realized that we need to leave the other one flat until we finish preparing the cores. We still need to router a chanel in the perimeter of the core for the edges to nest into. I expect that this will prevent some of the base concaveness that some people are reporting.
Last edited by hose-man on Sat May 06, 2006 8:54 pm, edited 1 time in total.
We did some test laminations with some of the different components we have procured to see what will work & what won't. I've been looking for a topsheet material that is clearer than Ptex but bonds well to the rest of the ski. You can see in the images below that it is very clear, but didn't bond very well.
Test laminations for a wood veneer topped ski....
LEFT: wood veneer. no top sheet. a polyurethane would be applied after the ski is complete. some epoxy seeped onto the top of the veneer. I don't think that is a big deal. This would be a viable way to finish a ski, but not very durable.
CENTER: experimental top sheet. (cant remember what the plastic is called, but its not a polycarbinate, because the Kams & Kelvin already ruled that out) This material was flexible, very clear, but very smooth on both sides. It did not bond well. With a little effort the layer could be peeled up off the ski. This did however reveal a very nice, epoxy saturated wood veneer that could be a satisfactory finish for a ski. The top right corner of the test block has the clear plastic cut away. The horizontal scrach is the result of scoring with a utility knife to try to guage durability, and the impact marks on the top right are attempts to simulate edge impacts and asess durability. The epoxy saturated veneer seems fairly durable. This may be the way to go.
RIGHT: This is the veneer under "clear" ptex. Good adhesion, good durability, doesn't look so good.
More test blocks. This time with fabric graphic layers.
LEFT: White lightweight fabric under clear ptex with blue spray paint top left, green grease pencil center right, and red sharpie bottom left. The white fabric turned transparent and the wood is visible beneath it. The red sharpie bled with the epoxy. The spray paint would work fine & the grease pencil marks didn't bleed, but still just look like grease pencil marks. The ptex was accidentally aplied upside down so it didn't bond very well.
CENTER: Pink Camo Canvas under the ultra-clear plastic. The plastic did not bond well at all. In fact, it's not even on the test block in this picture. The epoxy saturated canvas that remained is attractive looking and seems durable to impact and cutting type abuse. The color did darken somewhat, due to the dark amber color of our epoxy.
RIGHT: Lightweight orage plaid fabrick under "clear" ptex. Again, the ptex was upside down so it didn't bond well. In this case, I think that the colors are contrasting enough that the ptex could be used over this fabric with satisfactory cosmetic results. I peeled the corner of the ptex off so that I could test the durability of the epoxy & fabric on their own.

I should mention that these test laminations were all just blocks of pine, then a layer of epoxy soaked fiberglass, then the graphic layer, then more epoxy, then the top sheet. The only exception being the raw wood veneer which didn't have anything on top of the graphic layer.
LEFT: White lightweight fabric under clear ptex with blue spray paint top left, green grease pencil center right, and red sharpie bottom left. The white fabric turned transparent and the wood is visible beneath it. The red sharpie bled with the epoxy. The spray paint would work fine & the grease pencil marks didn't bleed, but still just look like grease pencil marks. The ptex was accidentally aplied upside down so it didn't bond very well.
CENTER: Pink Camo Canvas under the ultra-clear plastic. The plastic did not bond well at all. In fact, it's not even on the test block in this picture. The epoxy saturated canvas that remained is attractive looking and seems durable to impact and cutting type abuse. The color did darken somewhat, due to the dark amber color of our epoxy.
RIGHT: Lightweight orage plaid fabrick under "clear" ptex. Again, the ptex was upside down so it didn't bond well. In this case, I think that the colors are contrasting enough that the ptex could be used over this fabric with satisfactory cosmetic results. I peeled the corner of the ptex off so that I could test the durability of the epoxy & fabric on their own.
I should mention that these test laminations were all just blocks of pine, then a layer of epoxy soaked fiberglass, then the graphic layer, then more epoxy, then the top sheet. The only exception being the raw wood veneer which didn't have anything on top of the graphic layer.