

Pressed some skis today!!!!! I have a lot to say about it and several photos, but no time for the words, or mechanism for uploading the images here at the firestation.
I am very excited.
HOSE-MAN's JOURNAL - chronicling my ski build
Moderators: Head Monkey, kelvin, bigKam, skidesmond, chrismp
-
windsurfer

- Posts: 47
- Joined: Sun Aug 21, 2005 2:24 pm
- Location: Germany and Vancouver
- Contact:
Okay, here are the images from the latest progress. I will edit this post and add descriptions as soon as possible.
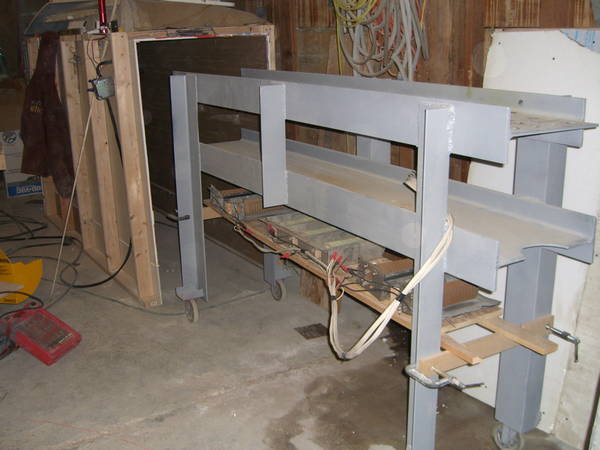
The press is all lined up & ready to go into our primative oven. This has been a reasonably effective way to contain the heat & reach the desired temp of 170* F. We're using a digital kitchen temperature probe in the oven to sense the temperature and cycling the heating elements manually to maintain the desired temp. We salvaged an old oven thermostat with the intent to wire it into the system, but it turned out to be faulty so manual was the only way to go.
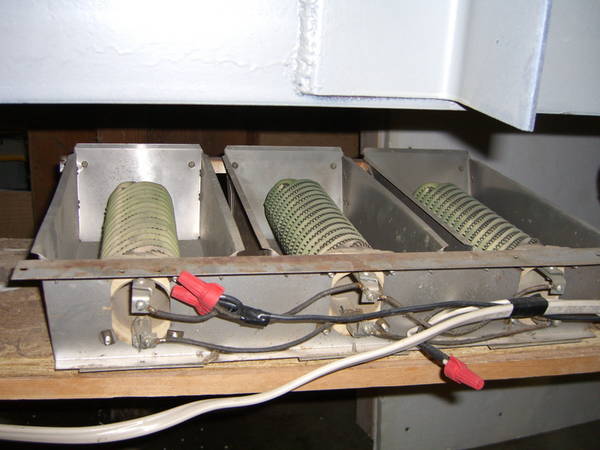
These heater coils were salvaged from radiant heaters in a home which was being converted to modern forced air heating. There are seven coils in total which really make my electric meter spin fast when they're turned on. I calculated that the heaters use electricity at about 10 times the rate of our normal consumption. Crazy.
Just mocking the components up. Making sure that we can see all the allignemnt marks through the plastic
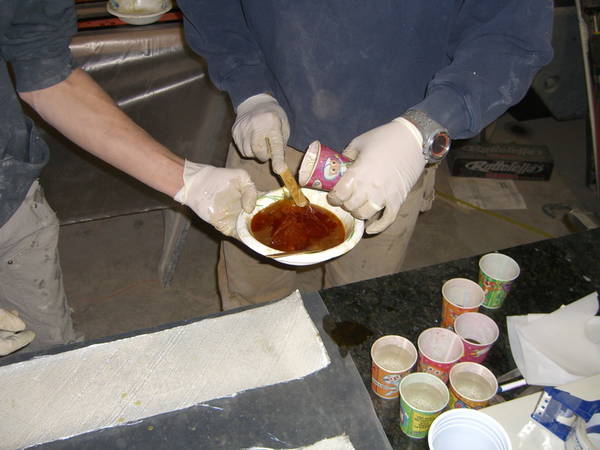
Mixing the epoxy. We had several portions of epoxy measured out so that we could mix just enough to do the skis. I turned out that we used about 1/4 of the gallon of resin on this pair of skis. More than it expected.
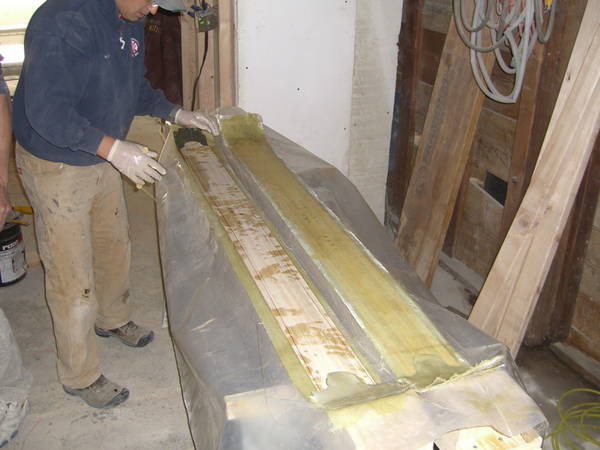
wetting the VDS with epoxy and applying to the base & edges.

Wetting out the fiber glass. Or resin was rather thick and wetting the glass turn out to be a time consuming process.
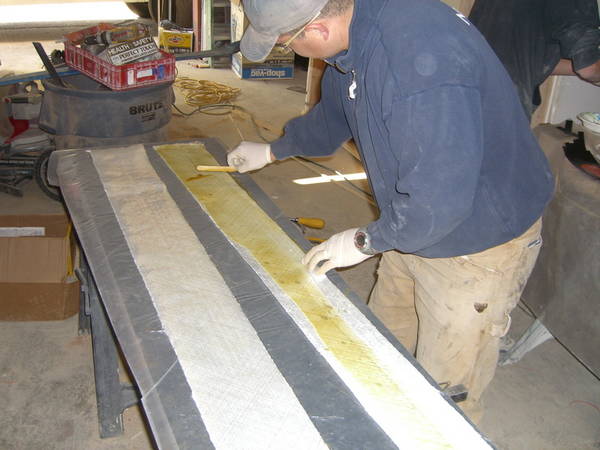
The actual layup. We wetted the glass and applied the core, and top sheet dry, expecting them to pickup the epoxy from the glass.
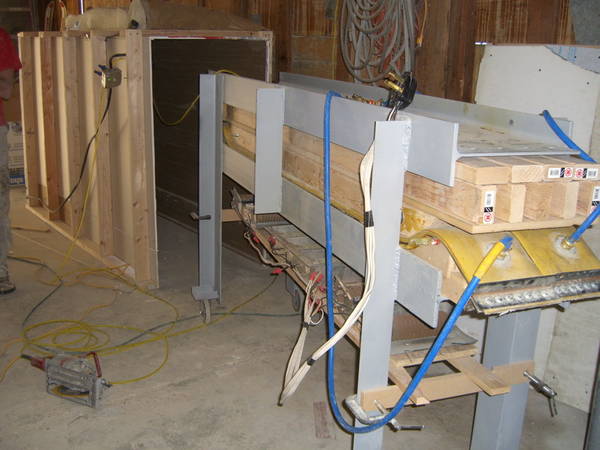
The press frame was in the oven & brought up to temp while we layed up the ski. Once we had everything layed up on the camber/tip-tail cassetted we pulled the press frame out & slid everything in. You can see that my press frame is way to large verticaly and some lumber had to be used to take up the extra space. If I were building it again I would build a 9" vertical clearance in my frame. This image showes all the pieces in place, just before air was applied to the bladders.
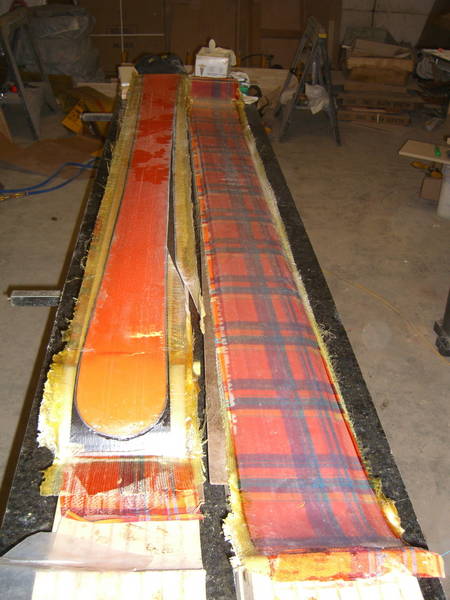
Hot off the press!
We encountered some issues which should be explained.....
Our initial press time was about 1.5 hours. The epoxy is supposed to be cured after 45 min at 170 degrees. We couldn't help ourselves & we pulled the skis out of the press. It was imediately clear that the tip areas of the skis hadn't been up to temperature long enough & were not yet cured. They pulled appart imediatly. We rushed to get the skis back into the press & into the oven. In our haste part of the tip block dislocated & formed a bit of a wrinkle in the ski at the transition from running length to tip area. Lesson learned that the thicker tip & tail area need a longer bake time to get up to temperature. Our next bake time will be 2.5 hours @ 190 in the oven.
There are some other questionable things which I will describe just as soon as I finish cutting the dang skis out. 3 different band saw blade were ruined just cutting out the first ski. I've been to the store for jigsaw blades & I'll get the second one cut out & sanded tonight! WhoooHoooo!
(Edit was to add all the text describing the images)
The press is all lined up & ready to go into our primative oven. This has been a reasonably effective way to contain the heat & reach the desired temp of 170* F. We're using a digital kitchen temperature probe in the oven to sense the temperature and cycling the heating elements manually to maintain the desired temp. We salvaged an old oven thermostat with the intent to wire it into the system, but it turned out to be faulty so manual was the only way to go.
These heater coils were salvaged from radiant heaters in a home which was being converted to modern forced air heating. There are seven coils in total which really make my electric meter spin fast when they're turned on. I calculated that the heaters use electricity at about 10 times the rate of our normal consumption. Crazy.
Just mocking the components up. Making sure that we can see all the allignemnt marks through the plastic
Mixing the epoxy. We had several portions of epoxy measured out so that we could mix just enough to do the skis. I turned out that we used about 1/4 of the gallon of resin on this pair of skis. More than it expected.
wetting the VDS with epoxy and applying to the base & edges.
Wetting out the fiber glass. Or resin was rather thick and wetting the glass turn out to be a time consuming process.
The actual layup. We wetted the glass and applied the core, and top sheet dry, expecting them to pickup the epoxy from the glass.
The press frame was in the oven & brought up to temp while we layed up the ski. Once we had everything layed up on the camber/tip-tail cassetted we pulled the press frame out & slid everything in. You can see that my press frame is way to large verticaly and some lumber had to be used to take up the extra space. If I were building it again I would build a 9" vertical clearance in my frame. This image showes all the pieces in place, just before air was applied to the bladders.
Hot off the press!
We encountered some issues which should be explained.....
Our initial press time was about 1.5 hours. The epoxy is supposed to be cured after 45 min at 170 degrees. We couldn't help ourselves & we pulled the skis out of the press. It was imediately clear that the tip areas of the skis hadn't been up to temperature long enough & were not yet cured. They pulled appart imediatly. We rushed to get the skis back into the press & into the oven. In our haste part of the tip block dislocated & formed a bit of a wrinkle in the ski at the transition from running length to tip area. Lesson learned that the thicker tip & tail area need a longer bake time to get up to temperature. Our next bake time will be 2.5 hours @ 190 in the oven.
There are some other questionable things which I will describe just as soon as I finish cutting the dang skis out. 3 different band saw blade were ruined just cutting out the first ski. I've been to the store for jigsaw blades & I'll get the second one cut out & sanded tonight! WhoooHoooo!
(Edit was to add all the text describing the images)
Last edited by hose-man on Sun May 21, 2006 3:51 pm, edited 1 time in total.
Great Pictures
Great Pics. I really like your oven. What are your heaters off of? Can't wait to see the skis all trimmed out and here how they work.
I saw that you had a valve similar to a bike or a car, do you fill up the hoses and seal them? and do they actually stay sealed or do you have to keep pumping them up?
Also, what pressure does that put on the skis?
I am using hydraulic pumps and I am pressing at approx 8000 lbs, I am pondering making another press but I am thinking of using fire hoses and a compressor but I have fears of it leaking air and things becoming ruined.
Also, what pressure does that put on the skis?
I am using hydraulic pumps and I am pressing at approx 8000 lbs, I am pondering making another press but I am thinking of using fire hoses and a compressor but I have fears of it leaking air and things becoming ruined.
I noticed that most everyone uses the convex shaped core ends. I thought that it would make more sense to have the core extend to the edges as far forward as possible. My thinking was that the edge pressure would be better and they would be a more responsive ski. It turns out that the tips that have the concave shaped core didn't press out as well as the convex. A bubble of sorts forms in the pocket created by the convexity and doesn't really look great. Our future skis will likely have the convex core ends.collin wrote:What's up with having both concave and convex ends on the cores? Just wondering why... Good work!
The post containing the image of the schrader valve (bike tube) is not mine. For our bladder we used a combination of couplings to sandwich a standard construction air hose fitting into the fire hose.Jordan wrote:I saw that you had a valve similar to a bike or a car, do you fill up the hoses and seal them? and do they actually stay sealed or do you have to keep pumping them up?
Also, what pressure does that put on the skis?
I am using hydraulic pumps and I am pressing at approx 8000 lbs, I am pondering making another press but I am thinking of using fire hoses and a compressor but I have fears of it leaking air and things becoming ruined.
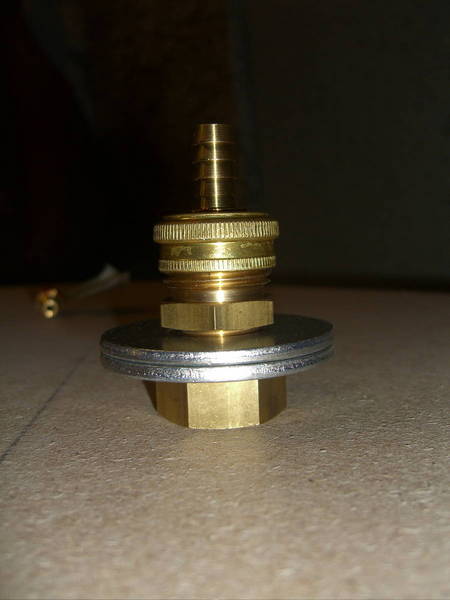
this is the hardware we used. A short pig tail of air hose is attached with a hose clamp (screw style) which leads to the air hose coupler "T" so both bladders are fed by one hose from the compressor.
The compressor is on it the whole time. The compressor doesn't run. (unless a leak somehow developed) It's there just in case there is a little leak. I have the pressure to the press regulated down to 40. The compressor kicks on when it's tank gets down to 80 psi, so the pressure in the bladder is very constant at 40 psi.Jordan wrote:but is it sealed off or is the compressor on it the whole time?
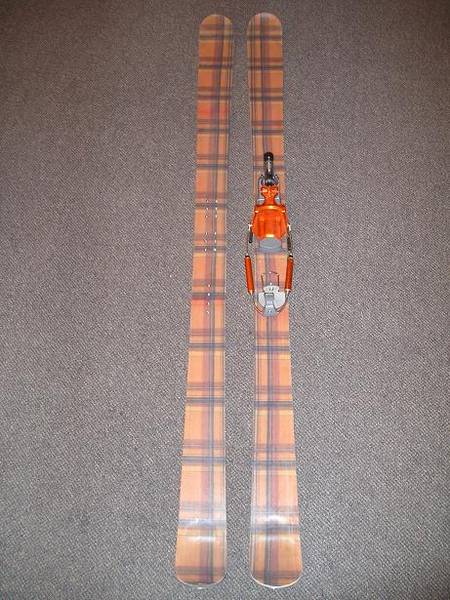
Time for me to introduce the "NICE KILT"s
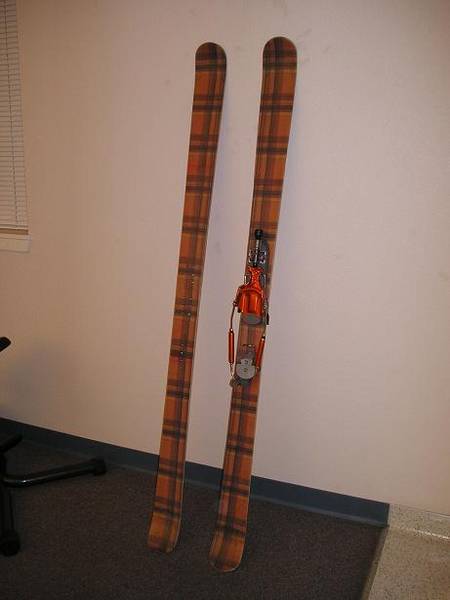
These are our very first skis so they definitely have their flaws.....
First off, they are comically soft. We'll be skiing them for the first time this Wednesday but just hand flexing them yeilds results that rate them as being softer than Salomon's Pocket Rocket. Skiing them should be interesting.
We built 10mm of camber into the mold, but as you can see, there is only about 1mm of camber left. That's okay, but not what we were after. Our mold also completely de-cambered. I'll get images of that up later.
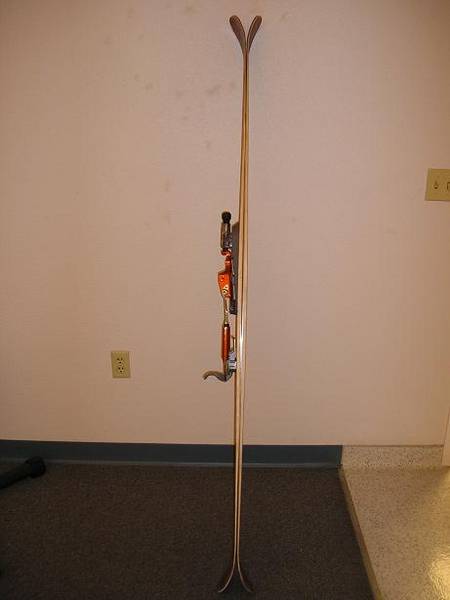
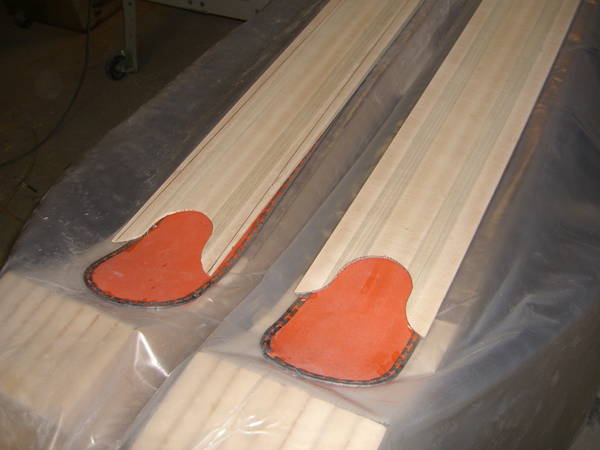
For tip and tail spacers we used two layers of clear p-tex, the same p-tex we used as the topsheet, with fiberglass between the layers. We belt sanded the smooth side of the p-tex so there would be some mechanical fastening with the epoxy, but two of the four tips are already separated. I'll get some epoxy in there & rivet them befor the first turns are taken.
The skis have been riding around on the roof of my car for about a week in 80-90 degree heat. The fabric graphic layer faded considerably in that time. You can see the bolder orange where the ski rack blocked the sun where the heel piece will be on the left ski. There is also a stripe across the skis towards the tip. I don't know how to tell wether a fabric is going to be UV stable or not. I've got some research to do there.
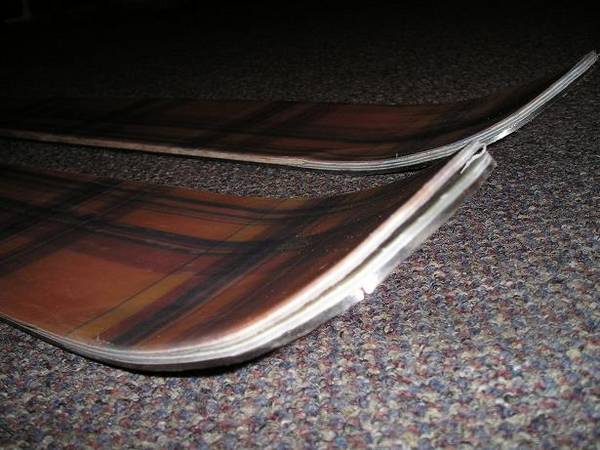
The allignment issue we caused when we had to put the skis back in the press to finish curing created a crease in the transition from running surface-tail. You can see it here. While it is by no means desirable, I don't think it will be noticable when skiing these noodly skis. We covered the bases with packing tape to protect them form the epoxy, but the tape is proving to be very difficult to remove. I've only removed it from a small section on one ski. This ski still has the tape in place.
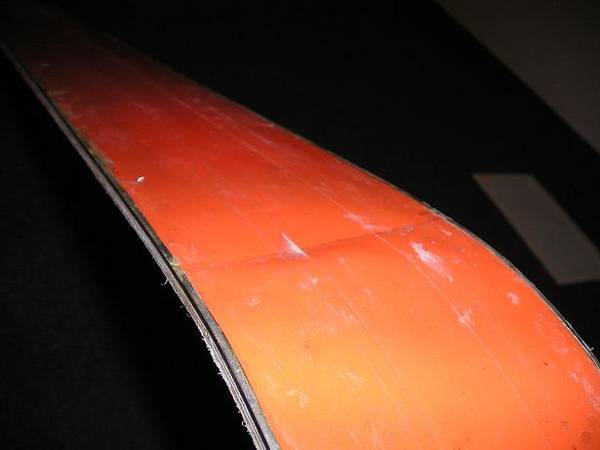
There is a corresponding bump in the topsheet of the ski. I think that concave shape of the core end contributed to the formation of this wrinkle. When we pulled the skis out early, the area in the concavity released and appeared like a bubble under the topsheet.
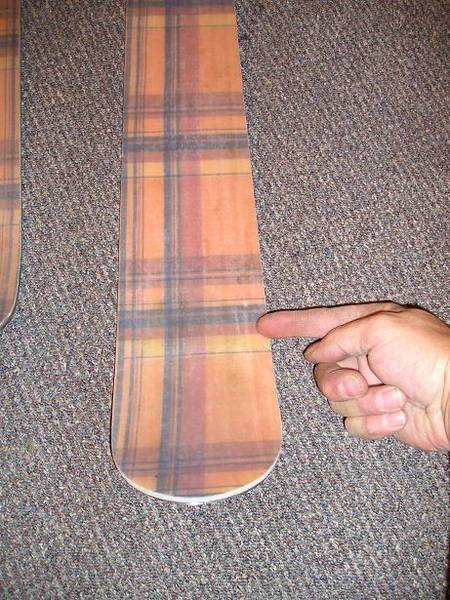
The inserts seemed to work out fine. Locating them was not a very precise proceedure. I used Camax with the magnetic caps. The caps did a good job of keeping the epoxy out of the inserts, but locating with them gave a rough location & one or two or our holes drilled to expose the inserts were off center.
Our future skis will have to be thicker cored through the tip & tail. We will also need to source some tip-tail spacer material prior to the next layup.
My next post should have the weight of these skis as well as images of the wierd deformity of our mold.
These are our very first skis so they definitely have their flaws.....
First off, they are comically soft. We'll be skiing them for the first time this Wednesday but just hand flexing them yeilds results that rate them as being softer than Salomon's Pocket Rocket. Skiing them should be interesting.
We built 10mm of camber into the mold, but as you can see, there is only about 1mm of camber left. That's okay, but not what we were after. Our mold also completely de-cambered. I'll get images of that up later.
For tip and tail spacers we used two layers of clear p-tex, the same p-tex we used as the topsheet, with fiberglass between the layers. We belt sanded the smooth side of the p-tex so there would be some mechanical fastening with the epoxy, but two of the four tips are already separated. I'll get some epoxy in there & rivet them befor the first turns are taken.
The skis have been riding around on the roof of my car for about a week in 80-90 degree heat. The fabric graphic layer faded considerably in that time. You can see the bolder orange where the ski rack blocked the sun where the heel piece will be on the left ski. There is also a stripe across the skis towards the tip. I don't know how to tell wether a fabric is going to be UV stable or not. I've got some research to do there.
The allignment issue we caused when we had to put the skis back in the press to finish curing created a crease in the transition from running surface-tail. You can see it here. While it is by no means desirable, I don't think it will be noticable when skiing these noodly skis. We covered the bases with packing tape to protect them form the epoxy, but the tape is proving to be very difficult to remove. I've only removed it from a small section on one ski. This ski still has the tape in place.
There is a corresponding bump in the topsheet of the ski. I think that concave shape of the core end contributed to the formation of this wrinkle. When we pulled the skis out early, the area in the concavity released and appeared like a bubble under the topsheet.
The inserts seemed to work out fine. Locating them was not a very precise proceedure. I used Camax with the magnetic caps. The caps did a good job of keeping the epoxy out of the inserts, but locating with them gave a rough location & one or two or our holes drilled to expose the inserts were off center.
Our future skis will have to be thicker cored through the tip & tail. We will also need to source some tip-tail spacer material prior to the next layup.
My next post should have the weight of these skis as well as images of the wierd deformity of our mold.
It might, but if I were a ski shop, I doubt i'd be too enthusiastic about gumming up my machine with the adhesives from this nasty tape.Jordan wrote:A good ol base grind should take off all of that packing tape and it might get rid of that crease.
I think that the heated press really magnified the bond of the packing tape to the p-tex.
I've tried some light weight solvents & abrasives, but they didn't really work. My next effort will involve a heat gun and a metal scraper. Once I get the majority of the residue off the base then I'll head in for that base grind. I suspect that the base grind may improve the crease a little bit, but there is no way that it will be eliminated. It is simply too deep.
Hey Hose-man, great first go'round. It's all about learning things from our latest attempts. My first pair were quite soft also, but they turned out to be the best skis I've ever skied. The soft flex is just great for the deep corn snow this time of year. I did end up with about 12mm of camber, though, which I think gives thim a bit more 'preload' while actually bouncing through the turns. I haven't posted any thing on my skis yet 'cause I've been so busy 'testing' them while we still have snow... but, soon. I hope that you are as pleasantly surprised by your soft flex as I have been with mine.
I also have had a very difficult time removing the packing tape after pressing... takes hours with a miniature putty knife. I've been working with 3M to find a protective surface film that will peel off in one large continuous sheet after the finish work is complete. I'll let you know if I'm successflul in locating one. Also, going back to another post a few weeks ago, you had asked me to let you know how my wet belt sander worked out. It works much better than a dry sander with aluminum oxide belts (I'm using silicon carbide belts), but, that UHMW is really tough stuff no matter how you grind it. I've decided that the best thing to do is to try to limit the need for grinding/sanding as much as possible by refining the process so that the skis come out needing as little work as possible. I'm also building a wet band saw for doing the flash trimming. I wear all kinds of protective gear while doing the finish work, but I just don't like the looks of all of that sparkly stuff floating around in the air while I'm doing the cutting and grinding. I haven't figured out the wet router thing,... yet. I've used the same band saw blade for trimming a number of skis... it's certainly a bit dull now, but still works okay. I know that other builders have reported rapid dulling of bandsaw blades with flash triming. I don't know why I'm not having the same experience... as yet, anyway.
Regarding the heat cure resin, I've also learned, the hard way, that the thicker portions of the ski take a lot longer to get up to heat than the thinner portions (a no-brainer, I know, but, I still missed it the first time around). I now leave my skis in the press for a full hour after my temp sensor says 170 degrees (it's attached to the aluminum smoothing layer that covers the silicone heat blankets). I haven't had any delam problems since adopting the longer cook times. My first topsheet delamed for about 12-14 inches at the center of the ski as soon as I pulled it out of the press. After a couple of days of brooding over it, I just worked some resin into the void and re-cooked it for and hour... now, I can't even tell there was ever a problem.
Thanks for sharing so much of your process with all of us, and congrats on the first pair.