attila

Document your personal work here. Show photos, movies, and share your secrets.

Moderators: Head Monkey, kelvin, bigKam, skidesmond, chrismp

plywood
Posts: 499
Joined: Fri Oct 13, 2006 2:13 am
Location: wilen, switzerland
Contact:

attila

Post by plywood »

new skis, new mold, new start - so i thought it`s time for a new topic.

as i wrote in an older post i`m really happy with how the gunnars perform - except of the screwed mounting, but this is a different story on duckstance. i`ll definately keep the gunnars as my everyday skis, they`re just incredibly versatile. but there were days when i wished for something more due to massive amounts of powder (luckily!). so i started to think about an even more powder oriented ski. on two super deep days the snow was so deep that the tips/radius in the tips of the gunnars were a bit too steep. they didn`t create enough uplift and somehow just shifted/pushed snow in front of them. it felt a bit weird, and so it is to describe it. anyway, this affected the floatation of the skis in a bad way and slowed me down when riding.

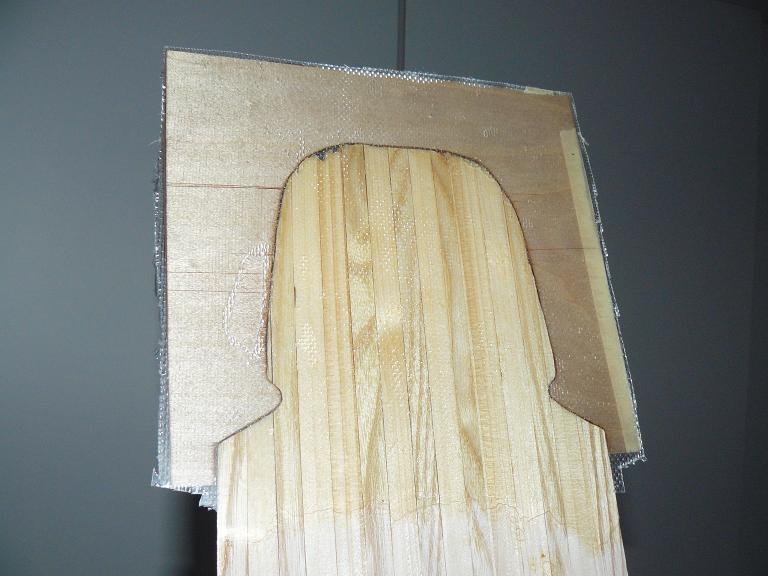
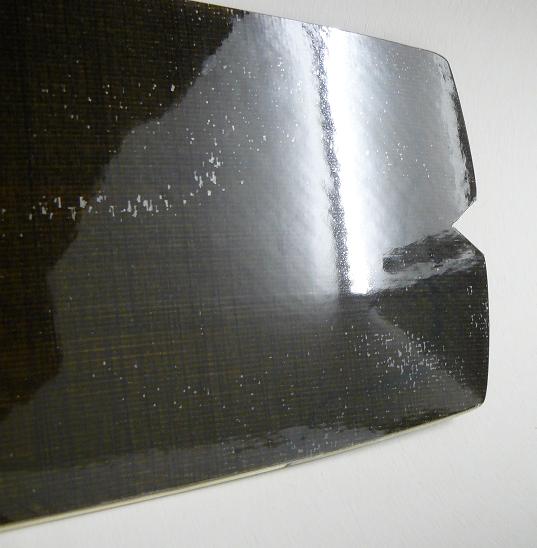
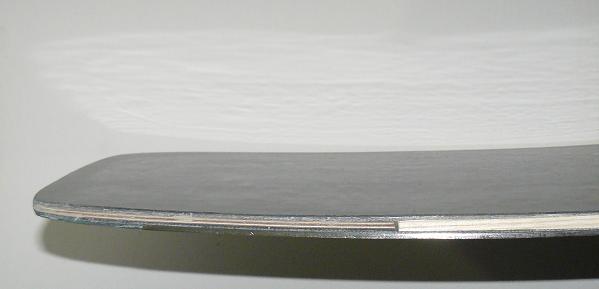
to avoid this effect i wanted to use a slightly longer radius for tip and tail, like on a snowboard maybe 300mm or so. of course in combination with rocker. i finally ended up with one huge radius over the whole lenght of tip and tail - even though i still think such skis look weird like waterskis. but it seems to be the best solution.

because of this i couldn`t reuse my old mold. i modified it too many times, and as i still want to build some more versions of the gunnar i didn`t want to change it. so i started to build a new mold.

from my last time i knew that building the mold as described on skibuilders is kind of a bitch and not really accurate - at least i wasn`t able to get a smooth and flat surface without lots of sanding and grinding and such stuff. so i came up with a new way of building molds:

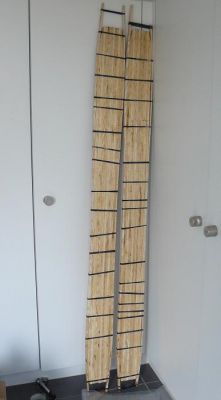
i bought some regular fir planks, 30mm wide, cut them more or less into shape with a jigsaw and glued them together. this was done very quickly and far away from being accurate, there were differences in height betweend the several sheets of several cm. afterwards i built some rails as used for profiling cores. these rails were accurate ;) so i clamped them on each side of the not-so-accurate wooden block that happened to be my mold. the rest is done pretty easily: i just profiled the mold as you would profile a skicore, guided by the rails on each side.

Image

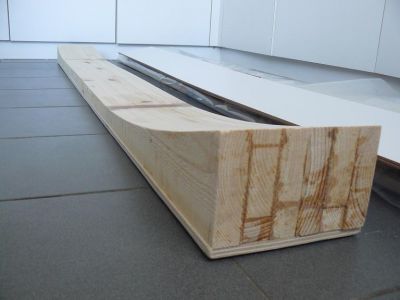
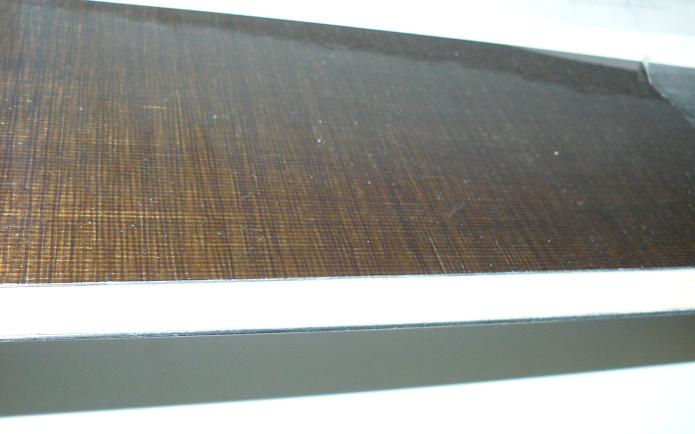
by doing so i got and incredibly flat and accurate mold in the end. in the end i planked the raw mold with one sheet of 3mm MDF and an other sheet 4mm MDF - now it is PERFECTLY even.

Image

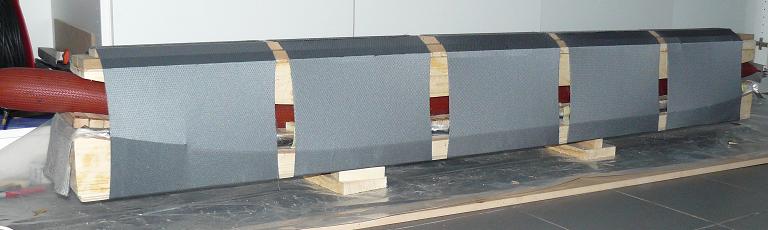
well, as i finished the mold i recognised that the old fire hose is too short for it - and so is the old cattrack. so i decided to build a new hose and a new cattrack and as i still have some leftover cloth i`ll also build a new "pressframe". soon i`ll have two systems up and running ;) :D

this way of building a mold is more accurate than the one described on skibuilders for sure. but it has some limitations of course: i don`t think you could use it for regular skis. there the radius in tip and tail just would be too narrow to rout out from above - you always have to keep in mind that the width of the router bridge has a big influence on the final mold if you just slide with it over tight radii. but maybe this method can be used for profiling the camber on adjustable molds and then do the tip and tail blocks with the traditional method.
plywood freeride industries - go ply, ride wood!
User avatar
endre
Posts: 413
Joined: Sun May 01, 2005 8:51 am
Location: norway
Contact:

Post by endre »

mmm.. rocker... biig rocker..
plywood
Posts: 499
Joined: Fri Oct 13, 2006 2:13 am
Location: wilen, switzerland
Contact:

Post by plywood »

well i think the ski industry needs to define what exactely rocker is and what not.... i mean there are:

- tips that rise with a snowboard-style radius like on the zag skis for example

- reverse camber that goes over the whole ski, like on the spatulas for example. with mostly some sort of traditional tip and tails at the end.

- early rise/mini rocker, so basically rockered, but less rockered than rockered. so how much/less rockered is early rise?!

- rocker. for me personally "rockered" means, that an area in front of the binding of a ski is bent upwards, and that on the ends of this bend there are traditional tip and tails.

- constructions like the BD megawatt or what i`m doing here. basically no "traditional" tip but one constant rise over the whole tip that reaches the total height in a continually parabolic rise. or so ;)
plywood freeride industries - go ply, ride wood!
plywood
Posts: 499
Joined: Fri Oct 13, 2006 2:13 am
Location: wilen, switzerland
Contact:

Post by plywood »

time for an update!

as we had spring like conditions on the past 3 weeks (temperatures of 15° and such stuff, spring snow etc.) i was pretty excited as there showed up a low pressure system - possible snowfalls. and they also predicted snowfall for the weekend. so i started to work as hard as i`ve never worked before:

luckily i already made the core and glued the sidewalls on: (as i bought a new bicycle tire because i needed the valve of the hose i still had some tire left. i cut it into smaller parts and used it for glueing on the sidewalls. worked kind of well, created enough pressure to press them properly, but it was a pain in the ass to get the tire parts over the core and align them)

Image

day 1: i profiled the core - pretty work intensive as i had to profile one side flat, and then profile the second after adjusting my profiling jig do get the profile i wanted. took me about 5-6h as i had serious troubles: my core started to split up in tip and tail / got ripped apart by the router...

day 2: well...my press wasn`t finished. so i still had to build the hose. and to fix the tip and tail spacers. i made them out of two sheets of 1mm plywood. to avoid it from shifting during layup i fixed it with a laxer of fibreglass on the bottom.

Image

day 3: the hose was done, but i still needed a pressframe. so i had to sew my new press frame: i consists out of 5 cuffs, each 40cm wide. the ends overlap 6cm and i sew through it a good 20 times on each cuff, followed by a fourfold criss-crossish thing.

day 4: i did all the alignment stuff for in the mold, grinded tip and tail spacer of the first core, cut all the composites for lay up, cut out the base (and of course it shifted because it was pretty old material. there were about 5mm difference from what it should have been - i tried to force it back into shape when glueing on the edges... hopefully i succeeded), glued on the edges and layed up the first ski. WOA!

Image

needless to say that on all those days i had to go to school, so all this work was done after 5 o`clock in the afternoon ;)

so there is still one ski to go, hopefully nothing shifted on the first pair, an nothing will on the second. and yes: right now it`s not snowing, it`s raining up to the top. damn it!
plywood freeride industries - go ply, ride wood!
burny
Posts: 50
Joined: Wed Jun 07, 2006 12:25 am
Location: Bavaria

Post by burny »

very nice!
alexisg1
Posts: 110
Joined: Fri Dec 08, 2006 12:38 am
Location: Grenoble, FRA

Post by alexisg1 »

very nice job as usual :)

I am juste wondering : did you do "bent" wood sidewalls ?

I like the plywood tip and tail, we use aluminium and I hope we won't have any problem with bonding. Do you think plywood prevent water from penetrating into the core ?

I hope you'll get some snow this week-end...I go to the aravis (probably not far from where you are) the whole week-end...water skiing ? :(
plywood
Posts: 499
Joined: Fri Oct 13, 2006 2:13 am
Location: wilen, switzerland
Contact:

Post by plywood »

time for a little teaser ;)

first i thought i`d paint the skis somehow...but now that they`re nearly finished they just look so clean and nice and special - i don`t want to paint them anymore with anything. not even a tiny logo, just nothing. the tissue right under the topsheet is basalt, really nice stuff! actually it became sort of half transparent after pressing, just awesome. the colour is somewhere between black and olive green.

Image

Image

Image


@alexisg: about the sidewalls, yes i bent them sort of. i cut the core to the shape that the ski will have in the end, so the sidewalls "follow" the shapewith an offset of 9mm on each side (sidewall thickness 10mm, so 1mm of overlap on each side...). if this is what you meant by "bent".

the plywood is not really to prevent water from penetrating the core - i`ll seal everything with epoxy of course. i just used plywood tipspacers to protect the fir core and to not have any end grain fir sticking out of my tips, because fir would soak water pretty easily and is not that resistant to impacts. so i used plywood to improve the impact resistance, that was the main reason.
plywood freeride industries - go ply, ride wood!
alexisg1
Posts: 110
Joined: Fri Dec 08, 2006 12:38 am
Location: Grenoble, FRA

Post by alexisg1 »

very nice indeed !

I like the results of basalt...how does it ride though ? did you test the skis ?

Have you been protecting your sidewalls ?
What do you think of using a liquid that fill holes ("bouche-pore" in french, can't find the word) and then treat ithem with epoxy ?

Are you gonna bevel the sidewalls with a router ?

thx
plywood
Posts: 499
Joined: Fri Oct 13, 2006 2:13 am
Location: wilen, switzerland
Contact:

Post by plywood »

tadaaaaaa

Image

2400g per ski (i think this is kind of ok), 190cm long, 150-154-138-152-140, nearly flat.... so.... can you hear it? THEY SCREAM FOR EPIC POWDER!

pic of the camber will follow as soon as i`ve sanded the bases.

now for the things i`ve learned on those beasts:
no matter how hard the base material wraps and twists and acts bitchy, as long as you clamp it down and force it into the shape of the template when glueing on the edges you won`t have any troubles later. my base material shifted on both skis 5-10mm - they are perfectly in shape after the threatment described above.

the troubles i had when building those skis:
first of all i damaged the woodcore a bit as i tried to profile the 2mm thick sections in tip and tail, ripped out some wood and such stuff. but in the end nothing i wasn`t able to repair.
on one ski the core shifted a little as i pressed it. luckily just about 2mm, so i had luck and still got some sidewall material left over the edges after pressing.

the result:
i`m pretty happy with those skis. i`ll do a testride tomorrow, so i can`t say anything about how they perform. but they look great ;) i really really like the basalt tissue. the colour is awesome: it ranges from nearly black to half transparent green/brown, depending on where the light comes from.
initially i wanted the tip to rise up to about 70mm. i don`t know exactely what went wrong, but now in the end it only reaches 55mm. as i planed the shape of this ski (long time ago ;) ) i thought about a so called "minimal rise" that i may wanted to try. this means: when skiing powder, on most of the skis half of the tip of the skis sticks out of the snow. so why not "leaving away" this part?
hope it works, i`m a bit worried that this minimal rise could be a bad thing when skiing in trees and such stuff, if there is any obstacle in my way the tips won`t glide that easy over it... but we`ll see.


@alexis: i beveled and sealed the sidewalls with epoxy. the beveling was done with a regular straight cutting bit. i built sort of a router table with a fence/end stop. then i built a wedge to angle one part of the router table. the rest is explained pretty quick: just take the cut out ski and place it base down (like on snow) on the wedged side of the router table. the fence/end stop will guide the ski by following the edges. of course i had to adjust everything properly so that the router bit cuts right above the edges and doesn`t catch metal. i can recommend this method as it is pretty easy to do and you don`t have to worry about the different thickness of the skicore (this is a real problem if you use a router with a ball bearing on top as a guide - it`s impossible to do because you`ll never manage to get a clean cut as the core tapers and the bearing either slips over the edges or you won`t cut that deep as you need it)

about your bouche-pore thing... i thought about alternatives to using epoxy for sealing sidewalls. but haven`t found any other alternative. i think epoxy is the best: you need something liquid that will penetrate the wood as deep as possible (varnish can do that too, BUT) and adds as much strenght as possible. and i think this is the problem. there are other alternatives that get soaked up better by the wood than epoxy, but there are hardly any other varnishs that add that much strengt to the wood as epoxy.
plywood freeride industries - go ply, ride wood!
Easy
Posts: 27
Joined: Mon Mar 26, 2007 12:31 pm
Location: Enschede, The Netherlands

Post by Easy »

looks great!

I read your post on tgr, which was quite a "ski-length" discussion ;)

So this is the 190cm long answer, can't wait to read the test report.

Ow, and a word of advice: I would not lend your ski's out to the maggots that easily. I am sure they mean well, but you don't get a refund when they break them. If you get a ski magazine to test them they will be tested by a panel of skiers and you can make a small contract to make sure you get a refund in case of loss or damage.

Ofcourse some might say that if your ski breaks you did something wrong, but there is no such thing as an unbreakable ski. And there is always the risk of theft.
davide
Posts: 260
Joined: Wed May 04, 2005 7:13 am
Location: Tsukuba, Ibaraki-ken, Japan
Contact:

Post by davide »

Do you sand the base yourself?

55 mm is indeed not very much, 70 mm was safer. Did you pre-bent the core?

I would like to have my equipment here, and try this basalt...

Still snow in the Alps? Got a bit warm in the weeks right? In case, You can send them to me, and I will test them in Seki Onsen (about 620 cm of base).
plywood
Posts: 499
Joined: Fri Oct 13, 2006 2:13 am
Location: wilen, switzerland
Contact:

Post by plywood »

@easy: oh god, the post on tgr..."long" time ago. since then i`ve learnt a lot. and today i might have to say that they were not that wrong about ski lenght. my 177 evil twins skied great and really worked for me then. but after having skied the attilas today i might have to admit that those 190cm things do a great job ;) but on the other hand there are companies like icelantic which build short skis too. i think it`s always a question of personal preferences and of the conditions you`re skiing. for a powder only skis the attilas are great! but for an everyday ski not so much...
i think since the post on tgr i also developed my riding abilities and made good progression. and i`m convinced that i couldn`t handle a regular 190 long ski with bindings mounted straight :)
and thanks for your advice, but as i`m a lazy ass it will barely happen that some other guys i don`t know test my skis - i won`t travel that much and go to other resorts just to lend someone my skis ;)

@davide: i didn`t grind them by myself up to now. a friend of mine works for stöckli and is a former service-man of an alpine racer who skied for atomic, so he`s the only one i trust to do those special jobs ;)
i didn`t prebend the cores, this is the advantage of such a shape: you don`t have to prebend the cores, and you don`t have to bend the edges either. this is VERY nice. and as you can read in my little test report the skis performed better than i expected. trip report also answers your question about snow - hopefully there is more to come so i won`t have to send you my skis hehe so you do have time for skiing over there?
plywood freeride industries - go ply, ride wood!
trod
Posts: 4
Joined: Fri Feb 22, 2008 4:29 am
Location: Norway

Post by trod »

Hi, think you have got this question a lot of times, but i still give it a try. What kind of fabric do you use for your press? Like the way you do it keeps it simple and light!
plywood
Posts: 499
Joined: Fri Oct 13, 2006 2:13 am
Location: wilen, switzerland
Contact:

Post by plywood »

yes, this really is a common question ;)

about the cloth: i have no idea what type of cloth it is exactely. i think it was made initially for protection clothes for bikers. so it`s quite tough and resistant. it feels a bit like the material used on lashing straps, but thinner. and if you try to rip out a fibre it cuts your hand. these are all the informations i can give you about the cloth...

just be sure to take a cloth that can`t be stretched that much. cloth mostly has two "directions", in one direction it can be stretched a bit more than in the other, so you have to take the less stretchy side to fit around the press when sewing your frame together. furthermore you should take a synthetic fabric. they are said to be stronger than natural fibres.
plywood freeride industries - go ply, ride wood!
User avatar
vinman
Posts: 1388
Joined: Fri Nov 09, 2007 4:16 pm
Location: The tin foil isle
Contact:

Post by vinman »

would nylon webbing rachet tie down straps combined with the pneumatic press work for something like that? The rachet would give decent holding pressure and the nylon webbing is pretty tough and non-elastic......
Fighting gravity on a daily basis
www.Whiteroomcustomskis.com
Post Reply