
For my mold skins I use 0.032" 5052-H32 aluminum, straight from the metal supplier. If you're in the Seattle area, that's Alaskan Copper & Brass. They'll shear it to width for you. This conforms to my molds just fine... sure, a little relaxation afterwards, but not much.
Hope that helps.
New press - Mongo style !
Moderators: Head Monkey, kelvin, bigKam, skidesmond, chrismp
-
Head Monkey

- Posts: 310
- Joined: Sun Jul 17, 2005 4:53 pm
- Location: Carnation, WA
- Contact:
Everything I know about snowboard building, almost: MonkeyWiki, a guide to snowboard construction
Free open source ski and snowboard CADCAM: MonkeyCAM, snoCAD-X
Free open source ski and snowboard CADCAM: MonkeyCAM, snoCAD-X
I'm just back from the shop where I pressed my fisrt ski with the press !
verdict is a monster failure ! not from the press so that's fine.
Actually my problem today was the resin. I got a new epoxy from a snowboard manufacturer here and it's super extra thick ! When mixed with hardener it's bit better but still ways too thick IMO. I had to apply a lot of resin, it was sticking to my hands so I was not able to spread by hand (I usually do that in some areas), finally it took me around 1 hour with a friend of mine just for the layup !
The fact that there was too much and to thick resin in the layup had a bad consequence on the final result : core shifting, as well as VDS shifting. After the ski cured all my VDS (1" wide) was outside the ski and the core had shifted about 1/4", enough so I have no sidewall over one edge on each skis.
Ever tried to eat a Big Mac with an inch of mayonnaise between the bread and meat ??? That's what it was !
Funny part, I was expecting the cores to shift away from each other but they shifted to get closer....
Any way, lessons learned :
- make a positioning system for the core, a nice and tight cassette is not enough.
- Try to make my resin thinner, I tried to add heat to the resin when not mixed but it just didn't help... I did not apply lots o heat though cause I didn't want it to cure instantaneously when mixed.... Or I'll go back to my old resin which was great to use (MIApoxy)
Other than the core shifting, the result is pretty nice : perfectly flat base, no camber loss, super smooth finish, no cat track marks, super fast cure (15 minutes).
I'm already preparing a new set of cores for the second attempt !
Sorry I was so frustrated when laying up because of the resin that I didn't took any picture !
A bad day skiing is always better than a good one at work...
ben, sorry to here about your shifting cores. I know how that feels.
I'm still using little blocks outside of my cores that get cut off with the flash.
But more and more have been thinking that a couple of little dowels glued to the base might be a better solution.( still not convinced though)
Glad your press is working as expected.
sam
I'm still using little blocks outside of my cores that get cut off with the flash.
But more and more have been thinking that a couple of little dowels glued to the base might be a better solution.( still not convinced though)
Glad your press is working as expected.
sam
You don't even have a legit signature, nothing to reveal who you are and what you do...
Best of luck to you. (uneva)
Best of luck to you. (uneva)

Hi Ben,
I was wondering how you attached the top mould to your press frame.
Is the plywood sheet screwed/bolted through the metal? Then how is the actual mould of 2x6s attached to the plywood?
I have a few ideas of how to do this myself, but would be interested how others have done it.
Thanks, hope your more recent skis have turned out well.
I have a sandwich made of 3/4" ply wood & 2x4 pieces between the press structure and the 2x6 topmold.
this sandwich is ply - 2x4 -ply, it basically acts as a stiff spacer and that's how I was able to control my cavity height.
This spacer is attached to the frame with 4 U-bolts going around the upper horizontal members of the frame.
Then for attaching the topmold itself I cut elongated holes in the "spacer". There are some threaded rods screwed in the top mold and they go through the "spacer" with large washer + bolt on the upper face.
That allows me to slide my top mold parts independantely to adjust for the length. As you see the top mold is made in 3 parts, I have spare tip and tail top-molds for when I use a rockered mold.
At first I directly bolted the top mold to the frame with U-Bolts, it was working fine but the cavity was too big and I was not able to adjust for the length...
I'll try to take pictures tonight if It's not too late after I press a pair.
My second pair came out great by the way... it was only a resin problem (too thick) and my stupidity of not having anything to hold the cores in place... the skis might be usable though.
A bad day skiing is always better than a good one at work...
thanks ben. funny thing is the elongated hole idea was exactly what I was thinking of doing to be able to slide the top mould end pieces back and forward (maybe its just the obvious thing to do). I just hadn't come up with the u-bolt part.
Glad you next pair came out well.
If you have time for some photos I would appreciate it.
Glad you next pair came out well.
If you have time for some photos I would appreciate it.
Sorry no pics today as yesterday was a bit of a rush to get everything in the press... tonight maybe !
it's not really easy when you get home @ 4PM and it's dark outside @4:30PM... I had to run a bit to cut the bases (outside) + cut the edges to length (outside) + glue the edges, then prepare all the materials.. can't wait to find a real shop where I can cut all the materials INSIDE. no more delays because it's dark or rainy or freezing cold... or the 3 of them !
The skis yesterday cam out pretty good from what I saw. I didn't flash them but no core shifting happenned, I just have a 1 foot section on one ski where the VDS moved out of the ski with the resin flowing under pressure... I guess it's in a spot I didn't carefully pushed on the VDS not to have too much resin under it. Did you guys experienced the same kind of problem ?
A bad day skiing is always better than a good one at work...
Back from the shop !
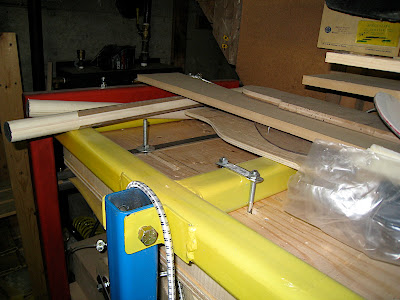
here is a pic of the U-bolt... the top of the press is pretty messy so it was not easy to get a photo that actually shows something...
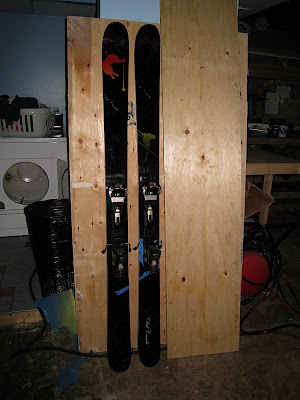
And another pic of my last pair of skis (pressed yesterday night). The topsheet didn't came out great, colors are off and lots of details are missing... I used it anyways as those are my own skis this winter (I keep the nice topsheets for my friend who actually pay for the skis..)
here is a pic of the U-bolt... the top of the press is pretty messy so it was not easy to get a photo that actually shows something...
And another pic of my last pair of skis (pressed yesterday night). The topsheet didn't came out great, colors are off and lots of details are missing... I used it anyways as those are my own skis this winter (I keep the nice topsheets for my friend who actually pay for the skis..)
A bad day skiing is always better than a good one at work...
I'll take some pics as soon as I go to the shop, today I can't but hopefully tomorrow as I still have to bevel the sidewalls, take the skis to the shop to have them tuned (belt sanded)... and we have a snow storm in the forecast for Wednesday... tight schedule !
A bad day skiing is always better than a good one at work...
As I said in another post (http://www.skibuilders.com/phpBB2/viewt ... 8&start=60)
I have a problem with the frame bending a little bit under pressure, not even that much pressure, just 40 PSI... resulting in skis with convex bases. I measured about 1,5 mm of deflection over the 16" span (width of the press)
The bending might not be the only cause of those convex bases (my mold is not perfect as well) but the fact is it bends !
I was wondering if other skibuilders (mongo ? Gman ?) with this kind of press noticed any deflection.
Thanks !
A bad day skiing is always better than a good one at work...
I get no notable flexing (lateral or longitudinal) of the lower steel press members on my press. I do keep an eye open for changes that take place over time with my bottom cassettes. Heat and pressure eventually causes the MDF to compress non-uniformly, which has resulted in bases that haven't been completely flat as they came out of the press. If I diligently monitor the condition of my bottom mold components, my bases come out very flat. I've traditionally pressed at 55 lbs, but lately, I've gradually backed off to 40 lbs, with no notable negative changes in the final product. Less pressure means an overall safer work environment, with less distortional issues regarding the press, and less over-compressional issues regarding the skis. The skis that are pressed with less pressure may weigh a few grams more (like maybe 10 or 20 grams, which is very negligible), but I'm not that much of a weight weenie.
G-man
G-man
One more thought...
I just saw the stress diagrams that you posted on the other thread. One of the main differences between your press and mine is that the bottom (and top) of my press is made up of longitudinally placed 2x3 rectangular tube (four @ 8 feet long), wall thickness .125 inch, with 2x2 angle iron cross-members beneath the 2x3 'bed' members. Everything is assembled with 1/2" grade 8 bolts. This difference would certainly add the the flex resistance of my press bed vs. yours... although mine is probably 3 times as heavy as yours is... something I'm not looking forward to with an upcoming move. I'd sure hate to have to disassemble the press. Anyway, it would be interesting to run my press structure through some stress analyzing software to see where it's theoretical deformation points are. Like I indicated before, I haven't noted anything significant thus far.
Nice work on the stress diagrams.
G-man